Brother International HL 4040CN Users Manual - English - Page 142
of the drum unit as shown in the illustration. Make sure that the number on each of the four drum unit
 |
UPC - 012502617785
View all Brother International HL 4040CN manuals
Add to My Manuals
Save this manual to your list of manuals |
Page 142 highlights
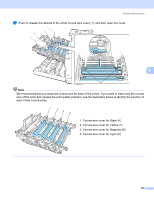
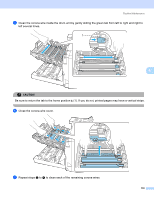
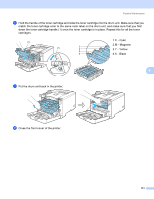
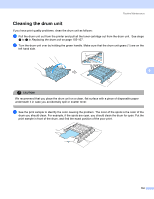
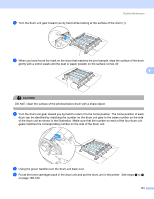
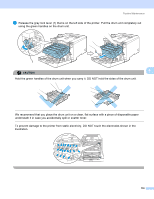
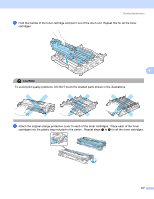
Routine Maintenance d Turn the drum unit gear toward you by hand while looking at the surface of the drum (1). 1 e When you have found the mark on the drum that matches the print sample, wipe the surface of the drum gently with a cotton swab until the dust or paper powder on the surface comes off. 6 CA UTI ON DO NOT clean the surface of the photosensitive drum with a sharp object. f Turn the drum unit gear toward you by hand to return it to the home position. The home position of each drum can be identified by matching the number on the drum unit gear to the same number on the side of the drum unit as shown in the illustration. Make sure that the number on each of the four drum unit gears matches the corresponding number on the side of the drum unit. g Using the green handles turn the drum unit back over. h Put all the toner cartridges back in the drum unit and put the drum unit in the printer. See steps f to h on page 108-109. 133
-
 1
1 -
2
-
3
-
4
-
5
-
6
-
7
-
8
-
9
-
10
-
11
-
12
-
13
-
14
-
15
-
16
-
17
-
18
-
19
-
20
-
21
-
22
-
23
-
24
-
25
-
26
-
27
-
28
-
29
-
30
-
31
-
32
-
33
-
34
-
35
-
36
-
37
-
38
-
39
-
40
-
41
-
42
-
43
-
44
-
45
-
46
-
47
-
48
-
49
-
50
-
51
-
52
-
53
-
54
-
55
-
56
-
57
-
58
-
59
-
60
-
61
-
62
-
63
-
64
-
65
-
66
-
67
-
68
-
69
-
70
-
71
-
72
-
73
-
74
-
75
-
76
-
77
-
78
-
79
-
80
-
81
-
82
-
83
-
84
-
85
-
86
-
87
-
88
-
89
-
90
-
91
-
92
-
93
-
94
-
95
-
96
-
97
-
98
-
99
-
100
-
101
-
102
-
103
-
104
-
105
-
106
-
107
-
108
-
109
-
110
-
111
-
112
-
113
-
114
-
115
-
116
-
117
-
118
-
119
-
120
-
121
-
122
-
123
-
124
-
125
-
126
-
127
-
128
-
129
-
130
-
131
-
132
-
133
-
134
-
135
-
136
-
 137
137 -
 138
138 -
 139
139 -
 140
140 -
 141
141 -
 142
142 -
 143
143 -
 144
144 -
 145
145 -
 146
146 -
 147
147 -
148
-
149
-
150
-
151
-
152
-
153
-
154
-
155
-
156
-
157
-
158
-
159
-
160
-
161
-
162
-
163
-
164
-
165
-
166
-
167
-
168
-
169
-
170
-
171
-
172
-
173
-
174
-
175
-
176
-
177
-
178
-
179
-
180
-
181
-
182
-
183
-
184
-
185
-
186
-
187
-
188
-
189
-
190
-
191
-
192
-
193
-
194
-
195
-
196
-
197
-
198
-
199
-
200
-
201
-
202
-
203
-
204
-
205
-
206
-
207
-
208
-
209
-
210
-
211
 |
 |
