Brother International HL 4040CN Users Manual - English - Page 156
Paper jams and how to clear them, Jam MP Tray, Jam Tray 1, Jam Duplex, Jam Rear, Jam Inside - fuser
 |
UPC - 012502617785
View all Brother International HL 4040CN manuals
Add to My Manuals
Save this manual to your list of manuals |
Page 156 highlights
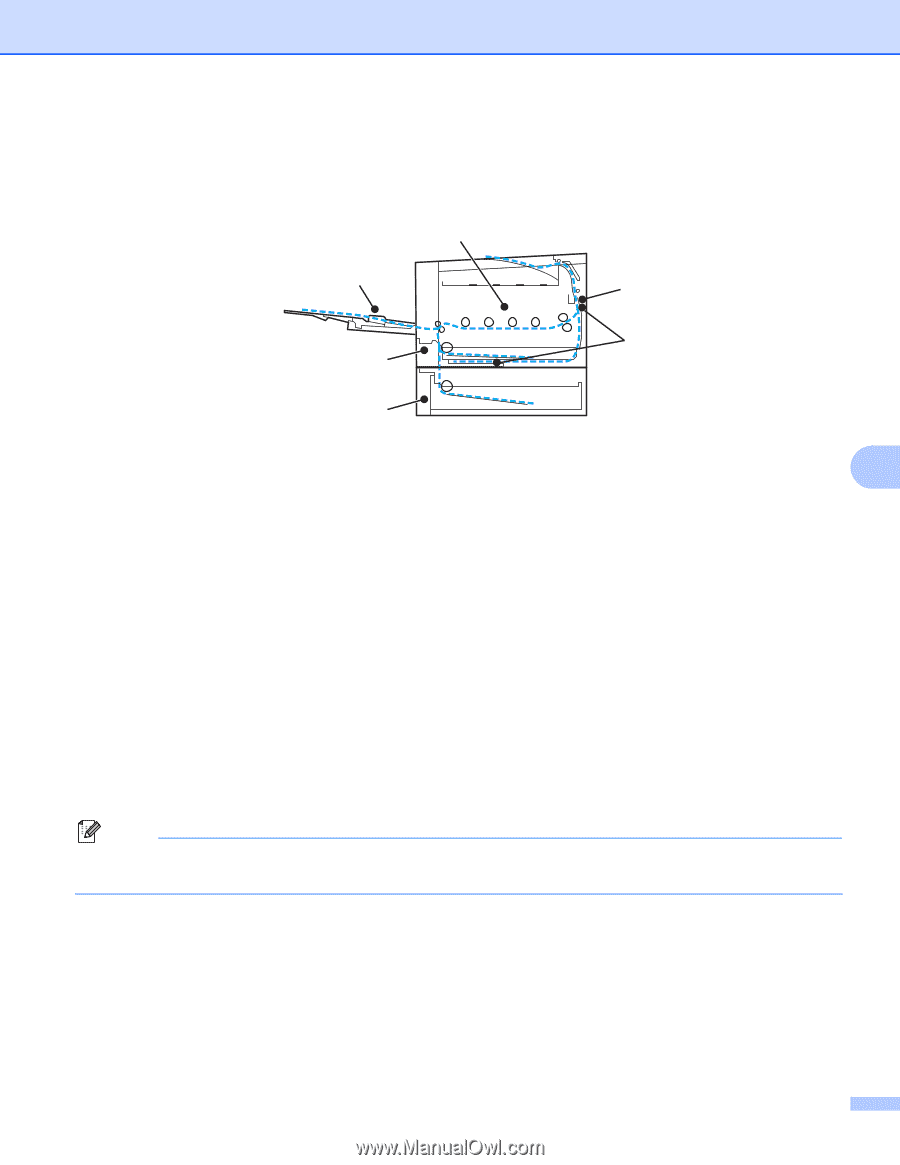
Troubleshooting Paper jams and how to clear them 7 If paper jams inside the printer, the printer will stop. One of the following LCD messages will appear to tell you where to find the jammed paper. 6 1 5 4 2 3 Jam MP Tray (1) Paper jam in the MP tray. (See page 148.) 7 Jam Tray 1 (2) Paper jam in the standard paper tray (Tray 1). (See page 148.) Jam Tray 2 (3) Paper jam in the lower tray (Tray 2). (See page 148.) Jam Duplex (4) Paper jam underneath the standard paper tray (Tray 1) or in the fuser unit. (See page 150.) Jam Rear (5) Paper jam where the paper comes out of the printer. (See page 153.) Jam Inside (6) Paper jam inside the printer. (See page 156.) If the error message still appears on the LCD after you remove the jammed paper, there may be more paper jammed somewhere else. Check the printer thoroughly. After you have removed all the jammed paper, open the front cover and then close it again to start printing. Note Always remove all paper from the paper tray and straighten the stack when you add new paper. This helps prevent multiple sheets of paper from feeding through the printer at one time and prevents paper jams. 147
-
 1
1 -
2
-
3
-
4
-
5
-
6
-
7
-
8
-
9
-
10
-
11
-
12
-
13
-
14
-
15
-
16
-
17
-
18
-
19
-
20
-
21
-
22
-
23
-
24
-
25
-
26
-
27
-
28
-
29
-
30
-
31
-
32
-
33
-
34
-
35
-
36
-
37
-
38
-
39
-
40
-
41
-
42
-
43
-
44
-
45
-
46
-
47
-
48
-
49
-
50
-
51
-
52
-
53
-
54
-
55
-
56
-
57
-
58
-
59
-
60
-
61
-
62
-
63
-
64
-
65
-
66
-
67
-
68
-
69
-
70
-
71
-
72
-
73
-
74
-
75
-
76
-
77
-
78
-
79
-
80
-
81
-
82
-
83
-
84
-
85
-
86
-
87
-
88
-
89
-
90
-
91
-
92
-
93
-
94
-
95
-
96
-
97
-
98
-
99
-
100
-
101
-
102
-
103
-
104
-
105
-
106
-
107
-
108
-
109
-
110
-
111
-
112
-
113
-
114
-
115
-
116
-
117
-
118
-
119
-
120
-
121
-
122
-
123
-
124
-
125
-
126
-
127
-
128
-
129
-
130
-
131
-
132
-
133
-
134
-
135
-
136
-
137
-
138
-
139
-
140
-
141
-
142
-
143
-
144
-
145
-
146
-
147
-
148
-
149
-
150
-
 151
151 -
 152
152 -
 153
153 -
 154
154 -
 155
155 -
 156
156 -
 157
157 -
 158
158 -
 159
159 -
 160
160 -
 161
161 -
162
-
163
-
164
-
165
-
166
-
167
-
168
-
169
-
170
-
171
-
172
-
173
-
174
-
175
-
176
-
177
-
178
-
179
-
180
-
181
-
182
-
183
-
184
-
185
-
186
-
187
-
188
-
189
-
190
-
191
-
192
-
193
-
194
-
195
-
196
-
197
-
198
-
199
-
200
-
201
-
202
-
203
-
204
-
205
-
206
-
207
-
208
-
209
-
210
-
211
 |
 |