Brother International Innov-ís 2800D Users Manual - English - Page 133
Inserting the Fabric, Using the Embroidery Sheet
 |
View all Brother International Innov-ís 2800D manuals
Add to My Manuals
Save this manual to your list of manuals |
Page 133 highlights
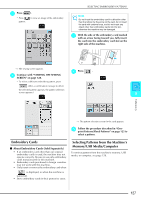
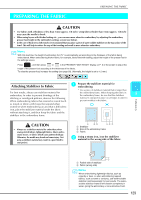
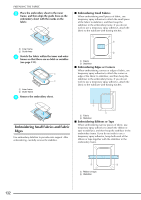
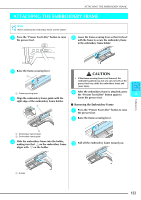
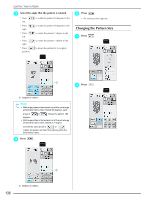
■ Inserting the Fabric Note If the fabric is not taut, the pattern may be misaligned or the fabric may pucker. Follow the procedure described below to gently stretch the fabric in the embroidery frame so that the fabric is not loose. In addition, be sure to work on a level surface when hooping the fabric in the embroidery frame. a Lift up and loosen the frame adjustment screw, and then remove the inner frame. PREPARING THE FABRIC d Gently stretch the fabric, and then securely tighten the frame adjustment screw so that the fabric remains stretched. * Make sure that the edges of the inner and outer frames are aligned. a a b b a Inner frame b Frame adjustment screw b Lay the fabric right side up on top of the outer frame, and then place the inner frame on top. * Be sure to align on the inner frame with on the outer frame. a c a Outer frame b Inner frame c Wrong side of fabric Memo • After stretching the fabric, lightly tapping it should produce a drum-like sound. • While stretching the fabric from all four corners and all four edges, securely tighten the frame adjustment screw. 5 e Return the frame adjustment screw to its original position. b Embroidery c a Inner frame b Outer frame c Frame adjustment screw c Slightly tighten the frame adjustment screw, and then gently pull the edges of the fabric to remove any slack. ■ Using the Embroidery Sheet When you want to embroider the pattern at a particular location, use the embroidery sheet to hoop the fabric in the embroidery frame. a Mark the area of the fabric to be embroidered. a b a Embroidery pattern b Mark 131
-
 1
1 -
2
-
3
-
4
-
5
-
6
-
7
-
8
-
9
-
10
-
11
-
12
-
13
-
14
-
15
-
16
-
17
-
18
-
19
-
20
-
21
-
22
-
23
-
24
-
25
-
26
-
27
-
28
-
29
-
30
-
31
-
32
-
33
-
34
-
35
-
36
-
37
-
38
-
39
-
40
-
41
-
42
-
43
-
44
-
45
-
46
-
47
-
48
-
49
-
50
-
51
-
52
-
53
-
54
-
55
-
56
-
57
-
58
-
59
-
60
-
61
-
62
-
63
-
64
-
65
-
66
-
67
-
68
-
69
-
70
-
71
-
72
-
73
-
74
-
75
-
76
-
77
-
78
-
79
-
80
-
81
-
82
-
83
-
84
-
85
-
86
-
87
-
88
-
89
-
90
-
91
-
92
-
93
-
94
-
95
-
96
-
97
-
98
-
99
-
100
-
101
-
102
-
103
-
104
-
105
-
106
-
107
-
108
-
109
-
110
-
111
-
112
-
113
-
114
-
115
-
116
-
117
-
118
-
119
-
120
-
121
-
122
-
123
-
124
-
125
-
126
-
127
-
 128
128 -
 129
129 -
 130
130 -
 131
131 -
 132
132 -
 133
133 -
 134
134 -
 135
135 -
 136
136 -
 137
137 -
 138
138 -
139
-
140
-
141
-
142
-
143
-
144
-
145
-
146
-
147
-
148
-
149
-
150
-
151
-
152
-
153
-
154
-
155
-
156
-
157
-
158
-
159
-
160
-
161
-
162
-
163
-
164
-
165
-
166
-
167
-
168
-
169
-
170
-
171
-
172
-
173
-
174
-
175
-
176
-
177
-
178
-
179
-
180
-
181
-
182
-
183
-
184
-
185
-
186
-
187
-
188
-
189
-
190
-
191
-
192
-
193
-
194
-
195
-
196
-
197
-
198
-
199
-
200
-
201
-
202
-
203
-
204
-
205
-
206
-
207
-
208
-
209
-
210
-
211
-
212
-
213
-
214
-
215
-
216
-
217
-
218
-
219
-
220
-
221
-
222
-
223
-
224
 |
 |
