Brother International Innov-ís 2800D Users Manual - English - Page 72
Free-motion Quilting
 |
View all Brother International Innov-ís 2800D manuals
Add to My Manuals
Save this manual to your list of manuals |
Page 72 highlights
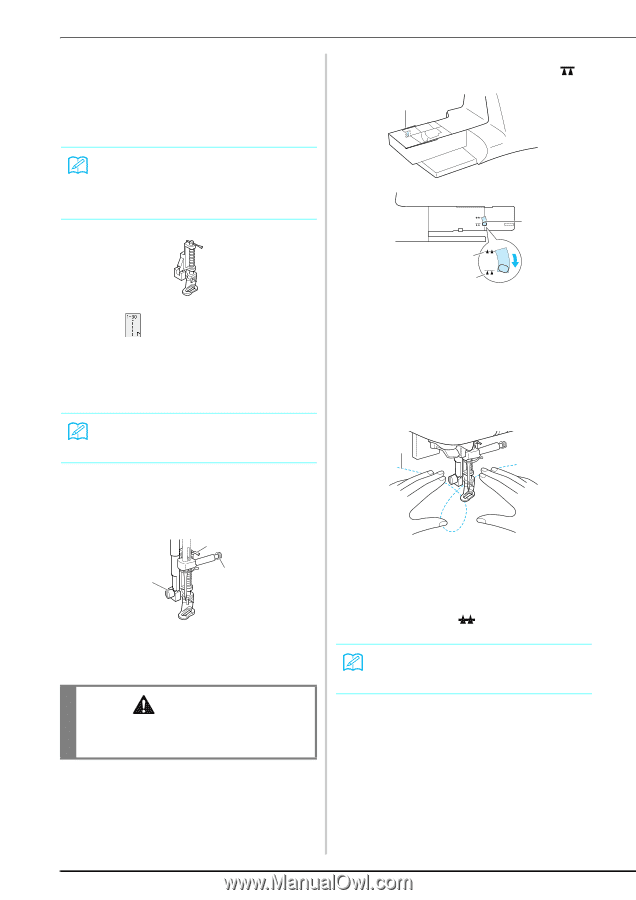
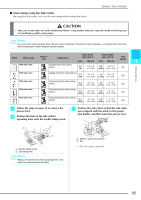
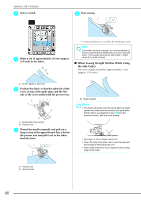
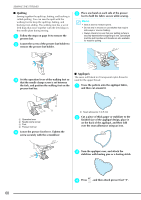
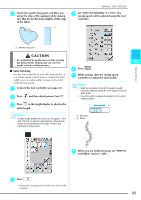
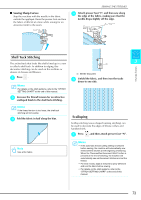
SEWING THE STITCHES ■ Free-motion Quilting With free-motion quilting, the feed dogs can be lowered (using the feed dog position switch) so that the fabric can be moved freely in any direction. The quilting foot is needed for free-motion quilting. We recommend attaching the foot controller and sewing at a consistent speed. Memo In order to sew a balanced stitch, it may be necessary to lower the upper thread tension (see page 45) or to loosen the presser foot pressure on the setting screen (see page 20). Test with a scrapped piece. e Lower the feed dog position switch, located at the rear of the base of the machine, to . a b a Select . b Remove the presser foot holder (see page 68). c Align the quilting foot with the lower-left side of the presser bar. Memo The pin on the quilting foot should be positioned over the needle clamp screw. c d a Rear of machine b Feed dog position switch (as seen from the rear of the machine) c Up d Down f Use both hands to stretch the fabric taut, and then move the fabric at a regular pace in order to sew uniform stitches roughly 2.0-2.5 mm (approx. 1/16 - 3/32 inch) in length. a d Hold the quilting foot in place with your right hand, and then tighten the presser foot holder screw using the screwdriver in your left hand. a c b a Pin on quilting foot b Presser foot holder screw c Needle clamp screw CAUTION • Be sure to securely tighten the screws with the screwdriver. Otherwise, the needle may touch the presser foot, causing it to bend or break. a Stitch → Reinforcement stitches are sewn at the beginning and end of sewing. g After sewing is finished, raise the feed dog position switch to to raise the feed dogs. Reset your machine to normal setting. Memo Normally, the feed dog position switch is in the up position. 70
-
 1
1 -
2
-
3
-
4
-
5
-
6
-
7
-
8
-
9
-
10
-
11
-
12
-
13
-
14
-
15
-
16
-
17
-
18
-
19
-
20
-
21
-
22
-
23
-
24
-
25
-
26
-
27
-
28
-
29
-
30
-
31
-
32
-
33
-
34
-
35
-
36
-
37
-
38
-
39
-
40
-
41
-
42
-
43
-
44
-
45
-
46
-
47
-
48
-
49
-
50
-
51
-
52
-
53
-
54
-
55
-
56
-
57
-
58
-
59
-
60
-
61
-
62
-
63
-
64
-
65
-
66
-
 67
67 -
 68
68 -
 69
69 -
 70
70 -
 71
71 -
 72
72 -
 73
73 -
 74
74 -
 75
75 -
 76
76 -
 77
77 -
78
-
79
-
80
-
81
-
82
-
83
-
84
-
85
-
86
-
87
-
88
-
89
-
90
-
91
-
92
-
93
-
94
-
95
-
96
-
97
-
98
-
99
-
100
-
101
-
102
-
103
-
104
-
105
-
106
-
107
-
108
-
109
-
110
-
111
-
112
-
113
-
114
-
115
-
116
-
117
-
118
-
119
-
120
-
121
-
122
-
123
-
124
-
125
-
126
-
127
-
128
-
129
-
130
-
131
-
132
-
133
-
134
-
135
-
136
-
137
-
138
-
139
-
140
-
141
-
142
-
143
-
144
-
145
-
146
-
147
-
148
-
149
-
150
-
151
-
152
-
153
-
154
-
155
-
156
-
157
-
158
-
159
-
160
-
161
-
162
-
163
-
164
-
165
-
166
-
167
-
168
-
169
-
170
-
171
-
172
-
173
-
174
-
175
-
176
-
177
-
178
-
179
-
180
-
181
-
182
-
183
-
184
-
185
-
186
-
187
-
188
-
189
-
190
-
191
-
192
-
193
-
194
-
195
-
196
-
197
-
198
-
199
-
200
-
201
-
202
-
203
-
204
-
205
-
206
-
207
-
208
-
209
-
210
-
211
-
212
-
213
-
214
-
215
-
216
-
217
-
218
-
219
-
220
-
221
-
222
-
223
-
224
 |
 |