Brother International Innov-ís 2800D Users Manual - English - Page 80
Heirloom stitching/Hemstitching 3 Drawn, Work 2
 |
View all Brother International Innov-ís 2800D manuals
Add to My Manuals
Save this manual to your list of manuals |
Page 80 highlights
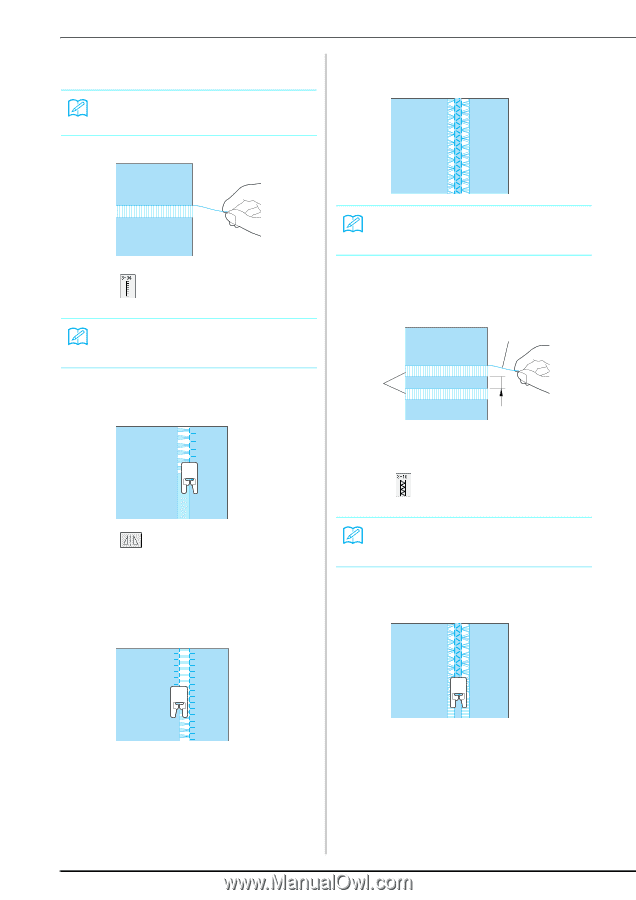
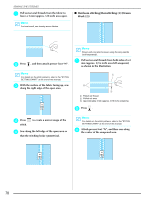
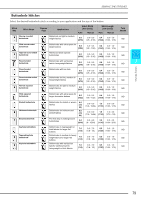
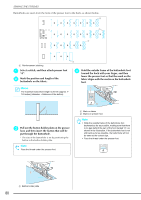
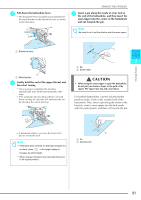
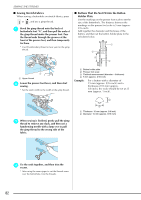
SEWING THE STITCHES a Pull out several threads from the fabric to leave a 3 mm (approx. 1/8 inch) area open. Memo For best result, use loosely woven fabrics. ■ Heirloom stitching/Hemstitching (3) (Drawn Work (2)) b Press , and then attach presser foot "N". Memo Drawn work can also be sewn using the wing needle (sold separately). a Pull out several threads from both sides of a 4 mm (approx. 3/16 inch) area left unopened, as shown in the illustration. Memo For details on the stitch patterns, refer to the "STITCH SETTING CHART" at the end of this manual. c With the surface of the fabric facing up, sew along the right edge of the open area. N a b c a Pulled out thread b Pulled out area c Approximately 4 mm (approx. 3/16 inch) remaining b Press . d Press stitch. to create a mirror image of the e Sew along the left edge of the open area so that the stitching looks symmetrical. Memo For details on the stitch patterns, refer to the "STITCH SETTING CHART" at the end of this manual. c Attach presser foot "N", and then sew along the center of the unopened area. N N 78
-
 1
1 -
2
-
3
-
4
-
5
-
6
-
7
-
8
-
9
-
10
-
11
-
12
-
13
-
14
-
15
-
16
-
17
-
18
-
19
-
20
-
21
-
22
-
23
-
24
-
25
-
26
-
27
-
28
-
29
-
30
-
31
-
32
-
33
-
34
-
35
-
36
-
37
-
38
-
39
-
40
-
41
-
42
-
43
-
44
-
45
-
46
-
47
-
48
-
49
-
50
-
51
-
52
-
53
-
54
-
55
-
56
-
57
-
58
-
59
-
60
-
61
-
62
-
63
-
64
-
65
-
66
-
67
-
68
-
69
-
70
-
71
-
72
-
73
-
74
-
 75
75 -
 76
76 -
 77
77 -
 78
78 -
 79
79 -
 80
80 -
 81
81 -
 82
82 -
 83
83 -
 84
84 -
 85
85 -
86
-
87
-
88
-
89
-
90
-
91
-
92
-
93
-
94
-
95
-
96
-
97
-
98
-
99
-
100
-
101
-
102
-
103
-
104
-
105
-
106
-
107
-
108
-
109
-
110
-
111
-
112
-
113
-
114
-
115
-
116
-
117
-
118
-
119
-
120
-
121
-
122
-
123
-
124
-
125
-
126
-
127
-
128
-
129
-
130
-
131
-
132
-
133
-
134
-
135
-
136
-
137
-
138
-
139
-
140
-
141
-
142
-
143
-
144
-
145
-
146
-
147
-
148
-
149
-
150
-
151
-
152
-
153
-
154
-
155
-
156
-
157
-
158
-
159
-
160
-
161
-
162
-
163
-
164
-
165
-
166
-
167
-
168
-
169
-
170
-
171
-
172
-
173
-
174
-
175
-
176
-
177
-
178
-
179
-
180
-
181
-
182
-
183
-
184
-
185
-
186
-
187
-
188
-
189
-
190
-
191
-
192
-
193
-
194
-
195
-
196
-
197
-
198
-
199
-
200
-
201
-
202
-
203
-
204
-
205
-
206
-
207
-
208
-
209
-
210
-
211
-
212
-
213
-
214
-
215
-
216
-
217
-
218
-
219
-
220
-
221
-
222
-
223
-
224
 |
 |