Brother International Innov-ís 2800D Users Manual - English - Page 78
Tape or Elastic Attaching
 |
View all Brother International Innov-ís 2800D manuals
Add to My Manuals
Save this manual to your list of manuals |
Page 78 highlights
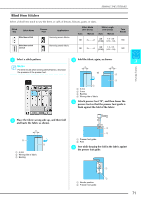
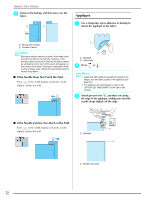
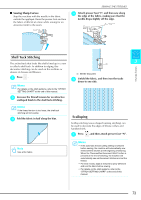
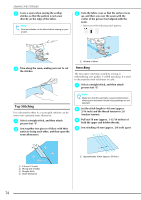
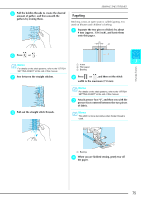
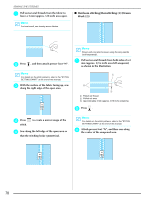
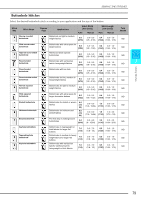
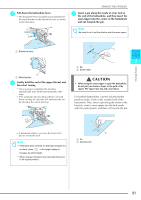
SEWING THE STITCHES Tape or Elastic Attaching Elastic tape is sewn onto the fabric unstretched. a Select a straight stitch, and then attach presser foot "J". Note Make sure that the automatic reverse/reinforcement stitching and automatic thread cutting settings are not selected. b Set the stitch length to 4.0 mm (approx. 3/16 inch) and the thread tension to 2.0 (weaker tension). c Pull out 50 mm (approx. 1-15/16 inches) of both the upper and bobbin threads (see "Pulling Up the Bobbin Thread" on page 28). f Press or . Note For details on the stitch patterns, refer to the "STITCH SETTING CHART" at the end of this manual. g While pulling the elastic tape so that it is about the same length as the fabric, pull the fabric at the pin nearest the front of the presser foot with your right hand, and feed the fabric behind the presser foot with your left hand according to the feeding speed. Memo This is easy to do if the foot controller is used. a b c a Upper thread b Bobbin thread c 50 mm d Sew two rows of straight stitches on the surface of the fabric, and then pull the bobbin threads to create the desired amount of gather. e Pin the elastic tape to the wrong side of the fabric with the elastic tape evenly positioned on the gathers. CAUTION • Be sure the needle does not strike a basting pin, or any other objects, during sewing. The thread could tangle or the needle could break, causing injury. h Pull out the threads for the straight stitches. a a Elastic tape 76
-
 1
1 -
2
-
3
-
4
-
5
-
6
-
7
-
8
-
9
-
10
-
11
-
12
-
13
-
14
-
15
-
16
-
17
-
18
-
19
-
20
-
21
-
22
-
23
-
24
-
25
-
26
-
27
-
28
-
29
-
30
-
31
-
32
-
33
-
34
-
35
-
36
-
37
-
38
-
39
-
40
-
41
-
42
-
43
-
44
-
45
-
46
-
47
-
48
-
49
-
50
-
51
-
52
-
53
-
54
-
55
-
56
-
57
-
58
-
59
-
60
-
61
-
62
-
63
-
64
-
65
-
66
-
67
-
68
-
69
-
70
-
71
-
72
-
 73
73 -
 74
74 -
 75
75 -
 76
76 -
 77
77 -
 78
78 -
 79
79 -
 80
80 -
 81
81 -
 82
82 -
 83
83 -
84
-
85
-
86
-
87
-
88
-
89
-
90
-
91
-
92
-
93
-
94
-
95
-
96
-
97
-
98
-
99
-
100
-
101
-
102
-
103
-
104
-
105
-
106
-
107
-
108
-
109
-
110
-
111
-
112
-
113
-
114
-
115
-
116
-
117
-
118
-
119
-
120
-
121
-
122
-
123
-
124
-
125
-
126
-
127
-
128
-
129
-
130
-
131
-
132
-
133
-
134
-
135
-
136
-
137
-
138
-
139
-
140
-
141
-
142
-
143
-
144
-
145
-
146
-
147
-
148
-
149
-
150
-
151
-
152
-
153
-
154
-
155
-
156
-
157
-
158
-
159
-
160
-
161
-
162
-
163
-
164
-
165
-
166
-
167
-
168
-
169
-
170
-
171
-
172
-
173
-
174
-
175
-
176
-
177
-
178
-
179
-
180
-
181
-
182
-
183
-
184
-
185
-
186
-
187
-
188
-
189
-
190
-
191
-
192
-
193
-
194
-
195
-
196
-
197
-
198
-
199
-
200
-
201
-
202
-
203
-
204
-
205
-
206
-
207
-
208
-
209
-
210
-
211
-
212
-
213
-
214
-
215
-
216
-
217
-
218
-
219
-
220
-
221
-
222
-
223
-
224
 |
 |
