Brother International Innov-ís 2800D Users Manual - English - Page 76
Top Stitching, Smocking
 |
View all Brother International Innov-ís 2800D manuals
Add to My Manuals
Save this manual to your list of manuals |
Page 76 highlights
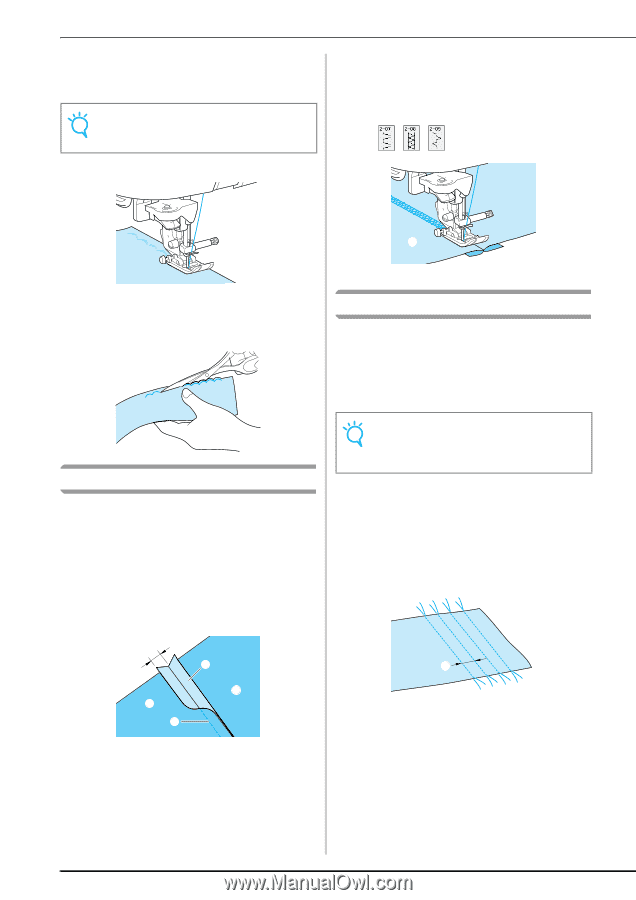
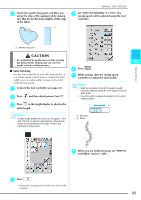
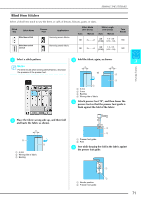
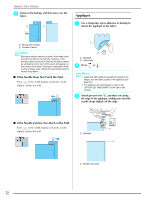
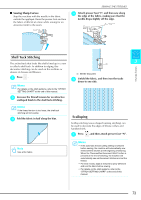
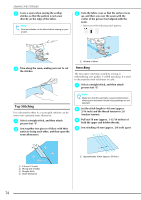
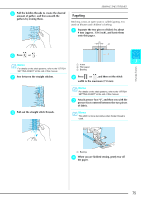
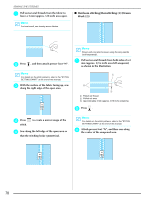
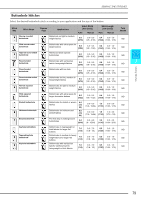
SEWING THE STITCHES b Leave a seam when sewing the scallop stitches so that the pattern is not sewn directly on the edge of the fabric. Note Sew test stitches on the fabric before sewing on your project. c Turn the fabric over so that the surface faces up, and then sew over the seam with the center of the presser foot aligned with the seam. * Select one of the following stitch patterns. a c Trim along the seam, making sure not to cut the stitches. a Surface of fabric Smocking The decorative stitching created by sewing or embroidering over gathers is called smocking. It is used to decorate the front of blouses or cuffs. a Select a straight stitch, and then attach presser foot "J". Top Stitching For a decorative effect in a crazy quilt, stitches can be sewn over a pressed seam allowance. a Select a straight stitch, and then attach presser foot "J". b Sew together two pieces of fabric with their surfaces facing each other, and then open the seam allowances. Note Make sure that the automatic reverse/reinforcement stitching and automatic thread cutting settings are not selected. b Set the stitch length to 4.0 mm (approx. 3/16 inch) and the thread tension to 2.0 (weaker tension). c Pull out 50 mm (approx. 1-15/16 inches) of both the upper and bobbin threads. d Sew stitching 10 mm (approx. 3/8 inch) apart. a d b b c a 6.5 mm (1/4 inch) b Wrong side of fabric c Straight stitch d Seam allowance a a Approximately 10mm (approx. 3/8 inch) 74
-
 1
1 -
2
-
3
-
4
-
5
-
6
-
7
-
8
-
9
-
10
-
11
-
12
-
13
-
14
-
15
-
16
-
17
-
18
-
19
-
20
-
21
-
22
-
23
-
24
-
25
-
26
-
27
-
28
-
29
-
30
-
31
-
32
-
33
-
34
-
35
-
36
-
37
-
38
-
39
-
40
-
41
-
42
-
43
-
44
-
45
-
46
-
47
-
48
-
49
-
50
-
51
-
52
-
53
-
54
-
55
-
56
-
57
-
58
-
59
-
60
-
61
-
62
-
63
-
64
-
65
-
66
-
67
-
68
-
69
-
70
-
 71
71 -
 72
72 -
 73
73 -
 74
74 -
 75
75 -
 76
76 -
 77
77 -
 78
78 -
 79
79 -
 80
80 -
 81
81 -
82
-
83
-
84
-
85
-
86
-
87
-
88
-
89
-
90
-
91
-
92
-
93
-
94
-
95
-
96
-
97
-
98
-
99
-
100
-
101
-
102
-
103
-
104
-
105
-
106
-
107
-
108
-
109
-
110
-
111
-
112
-
113
-
114
-
115
-
116
-
117
-
118
-
119
-
120
-
121
-
122
-
123
-
124
-
125
-
126
-
127
-
128
-
129
-
130
-
131
-
132
-
133
-
134
-
135
-
136
-
137
-
138
-
139
-
140
-
141
-
142
-
143
-
144
-
145
-
146
-
147
-
148
-
149
-
150
-
151
-
152
-
153
-
154
-
155
-
156
-
157
-
158
-
159
-
160
-
161
-
162
-
163
-
164
-
165
-
166
-
167
-
168
-
169
-
170
-
171
-
172
-
173
-
174
-
175
-
176
-
177
-
178
-
179
-
180
-
181
-
182
-
183
-
184
-
185
-
186
-
187
-
188
-
189
-
190
-
191
-
192
-
193
-
194
-
195
-
196
-
197
-
198
-
199
-
200
-
201
-
202
-
203
-
204
-
205
-
206
-
207
-
208
-
209
-
210
-
211
-
212
-
213
-
214
-
215
-
216
-
217
-
218
-
219
-
220
-
221
-
222
-
223
-
224
 |
 |