Brother International Innov-ís 2800D Users Manual - English - Page 84
Sewing Stretch Fabrics, Buttons That Do Not Fit into the Button, Holder Plate
 |
View all Brother International Innov-ís 2800D manuals
Add to My Manuals
Save this manual to your list of manuals |
Page 84 highlights
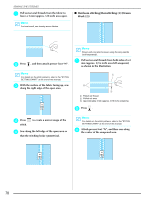
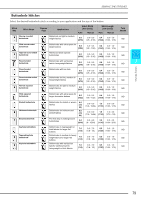
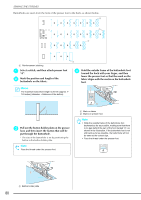
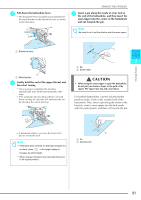
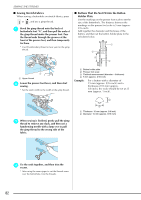
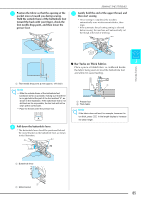
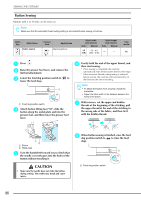
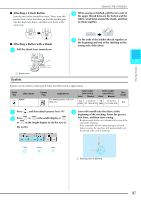
SEWING THE STITCHES ■ Sewing Stretch Fabrics When sewing a buttonhole on stretch fabrics, press or , and use a gimp thread. a Hook the gimp thread onto the back of buttonhole foot "A", and then pull the ends of the gimp thread under the presser foot. Pass the thread ends through the grooves at the front of the presser foot, and then temporarily tie them. * Use #5 embroidery thread or lace yarn for the gimp thread. ■ Buttons That Do Not Fit into the Button Holder Plate Use the markings on the presser foot scale to set the size of the buttonhole. The distance between the markings on the presser foot scale is 5 mm (approx. 3/16 inch). Add together the diameter and thickness of the button, and then set the button holder plate to the calculated value. a b c d a a Upper thread b Lower the presser foot lever, and then start sewing. * Set the stitch width to the width of the gimp thread. a Button holder plate b Presser foot scale c Finished measurement (diameter + thickness) d 5 mm (approx. 3/16 inch) Example: For a button with a diameter of 15 mm (approx. 9/16 inch) and a thickness of 10 mm (approx. 3/8 inch), the scale should be set at 25 mm (approx. 1 inch). c When sewing is finished, gently pull the gimp thread to remove any slack, and then use a handsewing needle with a large eye to pull the gimp thread to the wrong side of the fabric. a b a Thickness: 10 mm (approx. 3/8 inch) b Diameter: 15 mm (approx. 9/16 inch) d Tie the ends together, and then trim the excess. * After using the seam ripper to cut the threads sewn over the buttonhole, trim the threads. 82
-
 1
1 -
2
-
3
-
4
-
5
-
6
-
7
-
8
-
9
-
10
-
11
-
12
-
13
-
14
-
15
-
16
-
17
-
18
-
19
-
20
-
21
-
22
-
23
-
24
-
25
-
26
-
27
-
28
-
29
-
30
-
31
-
32
-
33
-
34
-
35
-
36
-
37
-
38
-
39
-
40
-
41
-
42
-
43
-
44
-
45
-
46
-
47
-
48
-
49
-
50
-
51
-
52
-
53
-
54
-
55
-
56
-
57
-
58
-
59
-
60
-
61
-
62
-
63
-
64
-
65
-
66
-
67
-
68
-
69
-
70
-
71
-
72
-
73
-
74
-
75
-
76
-
77
-
78
-
 79
79 -
 80
80 -
 81
81 -
 82
82 -
 83
83 -
 84
84 -
 85
85 -
 86
86 -
 87
87 -
 88
88 -
 89
89 -
90
-
91
-
92
-
93
-
94
-
95
-
96
-
97
-
98
-
99
-
100
-
101
-
102
-
103
-
104
-
105
-
106
-
107
-
108
-
109
-
110
-
111
-
112
-
113
-
114
-
115
-
116
-
117
-
118
-
119
-
120
-
121
-
122
-
123
-
124
-
125
-
126
-
127
-
128
-
129
-
130
-
131
-
132
-
133
-
134
-
135
-
136
-
137
-
138
-
139
-
140
-
141
-
142
-
143
-
144
-
145
-
146
-
147
-
148
-
149
-
150
-
151
-
152
-
153
-
154
-
155
-
156
-
157
-
158
-
159
-
160
-
161
-
162
-
163
-
164
-
165
-
166
-
167
-
168
-
169
-
170
-
171
-
172
-
173
-
174
-
175
-
176
-
177
-
178
-
179
-
180
-
181
-
182
-
183
-
184
-
185
-
186
-
187
-
188
-
189
-
190
-
191
-
192
-
193
-
194
-
195
-
196
-
197
-
198
-
199
-
200
-
201
-
202
-
203
-
204
-
205
-
206
-
207
-
208
-
209
-
210
-
211
-
212
-
213
-
214
-
215
-
216
-
217
-
218
-
219
-
220
-
221
-
222
-
223
-
224
 |
 |