Brother International Innov-ís 2800D Users Manual - English - Page 144
Sewing Embroidery Patterns
 |
View all Brother International Innov-ís 2800D manuals
Add to My Manuals
Save this manual to your list of manuals |
Page 144 highlights
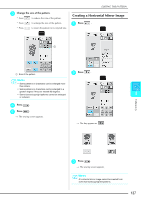
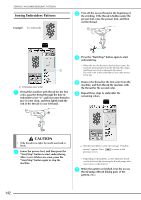
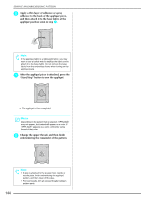
SEWING AN EMBROIDERING PATTERN Sewing Embroidery Patterns Example: To embroider c Trim off the excess thread at the beginning of the stitching. If the thread is hidden under the presser foot, raise the presser foot, and then cut the thread. d Press the "Start/Stop" button again to start embroidering. → When the area for the first color has been sewn, the machine automatically trims the threads, then stops, a and the presser foot is automatically raised. The next color in the embroidery color order moves to the top. a Embroidery color order a Thread the machine with thread for the first color, pass the thread through the hole in embroidery foot "U", pull out some thread to give it some slack, and then lightly hold the end of the thread in your left hand. e Remove the thread for the first color from the machine, and then thread the machine with the thread for the second color. f Repeat these steps to embroider the remaining colors. CAUTION • If the thread is too tight, the needle may bend or break. b Lower the presser foot, and then press the "Start/Stop" button to start embroidering. After 5 or 6 stitches are sewn, press the "Start/Stop" button again to stop the machine. → After the last stitch is sewn, the message "Finished sewing" appears. Press previous screen. to return to the * Depending on the pattern, a more attractive finish can be achieved by trimming the thread jumps after each color is embroidered. g When the pattern is finished, trim the excess thread jumps (thread linking parts of the pattern, etc.). 142
-
 1
1 -
2
-
3
-
4
-
5
-
6
-
7
-
8
-
9
-
10
-
11
-
12
-
13
-
14
-
15
-
16
-
17
-
18
-
19
-
20
-
21
-
22
-
23
-
24
-
25
-
26
-
27
-
28
-
29
-
30
-
31
-
32
-
33
-
34
-
35
-
36
-
37
-
38
-
39
-
40
-
41
-
42
-
43
-
44
-
45
-
46
-
47
-
48
-
49
-
50
-
51
-
52
-
53
-
54
-
55
-
56
-
57
-
58
-
59
-
60
-
61
-
62
-
63
-
64
-
65
-
66
-
67
-
68
-
69
-
70
-
71
-
72
-
73
-
74
-
75
-
76
-
77
-
78
-
79
-
80
-
81
-
82
-
83
-
84
-
85
-
86
-
87
-
88
-
89
-
90
-
91
-
92
-
93
-
94
-
95
-
96
-
97
-
98
-
99
-
100
-
101
-
102
-
103
-
104
-
105
-
106
-
107
-
108
-
109
-
110
-
111
-
112
-
113
-
114
-
115
-
116
-
117
-
118
-
119
-
120
-
121
-
122
-
123
-
124
-
125
-
126
-
127
-
128
-
129
-
130
-
131
-
132
-
133
-
134
-
135
-
136
-
137
-
138
-
 139
139 -
 140
140 -
 141
141 -
 142
142 -
 143
143 -
 144
144 -
 145
145 -
 146
146 -
 147
147 -
 148
148 -
 149
149 -
150
-
151
-
152
-
153
-
154
-
155
-
156
-
157
-
158
-
159
-
160
-
161
-
162
-
163
-
164
-
165
-
166
-
167
-
168
-
169
-
170
-
171
-
172
-
173
-
174
-
175
-
176
-
177
-
178
-
179
-
180
-
181
-
182
-
183
-
184
-
185
-
186
-
187
-
188
-
189
-
190
-
191
-
192
-
193
-
194
-
195
-
196
-
197
-
198
-
199
-
200
-
201
-
202
-
203
-
204
-
205
-
206
-
207
-
208
-
209
-
210
-
211
-
212
-
213
-
214
-
215
-
216
-
217
-
218
-
219
-
220
-
221
-
222
-
223
-
224
 |
 |
