Brother International Innov-ís 2800D Users Manual - English - Page 19
Lcd Screen
 |
View all Brother International Innov-ís 2800D manuals
Add to My Manuals
Save this manual to your list of manuals |
Page 19 highlights
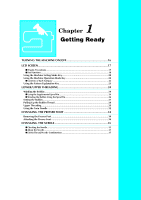
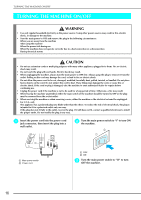
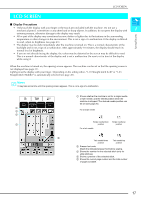
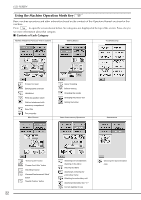
LCD SCREEN LCD SCREEN ■ Display Precautions • Only touch the display with your finger or the touch pen included with the machine. Do not use a mechanical pencil, screwdriver or any other hard or sharp objects. In addition, do not press the display with 1 extreme pressure, otherwise damage to the display may result. Getting Ready • All or part of the display may sometimes become darker or lighter due to fluctuations in the surrounding temperature or other changes in the environment. This is not a sign of a malfunction. If the display is difficult to read, adjust its brightness (see page 21). • The display may be dark immediately after the machine is turned on. This is a normal characteristic of the backlight and is not a sign of a malfunction. After approximately 10 minutes, the display should reach its normal level of brightness. • If you are not directly facing the display, the colors may be distorted or the screen may be difficult to read. This is a normal characteristic of the display and is not a malfunction. Be sure to sit in front of the display while using it. When the machine is turned on, the opening screen appears. The machine can be set so that the opening screen is not displayed (see page 21). Lightly press the display with your finger. Depending on the setting either, "1-01 Straight stitch (Left)" or "1-03 Straight stitch (Middle)" is automatically selected (see page 20). Memo It may take some time until the opening screen appears. This is not a sign of a malfunction. a Shows whether the machine is set for a single needle or twin needle, and the needle position when the machine is stopped. The desired needle position can be set (see page 20). a b For a single needle c Single needle/down Single needle/up d position position For a twin needle e Twin needle/down Twin needle/up position position b Presser foot code Attach the indicated presser foot before sewing. c Shows the number for the selected stitch (only for utility stitches). d Shows a preview of the selected stitch. e Shows the current page number and the total number of pages available. 17
-
 1
1 -
2
-
3
-
4
-
5
-
6
-
7
-
8
-
9
-
10
-
11
-
12
-
13
-
 14
14 -
 15
15 -
 16
16 -
 17
17 -
 18
18 -
 19
19 -
 20
20 -
 21
21 -
 22
22 -
 23
23 -
 24
24 -
25
-
26
-
27
-
28
-
29
-
30
-
31
-
32
-
33
-
34
-
35
-
36
-
37
-
38
-
39
-
40
-
41
-
42
-
43
-
44
-
45
-
46
-
47
-
48
-
49
-
50
-
51
-
52
-
53
-
54
-
55
-
56
-
57
-
58
-
59
-
60
-
61
-
62
-
63
-
64
-
65
-
66
-
67
-
68
-
69
-
70
-
71
-
72
-
73
-
74
-
75
-
76
-
77
-
78
-
79
-
80
-
81
-
82
-
83
-
84
-
85
-
86
-
87
-
88
-
89
-
90
-
91
-
92
-
93
-
94
-
95
-
96
-
97
-
98
-
99
-
100
-
101
-
102
-
103
-
104
-
105
-
106
-
107
-
108
-
109
-
110
-
111
-
112
-
113
-
114
-
115
-
116
-
117
-
118
-
119
-
120
-
121
-
122
-
123
-
124
-
125
-
126
-
127
-
128
-
129
-
130
-
131
-
132
-
133
-
134
-
135
-
136
-
137
-
138
-
139
-
140
-
141
-
142
-
143
-
144
-
145
-
146
-
147
-
148
-
149
-
150
-
151
-
152
-
153
-
154
-
155
-
156
-
157
-
158
-
159
-
160
-
161
-
162
-
163
-
164
-
165
-
166
-
167
-
168
-
169
-
170
-
171
-
172
-
173
-
174
-
175
-
176
-
177
-
178
-
179
-
180
-
181
-
182
-
183
-
184
-
185
-
186
-
187
-
188
-
189
-
190
-
191
-
192
-
193
-
194
-
195
-
196
-
197
-
198
-
199
-
200
-
201
-
202
-
203
-
204
-
205
-
206
-
207
-
208
-
209
-
210
-
211
-
212
-
213
-
214
-
215
-
216
-
217
-
218
-
219
-
220
-
221
-
222
-
223
-
224
 |
 |