Brother International Innov-ís 2800D Users Manual - English - Page 151
Correct Thread Tension
 |
View all Brother International Innov-ís 2800D manuals
Add to My Manuals
Save this manual to your list of manuals |
Page 151 highlights
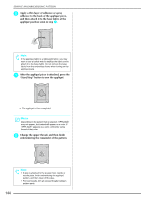
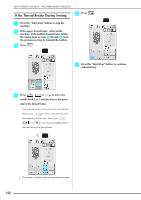
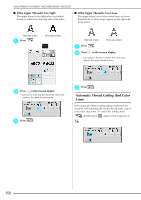
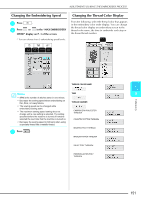
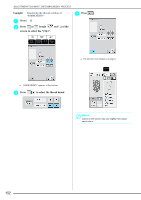
ADJUSTMENTS DURING THE EMBROIDERY PROCESS c Use , , or to advance the pattern to slightly before where sewing stopped. Adjusting the Thread Tension When embroidering, the thread tension should be set so that the upper thread can be slightly visible from the wrong side of the fabric. With some fabric and thread combinations, the thread tension may need to be adjusted. ■ Correct Thread Tension The upper thread can be slightly visible from the wrong side of the fabric. If the thread tension is not set correctly, the stitching may be uneven, there may be puckering in the fabric, or the thread may break. d Press to return to the original screen. e Press the "Presser Foot Lifter" button to lower the presser foot and press the "Start/Stop" button to start sewing. Note To continue a pattern that has had its position changed (see page 135), move the pattern the same amount in the layout display screen, then follow the steps above. In this case, you need to make a note of the pattern's position before turning off the power. Memo Use the display to remember the last stitch number sewn before you turn off the power. Then use the , , or keys to move the pattern to the same stitch number and continue sewing. Right side of fabric Wrong side of fabric Follow the procedures described below to adjust the thread tension according to the current condition. Note If the thread tension is set so that it is extremely weak, the machine may stop during sewing. This is not a sign of a malfunction. Slightly increase the thread tension to begin sewing again. 5 Embroidery Memo • If the machine is turned off or a different pattern is selected, the thread tension setting returns to its default. • When a saved pattern is retrieved, the thread tension setting changes to that set when the pattern was saved. • If the upper thread is not threaded correctly or the bobbin is not set correctly, it may not be possible to set the correct thread tension. If the correct thread tension cannot be achieved, rethread the upper thread or reset the bobbin. 149
-
 1
1 -
2
-
3
-
4
-
5
-
6
-
7
-
8
-
9
-
10
-
11
-
12
-
13
-
14
-
15
-
16
-
17
-
18
-
19
-
20
-
21
-
22
-
23
-
24
-
25
-
26
-
27
-
28
-
29
-
30
-
31
-
32
-
33
-
34
-
35
-
36
-
37
-
38
-
39
-
40
-
41
-
42
-
43
-
44
-
45
-
46
-
47
-
48
-
49
-
50
-
51
-
52
-
53
-
54
-
55
-
56
-
57
-
58
-
59
-
60
-
61
-
62
-
63
-
64
-
65
-
66
-
67
-
68
-
69
-
70
-
71
-
72
-
73
-
74
-
75
-
76
-
77
-
78
-
79
-
80
-
81
-
82
-
83
-
84
-
85
-
86
-
87
-
88
-
89
-
90
-
91
-
92
-
93
-
94
-
95
-
96
-
97
-
98
-
99
-
100
-
101
-
102
-
103
-
104
-
105
-
106
-
107
-
108
-
109
-
110
-
111
-
112
-
113
-
114
-
115
-
116
-
117
-
118
-
119
-
120
-
121
-
122
-
123
-
124
-
125
-
126
-
127
-
128
-
129
-
130
-
131
-
132
-
133
-
134
-
135
-
136
-
137
-
138
-
139
-
140
-
141
-
142
-
143
-
144
-
145
-
 146
146 -
 147
147 -
 148
148 -
 149
149 -
 150
150 -
 151
151 -
 152
152 -
 153
153 -
 154
154 -
 155
155 -
 156
156 -
157
-
158
-
159
-
160
-
161
-
162
-
163
-
164
-
165
-
166
-
167
-
168
-
169
-
170
-
171
-
172
-
173
-
174
-
175
-
176
-
177
-
178
-
179
-
180
-
181
-
182
-
183
-
184
-
185
-
186
-
187
-
188
-
189
-
190
-
191
-
192
-
193
-
194
-
195
-
196
-
197
-
198
-
199
-
200
-
201
-
202
-
203
-
204
-
205
-
206
-
207
-
208
-
209
-
210
-
211
-
212
-
213
-
214
-
215
-
216
-
217
-
218
-
219
-
220
-
221
-
222
-
223
-
224
 |
 |