Brother International HL-3170CDW Users Manual - English - Page 110
Color Correction, Frequency, Color Calibration, Use Calibration Data, Get Device Data Automatically
 |
View all Brother International HL-3170CDW manuals
Add to My Manuals
Save this manual to your list of manuals |
Page 110 highlights
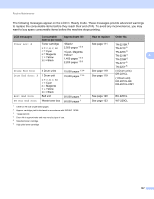
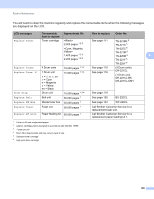
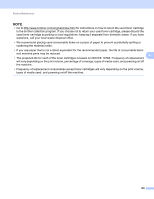
General Information Color Correction 3 Frequency 3 Set how often the color correction (Color Calibration and Auto Registration) occurs. The factory setting is Normal. The color correction process consumes some amount of the toner. a Press a or b to choose Color Correction. Press OK. 3 b Press a or b to choose Frequency. Press OK. c Press a or b to choose Normal, Low or Off. Press OK. Color Calibration 3 The output density for each color may vary depending on the machine's environment, such as temperature and humidity. Calibration helps you to improve the color density. NOTE • If you are using the Windows® printer driver, the driver will get the calibration data automatically if both Use Calibration Data and Get Device Data Automatically check boxes are selected. The default settings are on. See Color Calibration on page 42. • If you are using the Macintosh printer driver, you must perform the calibration using the Status Monitor. Turn on the Status Monitor, and then select Color Calibration from the Control menu. See Status Monitor on page 78 for how to turn on the Status Monitor. Calibration a Press a or b to choose Color Correction. Press OK. b Press a or b to choose ColorCalibration. Press OK. c Press a or b to choose Calibrate. Press OK. d Press a to choose Yes. The machine performs the Calibration, and then returns to Ready mode. Reset Reset the calibration parameters back to those set at the factory. a Press a or b to choose Color Correction. Press OK. b Press a or b to choose ColorCalibration. Press OK. c Press a or b to choose Reset. Press OK. d Press a to choose Reset. The LCD shows Accepted, and then returns to Ready mode. 104
-
 1
1 -
2
-
3
-
4
-
5
-
6
-
7
-
8
-
9
-
10
-
11
-
12
-
13
-
14
-
15
-
16
-
17
-
18
-
19
-
20
-
21
-
22
-
23
-
24
-
25
-
26
-
27
-
28
-
29
-
30
-
31
-
32
-
33
-
34
-
35
-
36
-
37
-
38
-
39
-
40
-
41
-
42
-
43
-
44
-
45
-
46
-
47
-
48
-
49
-
50
-
51
-
52
-
53
-
54
-
55
-
56
-
57
-
58
-
59
-
60
-
61
-
62
-
63
-
64
-
65
-
66
-
67
-
68
-
69
-
70
-
71
-
72
-
73
-
74
-
75
-
76
-
77
-
78
-
79
-
80
-
81
-
82
-
83
-
84
-
85
-
86
-
87
-
88
-
89
-
90
-
91
-
92
-
93
-
94
-
95
-
96
-
97
-
98
-
99
-
100
-
101
-
102
-
103
-
104
-
 105
105 -
 106
106 -
 107
107 -
 108
108 -
 109
109 -
 110
110 -
 111
111 -
 112
112 -
 113
113 -
 114
114 -
 115
115 -
116
-
117
-
118
-
119
-
120
-
121
-
122
-
123
-
124
-
125
-
126
-
127
-
128
-
129
-
130
-
131
-
132
-
133
-
134
-
135
-
136
-
137
-
138
-
139
-
140
-
141
-
142
-
143
-
144
-
145
-
146
-
147
-
148
-
149
-
150
-
151
-
152
-
153
-
154
-
155
-
156
-
157
-
158
-
159
-
160
-
161
-
162
-
163
-
164
-
165
-
166
-
167
-
168
-
169
-
170
-
171
-
172
-
173
-
174
-
175
-
176
-
177
-
178
-
179
-
180
-
181
-
182
-
183
-
184
-
185
-
186
-
187
-
188
-
189
-
190
-
191
-
192
-
193
-
194
-
195
-
196
-
197
-
198
-
199
-
200
-
201
-
202
-
203
-
204
-
205
-
206
 |
 |