Canon BJC-85 User manual for the BJC-85 IS12 - Page 78
Brightness, Contrast, and contrast of the image displayed within the preview area.
 |
View all Canon BJC-85 manuals
Add to My Manuals
Save this manual to your list of manuals |
Page 78 highlights
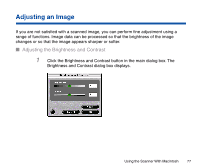
Adjusting an Image 2 Move each slide bar to the right or left to adjust the image. Brightness Moving the Brightness slide bar to the left makes the entire image darker, while moving it to the right makes the image brighter. Contrast Moving the slide bar to the left reduces the contrast of the entire image, while moving it to the right increases the contrast. 3 After making the adjustment, click the Apply button to change brightness and contrast of the image displayed within the preview area. 4 Once you are satisfied with the adjustment, click the OK button. Using the Scanner With Macintosh 78
-
 1
1 -
2
-
3
-
4
-
5
-
6
-
7
-
8
-
9
-
10
-
11
-
12
-
13
-
14
-
15
-
16
-
17
-
18
-
19
-
20
-
21
-
22
-
23
-
24
-
25
-
26
-
27
-
28
-
29
-
30
-
31
-
32
-
33
-
34
-
35
-
36
-
37
-
38
-
39
-
40
-
41
-
42
-
43
-
44
-
45
-
46
-
47
-
48
-
49
-
50
-
51
-
52
-
53
-
54
-
55
-
56
-
57
-
58
-
59
-
60
-
61
-
62
-
63
-
64
-
65
-
66
-
67
-
68
-
69
-
70
-
71
-
72
-
 73
73 -
 74
74 -
 75
75 -
 76
76 -
 77
77 -
 78
78 -
 79
79 -
 80
80 -
 81
81 -
 82
82 -
 83
83 -
84
-
85
-
86
-
87
-
88
-
89
-
90
-
91
-
92
-
93
-
94
-
95
-
96
-
97
-
98
-
99
-
100
-
101
-
102
-
103
-
104
-
105
-
106
-
107
-
108
-
109
 |
 |

78
Using the Scanner With Macintosh
Adjusting an Image
2
Move each slide bar to the right or left to adjust the image.
Brightness
Moving the Brightness slide bar to the left makes the entire image darker,
while moving it to the right makes the image brighter.
Contrast
Moving the slide bar to the left reduces the contrast of the entire image,
while moving it to the right increases the contrast.
3
After making the adjustment, click the Apply button to change brightness
and contrast of the image displayed within the preview area.
4
Once you are satis
fi
ed with the adjustment, click the OK button.