Casio WK-6500 User Guide - Page 31
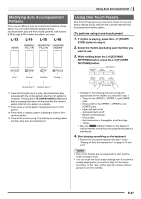
Using the Rhythm Editor
 |
View all Casio WK-6500 manuals
Add to My Manuals
Save this manual to your list of manuals |
Page 31 highlights
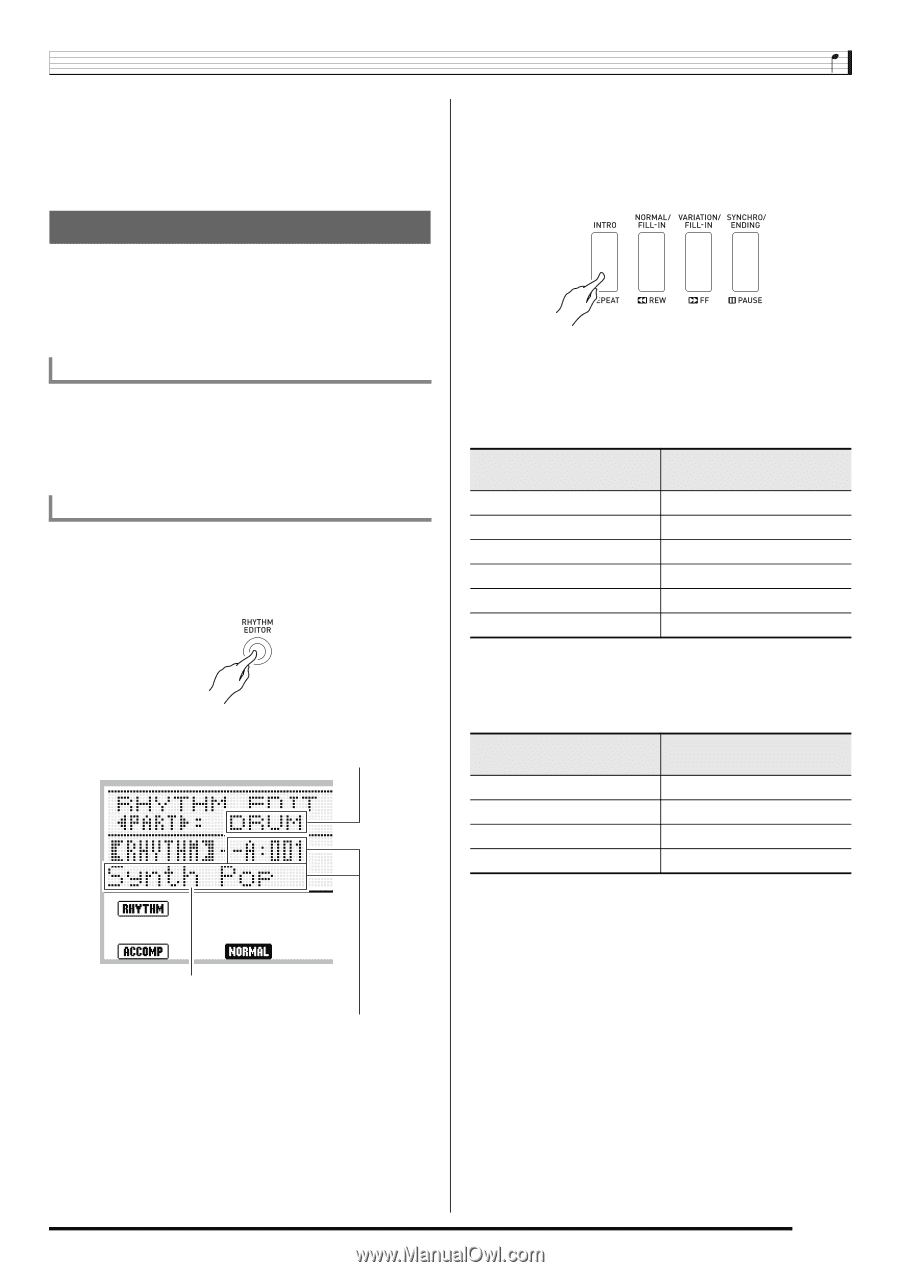
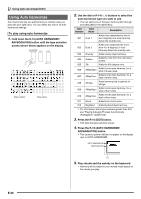
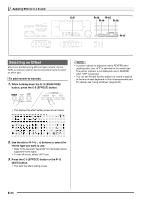
6. To turn off auto harmonize, press the R-18 (AUTO HARMONIZE/ARPEGGIATOR) button again. • This causes the pointer indicator next to AUTO HARMONIZE to disappear. Using the Rhythm Editor You can use the rhythm editor to modify a built-in Auto Accompaniment rhythm and create an original "user rhythm" of your own. You can select a part (drum, bass, etc.) of a normal, intro, or other pattern (page E-27) and turn it on or off, adjust its volume level, and perform other operations. User Rhythm Numbers Rhythm areas numbered F:001 through F:010 are for storage of user rhythms. You can have up to 10 user rhythms stored in memory at one time. You can recall a stored user rhythm by pressing the L-9 ([F] USER RHYTHMS) button. See "Playing an Auto Accompaniment" (page E-24) for more information. To create and save a user rhythm 1. Select the rhythm you want to edit in order to create your user rhythm. 2. Press the C-2 (RHYTHM EDITOR) button. • This displays the rhythm editor screen. Instrument part being edited Using Auto Accompaniment 3. Use buttons L-13 (INTRO) through L-16 (SYNCHRO/ENDING) to select the accompaniment pattern you want to edit. If you want to edit the intro accompaniment pattern, for example, press the L-13 (INTRO) button. • Each press of the L-14 (NORMAL/FILL-IN) button toggles between normal and normal fill-in, and each press of the L-15 (VARIATION/FILL-IN) button toggles between variation and variation fill-in. • The indicator for the currently selected accompaniment pattern will flash on the display. Selecting this accompaniment pattern: Causes this indicator to flash: Intro E Normal F Normal fill-in F G Variation H Variation fill-in Ending G H J 4. Use the R-17 (u, i) buttons to select the instrument part you want to edit. • The name of the instrument part you select will appear on the display. Selecting this instrument part: Causes this name to appear on the display: Percussion PERC Drums DRUM Bass BASS Chord 1 to Chord 5 CHORD1 to CHORD5 Accompaniment pattern being edited Rhythm number and rhythm name assigned to the instrument part of the accompaniment pattern being edited (Default: Number and name selected in step 1) E-29
-
 1
1 -
2
-
3
-
4
-
5
-
6
-
7
-
8
-
9
-
10
-
11
-
12
-
13
-
14
-
15
-
16
-
17
-
18
-
19
-
20
-
21
-
22
-
23
-
24
-
25
-
 26
26 -
 27
27 -
 28
28 -
 29
29 -
 30
30 -
 31
31 -
 32
32 -
 33
33 -
 34
34 -
 35
35 -
 36
36 -
37
-
38
-
39
-
40
-
41
-
42
-
43
-
44
-
45
-
46
-
47
-
48
-
49
-
50
-
51
-
52
-
53
-
54
-
55
-
56
-
57
-
58
-
59
-
60
-
61
-
62
-
63
-
64
-
65
-
66
-
67
-
68
-
69
-
70
-
71
-
72
-
73
-
74
-
75
-
76
-
77
-
78
-
79
-
80
-
81
-
82
-
83
-
84
-
85
-
86
-
87
-
88
-
89
-
90
-
91
-
92
-
93
-
94
-
95
-
96
-
97
-
98
-
99
-
100
-
101
-
102
-
103
-
104
-
105
-
106
-
107
-
108
-
109
-
110
-
111
-
112
-
113
-
114
-
115
-
116
-
117
-
118
-
119
-
120
-
121
-
122
-
123
-
124
-
125
-
126
-
127
-
128
-
129
-
130
-
131
-
132
 |
 |