Casio WK-6500 User Guide - Page 94
To adjust the velocity value of a note event
 |
View all Casio WK-6500 manuals
Add to My Manuals
Save this manual to your list of manuals |
Page 94 highlights
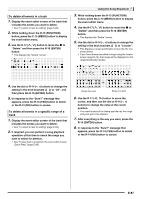
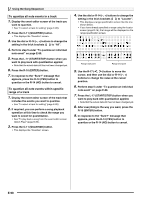
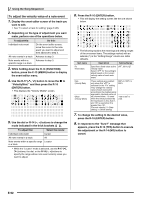
Using the Song Sequencer To adjust the velocity value of a note event 1. Display the event editor screen of the track you want to edit. • See "To select a track for editing" (page E-85). 2. Depending on the type of adjustment you want make, perform one of the operations below. To adjust this: Individual note event All note events in a track Note events within a specific range in a track Do this: On the event editor screen, move the cursor to the note event you want to adjust and then advance to step 3. Advance to step 3. Advance to step 3. 3. While holding down the R-13 (FUNCTION) button, press the C-13 (MENU) button to display the event editor menu. 4. Use the R-17 (t, y) button to move the 0 to "VelocityMod." and then press the R-16 (ENTER) button. • This displays the "Velocity Modify" screen. 5. Use the dial or R-14 (-, +) buttons to change the mode indicated in the thick brackets (%). To adjust this: Select this mode: Individual note event Cursor All note events in a track All Note events within a specific range Locator in a track • While the "Locator" mode is selected, use the R-17 (u, i) buttons, the dial, or the R-14 (-, +) buttons to specify the range whose note event velocity value you want to adjust. 6. Press the R-16 (ENTER) button. • This will display the setting screen like the one shown below. • The following explains the meanings and setting ranges of the on-screen items. The settings marked with an asterisk (*) in the "Setting Range" column are initial defaults. Item name Fix (Fixed value) Rate (Velocity Rate) Offset (Velocity Offset) Description Setting Range Specifies a fixed value as the velocity value. Select "oFF" for this setting to adjust based on the current velocity value of each note event. oFF*, 001 to 127 These settings are enabled only when the "oFF" is selected for the "Fix" setting. They change the velocity value of each note event according to the mathematical expression (decimal parts cut off) shown below. 1 is used when the value produced by the expression is less than 1, and 127 is used when it is greater than 127. (Current velocity) X (Rate setting) + (Offset setting) 000% to 100%* to 200% -126 to 000* to +126 7. To change the setting to the desired value, press the R-16 (ENTER) button. 8. In response to the "Sure?" message that appears, press the R-14 (YES) button to execute the adjustment or the R-14 (NO) button to cancel. E-92
-
 1
1 -
2
-
3
-
4
-
5
-
6
-
7
-
8
-
9
-
10
-
11
-
12
-
13
-
14
-
15
-
16
-
17
-
18
-
19
-
20
-
21
-
22
-
23
-
24
-
25
-
26
-
27
-
28
-
29
-
30
-
31
-
32
-
33
-
34
-
35
-
36
-
37
-
38
-
39
-
40
-
41
-
42
-
43
-
44
-
45
-
46
-
47
-
48
-
49
-
50
-
51
-
52
-
53
-
54
-
55
-
56
-
57
-
58
-
59
-
60
-
61
-
62
-
63
-
64
-
65
-
66
-
67
-
68
-
69
-
70
-
71
-
72
-
73
-
74
-
75
-
76
-
77
-
78
-
79
-
80
-
81
-
82
-
83
-
84
-
85
-
86
-
87
-
88
-
 89
89 -
 90
90 -
 91
91 -
 92
92 -
 93
93 -
 94
94 -
 95
95 -
 96
96 -
 97
97 -
 98
98 -
 99
99 -
100
-
101
-
102
-
103
-
104
-
105
-
106
-
107
-
108
-
109
-
110
-
111
-
112
-
113
-
114
-
115
-
116
-
117
-
118
-
119
-
120
-
121
-
122
-
123
-
124
-
125
-
126
-
127
-
128
-
129
-
130
-
131
-
132
 |
 |