Casio WK-6500 User Guide - Page 82
To copy one track to another track Tracks 01, through 16 only, To combine two tracks into a single
 |
View all Casio WK-6500 manuals
Add to My Manuals
Save this manual to your list of manuals |
Page 82 highlights
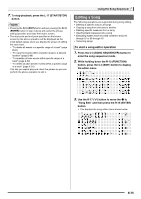
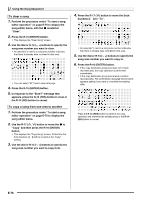
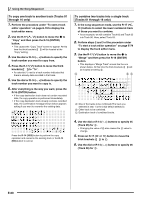
Using the Song Sequencer To copy one track to another track (Tracks 01 through 16 only) 1. Perform the procedure under "To start a track editor operation" on page E-79 to display the track editor menu. 2. Use the R-17 (t, y) button to move the 0 to "Copy" and then press the R-16 (ENTER) button. • This causes the "Copy Track" screen to appear. At this time the thick brackets (%) will be located at the "Copy" setting. 3. Use the dial or R-14 (-, +) buttons to specify the track number you want to copy from. 4. Press the R-17 (y) button to move the thick brackets (%) to "To". • An asterisk (*) next to a track number indicates that there is already data recorded in that track. 5. Use the dial or R-14 (-, +) buttons to specify the track number you want to copy to. 6. After everything is the way you want, press the R-16 (ENTER) button. • If the copy destination track does not contain recorded data, the copy operation is performed immediately. • If the copy destination track already contains recorded data, the confirmation message shown below appears asking if you want to overwrite the existing data. To combine two tracks into a single track (Tracks 01 through 16 only) 1. In the song sequencer mode, use the R-17 (u, i) buttons to select the lower numbered track of those you want to combine. • As an example, we will combine Track 03 and Track 05 into Track 06. Here, select Track 03. 2. Perform steps 2 and 3 of the procedure under "To start a track editor operation" on page E-79 to display the track editor menu. 3. Use the R-17 (y) button to move the 0 to "Merge" and then press the R-16 (ENTER) button. • This displays a "Merge Track" screen like the one shown below. At this time the thick brackets (%) will be located at setting B. A BC A: One of the tracks to be combined (The track you selected in step 1 is the initial default selection). B: Other track to be combined. C: Destination track of combined tracks. Press the R-14 (YES) button to perform the copy operation and overwrite the existing track or the R-14 (NO) button to cancel. 4. Use the dial or R-14 (-, +) buttons to specify 05 (Track 05) for B. • Changing the value of B also causes the C value to change. 5. Press an R-17 (i or y) button to move the thick brackets (%) to C. 6. Use the dial or R-14 (-, +) buttons to specify 06 (Track 06) for C. E-80
-
 1
1 -
2
-
3
-
4
-
5
-
6
-
7
-
8
-
9
-
10
-
11
-
12
-
13
-
14
-
15
-
16
-
17
-
18
-
19
-
20
-
21
-
22
-
23
-
24
-
25
-
26
-
27
-
28
-
29
-
30
-
31
-
32
-
33
-
34
-
35
-
36
-
37
-
38
-
39
-
40
-
41
-
42
-
43
-
44
-
45
-
46
-
47
-
48
-
49
-
50
-
51
-
52
-
53
-
54
-
55
-
56
-
57
-
58
-
59
-
60
-
61
-
62
-
63
-
64
-
65
-
66
-
67
-
68
-
69
-
70
-
71
-
72
-
73
-
74
-
75
-
76
-
 77
77 -
 78
78 -
 79
79 -
 80
80 -
 81
81 -
 82
82 -
 83
83 -
 84
84 -
 85
85 -
 86
86 -
 87
87 -
88
-
89
-
90
-
91
-
92
-
93
-
94
-
95
-
96
-
97
-
98
-
99
-
100
-
101
-
102
-
103
-
104
-
105
-
106
-
107
-
108
-
109
-
110
-
111
-
112
-
113
-
114
-
115
-
116
-
117
-
118
-
119
-
120
-
121
-
122
-
123
-
124
-
125
-
126
-
127
-
128
-
129
-
130
-
131
-
132
 |
 |
