Casio WK-6500 User Guide - Page 91
To quantize an individual note event
 |
View all Casio WK-6500 manuals
Add to My Manuals
Save this manual to your list of manuals |
Page 91 highlights
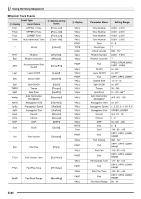
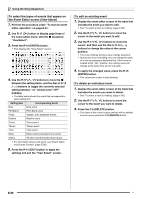
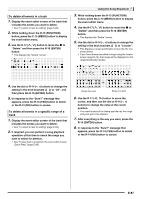
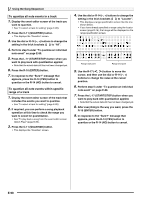
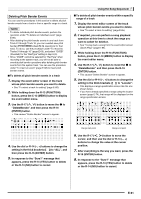
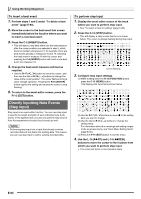
3. Press the C-10 (COPY) button. • This displays the "Copy" screen. • If you have already specified a range using the locator screen (page E-74), that range will be displayed on the range specification screen. Using the Song Sequencer To quantize an individual note event 1. Display the event editor screen of the track that includes the event you want to quantize. • See "To select a track for editing" (page E-85). 2. Use the R-17 (t, y) buttons to move the cursor to the event you want to quantize. 3. Press the C-11 (QUANTIZE) button. • This displays the "Quantize" screen. 2 Copy destination point 1 Copy source range (start point - end point) 4. Use the R-17 (u, i) button to move the cursor, and then use the dial or R-14 (-, +) buttons to change the value at the cursor position. 5. After everything is the way you want, press the R-16 (ENTER) button. 6. In response to the "Sure?" message that appears, press the R-14 (YES) button to copy or the R-14 (NO) button to cancel. • Pressing the R-14 (YES) button executes the copy operation. The message "Complete" appears and the display returns to the "Copy" screen after the copy is complete. • At this time, the "2 Copy destination position" value on the locator screen moves forward by the length specified by "1 Copy source range". 1 2 018:01:00 020:01:00 024:01:00 026:01:00 If you want to continue by copying the same copy source range to another location, repeat steps 5 and 6 again. 7. To return to the event editor screen, press the R-15 (EXIT) button. 4. Use the dial or R-14 (-, +) buttons to change the setting in the thick brackets (%) to "Cursor". 5. Specify the note you want to use as the quantize reference note. To specify this type of note: Quarter Eighth Sixteenth Thirty-second Triplet* Press this button: R-3 (2) R-7 (6) R-8 (7) R-9 (8) R-10 (,) * For a triplet, first select the note and then add the triplet. To specify a triplet made up of quarter notes, for example, press the R-3 (2) button and then the R-10 (,) button. 6. After everything is the way you want, press the R-16 (ENTER) button. • This performs quantization and returns to the event editor screen. E-89
-
 1
1 -
2
-
3
-
4
-
5
-
6
-
7
-
8
-
9
-
10
-
11
-
12
-
13
-
14
-
15
-
16
-
17
-
18
-
19
-
20
-
21
-
22
-
23
-
24
-
25
-
26
-
27
-
28
-
29
-
30
-
31
-
32
-
33
-
34
-
35
-
36
-
37
-
38
-
39
-
40
-
41
-
42
-
43
-
44
-
45
-
46
-
47
-
48
-
49
-
50
-
51
-
52
-
53
-
54
-
55
-
56
-
57
-
58
-
59
-
60
-
61
-
62
-
63
-
64
-
65
-
66
-
67
-
68
-
69
-
70
-
71
-
72
-
73
-
74
-
75
-
76
-
77
-
78
-
79
-
80
-
81
-
82
-
83
-
84
-
85
-
 86
86 -
 87
87 -
 88
88 -
 89
89 -
 90
90 -
 91
91 -
 92
92 -
 93
93 -
 94
94 -
 95
95 -
 96
96 -
97
-
98
-
99
-
100
-
101
-
102
-
103
-
104
-
105
-
106
-
107
-
108
-
109
-
110
-
111
-
112
-
113
-
114
-
115
-
116
-
117
-
118
-
119
-
120
-
121
-
122
-
123
-
124
-
125
-
126
-
127
-
128
-
129
-
130
-
131
-
132
 |
 |
