Casio WK-6500 User Guide - Page 60
Editing a Chord Progression
 |
View all Casio WK-6500 manuals
Add to My Manuals
Save this manual to your list of manuals |
Page 60 highlights
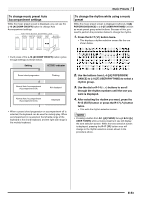
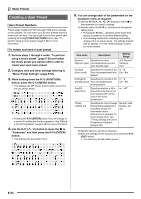
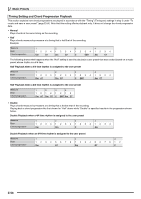
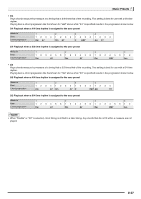
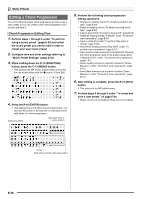
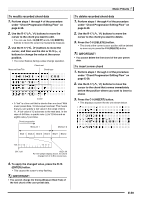
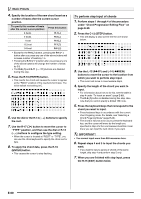
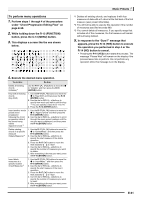
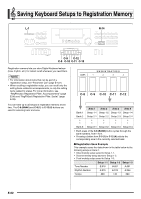
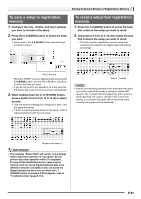
Music Presets Editing a Chord Progression You can modify the preset chord progression and save it as a user preset, or you can create a new chord progression from scratch and save it. Chord Progression Editing Flow 1. Perform steps 1 through 4 under "To perform using a music preset" (page E-50) and select the music preset you want to edit in order to create your user music preset. 2. Configure tone and other settings referring to "Music Preset Settings" (page E-52). 3. While holding down the R-13 (FUNCTION) button, press the C-13 (MENU) button. • This displays the MP (music preset) editor screen like the one shown below with the 0 next to "Chord Edit". 4. Press the R-16 (ENTER) button. • This displays the chord editor screen shown below. You can use this screen to directly edit the individual chord data items of a chord progression. Data being edited Data type name at cursor position 5. Perform the following chord progression editing operations. • Change an existing chord ("To modify recorded chord data", page E-59) • Delete an existing chord ("To delete recorded chord data", page E-59) • Insert a new chord ("To insert a new chord", page E-59) • Delete all existing chords ("Initialize", under "To perform menu operations", page E-61) • Input a series of chords ("To perform step input of chords", page E-60) • Key shift all existing chords ("Key Shift", under "To perform menu operations", page E-61) • Insert another music preset chord progression following the chord progression data of the preset being edited ("Append Chord", under "To perform menu operations", page E-61) • Delete existing chords in a specific measure ("Delete Measure", under "To perform menu operations", page E-61) • Insert blank measures at a specific location ("Insert Measure", under "To perform menu operations", page E-61) 6. After editing is complete, press the R-15 (EXIT) button. • This returns to the MP editor screen. 7. Perform steps 4 through 9 under "To create and save a user preset" on page E-54. • Steps 4 and 5 can be skipped if they are not necessary. Cursor Data before and after data being edited E-58
-
 1
1 -
2
-
3
-
4
-
5
-
6
-
7
-
8
-
9
-
10
-
11
-
12
-
13
-
14
-
15
-
16
-
17
-
18
-
19
-
20
-
21
-
22
-
23
-
24
-
25
-
26
-
27
-
28
-
29
-
30
-
31
-
32
-
33
-
34
-
35
-
36
-
37
-
38
-
39
-
40
-
41
-
42
-
43
-
44
-
45
-
46
-
47
-
48
-
49
-
50
-
51
-
52
-
53
-
54
-
 55
55 -
 56
56 -
 57
57 -
 58
58 -
 59
59 -
 60
60 -
 61
61 -
 62
62 -
 63
63 -
 64
64 -
 65
65 -
66
-
67
-
68
-
69
-
70
-
71
-
72
-
73
-
74
-
75
-
76
-
77
-
78
-
79
-
80
-
81
-
82
-
83
-
84
-
85
-
86
-
87
-
88
-
89
-
90
-
91
-
92
-
93
-
94
-
95
-
96
-
97
-
98
-
99
-
100
-
101
-
102
-
103
-
104
-
105
-
106
-
107
-
108
-
109
-
110
-
111
-
112
-
113
-
114
-
115
-
116
-
117
-
118
-
119
-
120
-
121
-
122
-
123
-
124
-
125
-
126
-
127
-
128
-
129
-
130
-
131
-
132
 |
 |
