Cisco 6509 Installation Guide - Page 134
Connecting the Supervisor Engine Uplink Ports - gbic
 |
UPC - 746320196077
View all Cisco 6509 manuals
Add to My Manuals
Save this manual to your list of manuals |
Page 134 highlights
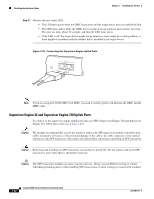
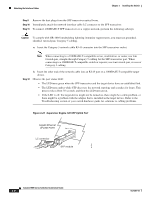
Attaching the Interface Cables Chapter 3 Installing the Switch Connecting the Supervisor Engine Uplink Ports This section describes how to connect to the supervisor engine uplink ports. Warning Invisible laser radiation may be emitted from disconnected fibers or connectors. Do not stare into beams or view directly with optical instruments. Statement 1051 Note In a redundant configuration with two supervisor engines, the uplink ports on the redundant (standby) supervisor engine are active and can be used for normal traffic, like any other ports in the chassis. Supervisor Engine 1 and Supervisor Engine 2 Uplink Ports Supervisor Engine 1 and Supervisor Engine 2 uplink ports use Gigabit Interface Converters (GBICs). Caution We strongly recommend that you do not install or remove the GBIC transceiver module with fiber-optic cables attached to it because of the potential damage to the cables, the cable connector, or the optical interfaces in the SFP transceiver. Disconnect all cables before removing or installing an SFP transceiver. Caution Removing and installing an GBIC transceiver can shorten its useful life. Do not remove and insert GBIC transceivers more often than is absolutely necessary. Caution The GBIC transceiver modules are static sensitive devices. Always use an ESD wrist strap or a similar individual grounding device when handling GBIC transceivers or coming in contact with modules. To install and cable an GBIC transceiver, follow these steps (see Figure 3-22): Step 1 Step 2 Attach an ESD-preventive wrist strap to your wrist and to the ESD ground connector or a bare metal surface on your chassis. Remove the GBIC transceiver module from its protective packaging. Note Do not remove the optical bore dust plugs until you are directed to do so later in the procedure. Step 3 Check the label on the GBIC transceiver body to verify that you have the correct model for your network. Step 4 Find the transmit (TX) and receive (RX) markings that identify the top side of the GBIC transceiver. Note On some GBIC transceivers, the TX and RX marking might be replaced by arrowheads pointing from the GBIC transceiver connector (transmit direction or TX) and toward the connector (receive direction or RX). Step 5 Position the GBIC transceiver in front of the socket opening. 3-30 Catalyst 6500 Series Switches Installation Guide OL-5781-04
-
 1
1 -
2
-
3
-
4
-
5
-
6
-
7
-
8
-
9
-
10
-
11
-
12
-
13
-
14
-
15
-
16
-
17
-
18
-
19
-
20
-
21
-
22
-
23
-
24
-
25
-
26
-
27
-
28
-
29
-
30
-
31
-
32
-
33
-
34
-
35
-
36
-
37
-
38
-
39
-
40
-
41
-
42
-
43
-
44
-
45
-
46
-
47
-
48
-
49
-
50
-
51
-
52
-
53
-
54
-
55
-
56
-
57
-
58
-
59
-
60
-
61
-
62
-
63
-
64
-
65
-
66
-
67
-
68
-
69
-
70
-
71
-
72
-
73
-
74
-
75
-
76
-
77
-
78
-
79
-
80
-
81
-
82
-
83
-
84
-
85
-
86
-
87
-
88
-
89
-
90
-
91
-
92
-
93
-
94
-
95
-
96
-
97
-
98
-
99
-
100
-
101
-
102
-
103
-
104
-
105
-
106
-
107
-
108
-
109
-
110
-
111
-
112
-
113
-
114
-
115
-
116
-
117
-
118
-
119
-
120
-
121
-
122
-
123
-
124
-
125
-
126
-
127
-
128
-
 129
129 -
 130
130 -
 131
131 -
 132
132 -
 133
133 -
 134
134 -
 135
135 -
 136
136 -
 137
137 -
 138
138 -
 139
139 -
140
-
141
-
142
-
143
-
144
-
145
-
146
-
147
-
148
-
149
-
150
-
151
-
152
-
153
-
154
-
155
-
156
-
157
-
158
-
159
-
160
-
161
-
162
-
163
-
164
-
165
-
166
-
167
-
168
-
169
-
170
-
171
-
172
-
173
-
174
-
175
-
176
-
177
-
178
-
179
-
180
-
181
-
182
-
183
-
184
-
185
-
186
-
187
-
188
-
189
-
190
-
191
-
192
-
193
-
194
-
195
-
196
-
197
-
198
-
199
-
200
-
201
-
202
-
203
-
204
-
205
-
206
-
207
-
208
-
209
-
210
-
211
-
212
-
213
-
214
-
215
-
216
-
217
-
218
-
219
-
220
-
221
-
222
-
223
-
224
-
225
-
226
-
227
-
228
-
229
-
230
-
231
-
232
-
233
-
234
-
235
-
236
-
237
-
238
-
239
-
240
-
241
-
242
-
243
-
244
-
245
-
246
-
247
-
248
-
249
-
250
-
251
-
252
-
253
-
254
-
255
-
256
-
257
-
258
-
259
-
260
-
261
-
262
-
263
-
264
-
265
-
266
-
267
-
268
-
269
-
270
-
271
-
272
-
273
-
274
-
275
-
276
-
277
-
278
-
279
-
280
-
281
-
282
-
283
-
284
-
285
-
286
-
287
-
288
-
289
-
290
-
291
-
292
-
293
-
294
-
295
-
296
-
297
-
298
-
299
-
300
-
301
-
302
-
303
-
304
-
305
-
306
-
307
-
308
-
309
-
310
-
311
-
312
-
313
-
314
-
315
-
316
-
317
-
318
-
319
-
320
-
321
-
322
-
323
-
324
-
325
-
326
-
327
-
328
-
329
-
330
-
331
-
332
-
333
-
334
-
335
-
336
 |
 |