Cisco 6509 Installation Guide - Page 149
Removing and Installing the 1000 W, 1300 W, 2500 W, 3000 W, 4000 W, and, W AC-Input Power Supplies - end of support
 |
UPC - 746320196077
View all Cisco 6509 manuals
Add to My Manuals
Save this manual to your list of manuals |
Page 149 highlights
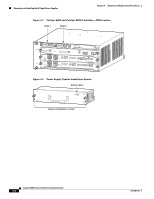
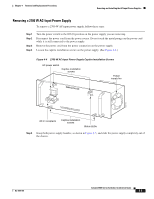
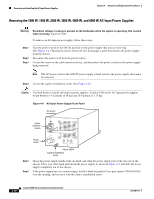
Chapter 4 Removal and Replacement Procedures Removing and Installing the AC-Input Power Supplies Warning Power supply captive installation screws must be tight to ensure protective grounding continuity. Statement 289 Step 6 Plug the power cord into the power supply AC-in receptacle. Step 7 Connect the other end of the power cord to the AC-input power source. Caution In a system with dual power supplies, connect each power supply to a separate source circuit. In case of a power source failure, the second source will most likely still be available. Step 8 Step 9 Turn the switch on the power supply to the On (|) position. Verify power supply operation by checking that the power supply LEDs are in the following states: • INPUT OK LED is green • FAN OK LED is green • OUTPUT FAIL LED is not lit If the LEDs indicate a power problem, see the "Identifying Startup Problems" section on page E-3 for troubleshooting information. Removing and Installing the 1000 W, 1300 W, 2500 W, 3000 W, 4000 W, and 6000 W AC-Input Power Supplies This section describes how to remove and install the 1000 W, 1300 W, 2500 W, 3000 W, 4000 W, and 6000 W AC-input power supplies in the Catalyst 6500 series switches that support them. The section is divided into the following topics: • Required Tools, page 4-9 • Removing the 1000 W, 1300 W, 2500 W, 3000 W, 4000 W, and 6000 W AC-Input Power Supplies, page 4-10 • Installing the 1000 W, 1300 W, 2500 W, 3000 W, 4000 W, and 6000 W AC-Input Power Supplies, page 4-11 All six power supplies have the same form factor and are removed and installed using the same procedures. Note In systems with redundant power supplies, you can replace the faulty supply while the system is operating. Required Tools You might need a flat-blade or number 2 Phillips-head screwdriver to loosen or tighten the captive installation screws on the power supply. OL-5781-04 Catalyst 6500 Series Switches Installation Guide 4-9
-
 1
1 -
2
-
3
-
4
-
5
-
6
-
7
-
8
-
9
-
10
-
11
-
12
-
13
-
14
-
15
-
16
-
17
-
18
-
19
-
20
-
21
-
22
-
23
-
24
-
25
-
26
-
27
-
28
-
29
-
30
-
31
-
32
-
33
-
34
-
35
-
36
-
37
-
38
-
39
-
40
-
41
-
42
-
43
-
44
-
45
-
46
-
47
-
48
-
49
-
50
-
51
-
52
-
53
-
54
-
55
-
56
-
57
-
58
-
59
-
60
-
61
-
62
-
63
-
64
-
65
-
66
-
67
-
68
-
69
-
70
-
71
-
72
-
73
-
74
-
75
-
76
-
77
-
78
-
79
-
80
-
81
-
82
-
83
-
84
-
85
-
86
-
87
-
88
-
89
-
90
-
91
-
92
-
93
-
94
-
95
-
96
-
97
-
98
-
99
-
100
-
101
-
102
-
103
-
104
-
105
-
106
-
107
-
108
-
109
-
110
-
111
-
112
-
113
-
114
-
115
-
116
-
117
-
118
-
119
-
120
-
121
-
122
-
123
-
124
-
125
-
126
-
127
-
128
-
129
-
130
-
131
-
132
-
133
-
134
-
135
-
136
-
137
-
138
-
139
-
140
-
141
-
142
-
143
-
 144
144 -
 145
145 -
 146
146 -
 147
147 -
 148
148 -
 149
149 -
 150
150 -
 151
151 -
 152
152 -
 153
153 -
 154
154 -
155
-
156
-
157
-
158
-
159
-
160
-
161
-
162
-
163
-
164
-
165
-
166
-
167
-
168
-
169
-
170
-
171
-
172
-
173
-
174
-
175
-
176
-
177
-
178
-
179
-
180
-
181
-
182
-
183
-
184
-
185
-
186
-
187
-
188
-
189
-
190
-
191
-
192
-
193
-
194
-
195
-
196
-
197
-
198
-
199
-
200
-
201
-
202
-
203
-
204
-
205
-
206
-
207
-
208
-
209
-
210
-
211
-
212
-
213
-
214
-
215
-
216
-
217
-
218
-
219
-
220
-
221
-
222
-
223
-
224
-
225
-
226
-
227
-
228
-
229
-
230
-
231
-
232
-
233
-
234
-
235
-
236
-
237
-
238
-
239
-
240
-
241
-
242
-
243
-
244
-
245
-
246
-
247
-
248
-
249
-
250
-
251
-
252
-
253
-
254
-
255
-
256
-
257
-
258
-
259
-
260
-
261
-
262
-
263
-
264
-
265
-
266
-
267
-
268
-
269
-
270
-
271
-
272
-
273
-
274
-
275
-
276
-
277
-
278
-
279
-
280
-
281
-
282
-
283
-
284
-
285
-
286
-
287
-
288
-
289
-
290
-
291
-
292
-
293
-
294
-
295
-
296
-
297
-
298
-
299
-
300
-
301
-
302
-
303
-
304
-
305
-
306
-
307
-
308
-
309
-
310
-
311
-
312
-
313
-
314
-
315
-
316
-
317
-
318
-
319
-
320
-
321
-
322
-
323
-
324
-
325
-
326
-
327
-
328
-
329
-
330
-
331
-
332
-
333
-
334
-
335
-
336
 |
 |
