Compaq Armada E700 Armada E700 - Page 110
€€Audio Board
 |
View all Compaq Armada E700 manuals
Add to My Manuals
Save this manual to your list of manuals |
Page 110 highlights
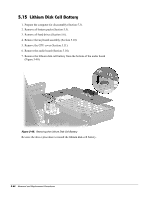
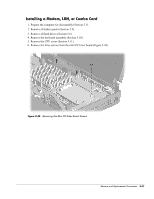
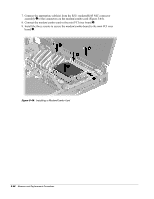
5.14 Audio Board 1. Prepare the computer for disassembly (Section 5.3). 2. Remove all battery packs (Section 5.5). 3. Remove all hard drives (Section 5.6). 4. Remove the keyboard assembly (Section 5.10). 5. Remove the CPU cover (Section 5.11). 6. Remove the screw 1 that secures the audio board to the standoff mounted on the system board. (Figure 5-39). 7. Partially lift up on the rear/right edge of the audio board 2 to disconnect it from the system board. Hold the board slightly above the base assembly. 8. Disconnect the microphone cable 3 from the audio board. Figure 5-39. Removing the Audio Board Screw and Disconnecting the Audio Board 9. Remove the audio board. Reverse the above procedure to install the audio board. Removal and Replacement Procedures 543
-
 1
1 -
2
-
3
-
4
-
5
-
6
-
7
-
8
-
9
-
10
-
11
-
12
-
13
-
14
-
15
-
16
-
17
-
18
-
19
-
20
-
21
-
22
-
23
-
24
-
25
-
26
-
27
-
28
-
29
-
30
-
31
-
32
-
33
-
34
-
35
-
36
-
37
-
38
-
39
-
40
-
41
-
42
-
43
-
44
-
45
-
46
-
47
-
48
-
49
-
50
-
51
-
52
-
53
-
54
-
55
-
56
-
57
-
58
-
59
-
60
-
61
-
62
-
63
-
64
-
65
-
66
-
67
-
68
-
69
-
70
-
71
-
72
-
73
-
74
-
75
-
76
-
77
-
78
-
79
-
80
-
81
-
82
-
83
-
84
-
85
-
86
-
87
-
88
-
89
-
90
-
91
-
92
-
93
-
94
-
95
-
96
-
97
-
98
-
99
-
100
-
101
-
102
-
103
-
104
-
 105
105 -
 106
106 -
 107
107 -
 108
108 -
 109
109 -
 110
110 -
 111
111 -
 112
112 -
 113
113 -
 114
114 -
 115
115 -
116
-
117
-
118
-
119
-
120
-
121
-
122
-
123
-
124
-
125
-
126
-
127
-
128
-
129
-
130
-
131
-
132
-
133
-
134
-
135
-
136
-
137
-
138
-
139
-
140
-
141
-
142
-
143
-
144
-
145
-
146
-
147
-
148
-
149
-
150
-
151
-
152
-
153
 |
 |