Compaq Armada E700 Armada E700 - Page 45
Table 2-10, Solving Compact Disc and DVD-ROM Problems
 |
View all Compaq Armada E700 manuals
Add to My Manuals
Save this manual to your list of manuals |
Page 45 highlights
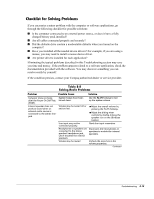
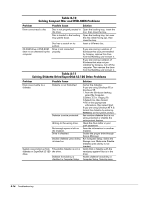
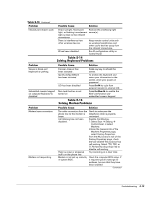
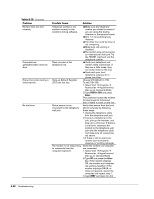
Table 2-10 Solving Compact Disc and DVD-ROM Problems Problem Possible Cause Solution Drive cannot read a disc CD-ROM drive or DVD-ROM drive is not detected by the computer. Disc is not properly seated in the drive. Disc is loaded in the loading tray upside down. Disc has a scratch on its surface. Drive is not connected properly. Open the loading tray, insert the disc, then close the tray. Open the loading tray, turn over the disc (label facing up), then close the tray. Insert a different disc. If you are running a version of Windows that was pre-installed by Compaq, remove the drive from the MultiBay and reinsert it. If you are running a version of Windows that was not preinstalled by Compaq, turn off the computer. Then remove the drive from the MultiBay and reinsert it. Table 2-11 Solving Diskette Drive/SuperDisk LS-120 Drive Problems Problem Possible Cause Solution Drive cannot write to a diskette. System cannot start up from diskette or SuperDisk LS-120 drive. Diskette is not formatted. Diskette is write-protected. Writing to the wrong drive. Not enough space is left on the diskette. Drive is disabled. Disable diskette write ability is turned on. A bootable diskette is not in the drive. Diskette bootability is disabled in Computer Setup. Format the diskette: If you are using Windows 95 or Windows 98: 1.From the Windows desktop, select My Computer. 2.Select 3.5-in. Floppy (A). 3.Select File, then Format. 4.Fill in the appropriate information, then select Start. If you are using Windows NT 4.0, format the diskette by entering format a: at the system prompt. Use another diskette that is not write-protected or disable the write-protect feature. Check the drive letter in your path statement. Save the information to another diskette. Enable the proper drive through Device Manager. Run Computer Setup. Select the Storage icon. Make sure Disable diskette write ability is not checked. Verify that a diskette with the necessary system files is in the drive. Enable diskette bootability in Computer Setup, Security menu. 2-16 Troubleshooting
-
 1
1 -
2
-
3
-
4
-
5
-
6
-
7
-
8
-
9
-
10
-
11
-
12
-
13
-
14
-
15
-
16
-
17
-
18
-
19
-
20
-
21
-
22
-
23
-
24
-
25
-
26
-
27
-
28
-
29
-
30
-
31
-
32
-
33
-
34
-
35
-
36
-
37
-
38
-
39
-
 40
40 -
 41
41 -
 42
42 -
 43
43 -
 44
44 -
 45
45 -
 46
46 -
 47
47 -
 48
48 -
 49
49 -
 50
50 -
51
-
52
-
53
-
54
-
55
-
56
-
57
-
58
-
59
-
60
-
61
-
62
-
63
-
64
-
65
-
66
-
67
-
68
-
69
-
70
-
71
-
72
-
73
-
74
-
75
-
76
-
77
-
78
-
79
-
80
-
81
-
82
-
83
-
84
-
85
-
86
-
87
-
88
-
89
-
90
-
91
-
92
-
93
-
94
-
95
-
96
-
97
-
98
-
99
-
100
-
101
-
102
-
103
-
104
-
105
-
106
-
107
-
108
-
109
-
110
-
111
-
112
-
113
-
114
-
115
-
116
-
117
-
118
-
119
-
120
-
121
-
122
-
123
-
124
-
125
-
126
-
127
-
128
-
129
-
130
-
131
-
132
-
133
-
134
-
135
-
136
-
137
-
138
-
139
-
140
-
141
-
142
-
143
-
144
-
145
-
146
-
147
-
148
-
149
-
150
-
151
-
152
-
153
 |
 |
