Compaq Armada E700 Armada E700 - Page 97
Installing a Memory Expansion Board, Run Computer Setup
 |
View all Compaq Armada E700 manuals
Add to My Manuals
Save this manual to your list of manuals |
Page 97 highlights
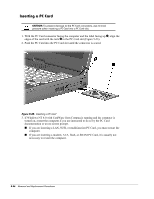
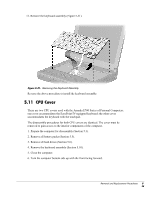
Installing a Memory Expansion Board All memory expansion boards are asymmetrically keyed (notched) to ensure correct positioning. Memory expansion boards can be used in either memory expansion slot. 1. Insert the memory expansion board into an empty memory expansion slot at a 45-degree angle 1 (Figure 5-26). 2. Push the board into place until it is seated. 3. Push the memory expansion board down 2 until the board is seated in the plastic retention clips. Figure 5-26. Inserting a Memory Expansion Board 4. Run Computer Setup (Section 2.5). 5-30 Removal and Replacement Procedures
-
 1
1 -
2
-
3
-
4
-
5
-
6
-
7
-
8
-
9
-
10
-
11
-
12
-
13
-
14
-
15
-
16
-
17
-
18
-
19
-
20
-
21
-
22
-
23
-
24
-
25
-
26
-
27
-
28
-
29
-
30
-
31
-
32
-
33
-
34
-
35
-
36
-
37
-
38
-
39
-
40
-
41
-
42
-
43
-
44
-
45
-
46
-
47
-
48
-
49
-
50
-
51
-
52
-
53
-
54
-
55
-
56
-
57
-
58
-
59
-
60
-
61
-
62
-
63
-
64
-
65
-
66
-
67
-
68
-
69
-
70
-
71
-
72
-
73
-
74
-
75
-
76
-
77
-
78
-
79
-
80
-
81
-
82
-
83
-
84
-
85
-
86
-
87
-
88
-
89
-
90
-
91
-
 92
92 -
 93
93 -
 94
94 -
 95
95 -
 96
96 -
 97
97 -
 98
98 -
 99
99 -
 100
100 -
 101
101 -
 102
102 -
103
-
104
-
105
-
106
-
107
-
108
-
109
-
110
-
111
-
112
-
113
-
114
-
115
-
116
-
117
-
118
-
119
-
120
-
121
-
122
-
123
-
124
-
125
-
126
-
127
-
128
-
129
-
130
-
131
-
132
-
133
-
134
-
135
-
136
-
137
-
138
-
139
-
140
-
141
-
142
-
143
-
144
-
145
-
146
-
147
-
148
-
149
-
150
-
151
-
152
-
153
 |
 |

5-30
Removal and Replacement Procedures
Installing a Memory Expansion Board
All memory expansion boards are asymmetrically keyed (notched) to ensure correct
positioning. Memory expansion boards can be used in either memory expansion slot.
1.
Insert the memory expansion board into an empty memory expansion slot at a
45-degree angle
1
(Figure 5-26).
2.
Push the board into place until it is seated.
3.
Push the memory expansion board down
2
until the board is seated in the plastic
retention clips.
Figure 5-26.
Inserting a Memory Expansion Board
4.
Run Computer Setup (Section 2.5).