Compaq Armada E700 Armada E700 - Page 128
system board,
 |
View all Compaq Armada E700 manuals
Add to My Manuals
Save this manual to your list of manuals |
Page 128 highlights
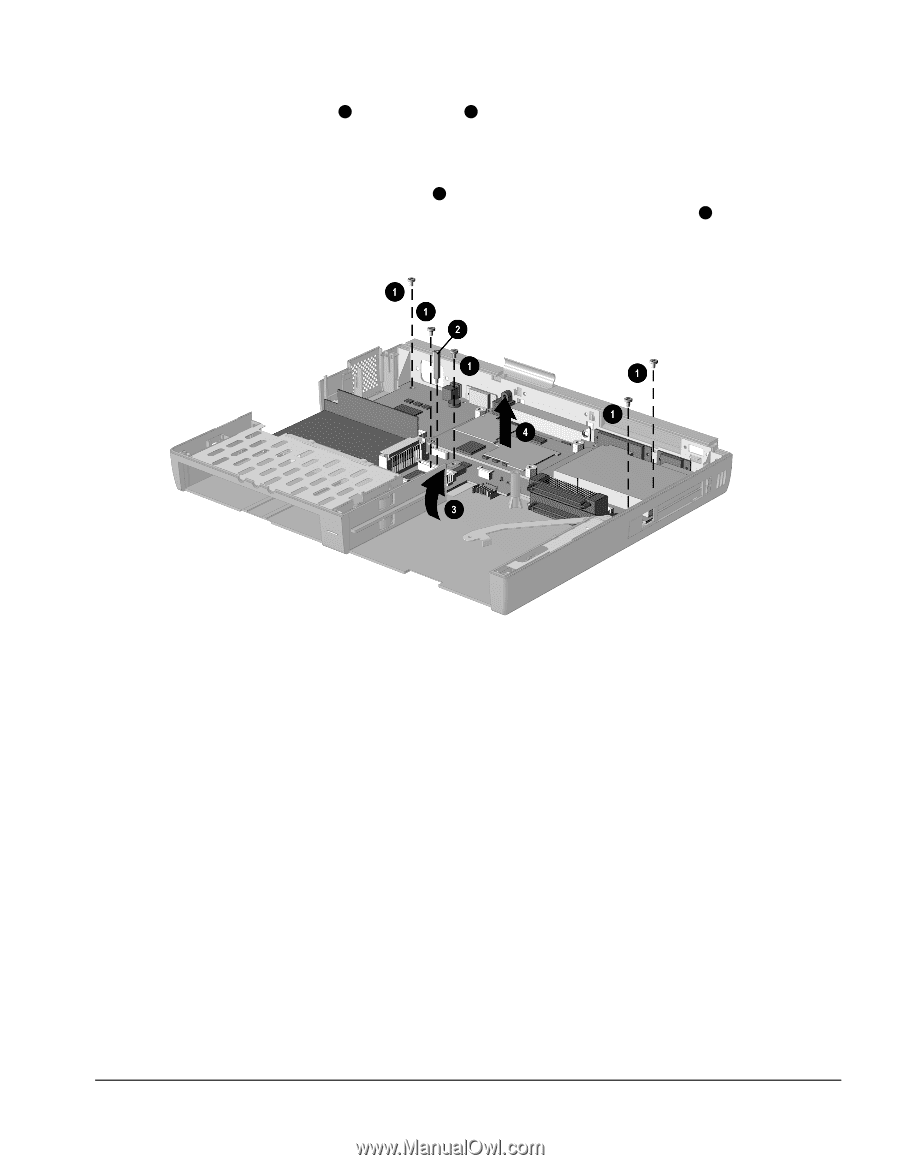
24. Remove the five screws 1 and the standoff 2 that secure the system board to the base assembly (Figure 5-56). 25. Slide and hold the battery pack release lever toward the front of the computer. 26. Lift the front edge of the system board 3 . When the front edge of the system board clears the base assembly, lift the board straight up and out of the base assembly 4 . Figure 5-56. Removing the System Board Reverse the above procedure to install the system board. After the system board has been replaced in the base enclosure, remove the short screws installed in Step 22 and reverse the disassembly steps to install the system board. Remove and Replacement Procedures 5-61
-
 1
1 -
2
-
3
-
4
-
5
-
6
-
7
-
8
-
9
-
10
-
11
-
12
-
13
-
14
-
15
-
16
-
17
-
18
-
19
-
20
-
21
-
22
-
23
-
24
-
25
-
26
-
27
-
28
-
29
-
30
-
31
-
32
-
33
-
34
-
35
-
36
-
37
-
38
-
39
-
40
-
41
-
42
-
43
-
44
-
45
-
46
-
47
-
48
-
49
-
50
-
51
-
52
-
53
-
54
-
55
-
56
-
57
-
58
-
59
-
60
-
61
-
62
-
63
-
64
-
65
-
66
-
67
-
68
-
69
-
70
-
71
-
72
-
73
-
74
-
75
-
76
-
77
-
78
-
79
-
80
-
81
-
82
-
83
-
84
-
85
-
86
-
87
-
88
-
89
-
90
-
91
-
92
-
93
-
94
-
95
-
96
-
97
-
98
-
99
-
100
-
101
-
102
-
103
-
104
-
105
-
106
-
107
-
108
-
109
-
110
-
111
-
112
-
113
-
114
-
115
-
116
-
117
-
118
-
119
-
120
-
121
-
122
-
 123
123 -
 124
124 -
 125
125 -
 126
126 -
 127
127 -
 128
128 -
 129
129 -
 130
130 -
 131
131 -
 132
132 -
 133
133 -
134
-
135
-
136
-
137
-
138
-
139
-
140
-
141
-
142
-
143
-
144
-
145
-
146
-
147
-
148
-
149
-
150
-
151
-
152
-
153
 |
 |
Remove and Replacement Procedures
5-61
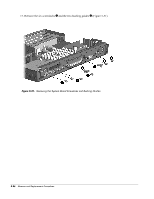
24.
Remove the five screws
1
and the standoff
2
that secure the system board to the
base assembly (Figure 5-56).
25.
Slide and hold the battery pack release lever toward the front of the computer.
26.
Lift the front edge of the system board
3
. When the front edge of the system board
clears the base assembly, lift the board straight up and out of the base assembly
4
.
Figure 5-56.
Removing the System Board
Reverse the above procedure to install the
system board
. After the system board has
been replaced in the base enclosure, remove the short screws installed in Step 22 and
reverse the disassembly steps to install the system board.