Dell PowerEdge R510 Hardware Owner's Manual - Page 89
Closing the System, Slide the cover towards the front of the chassis and press down the latch.
 |
View all Dell PowerEdge R510 manuals
Add to My Manuals
Save this manual to your list of manuals |
Page 89 highlights
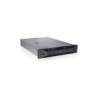
Figure 3-5. Removing and Replacing the System Cover (Twelve-Hard-Drive System) 2 1 1 system cover latch 2 latch release lock Closing the System 1 Lift the latch on the system cover. 2 Place the cover onto the chassis and offset it slightly back so that the two hooks on the back edge of the cover fit the corresponding tabs on the back edge of the chassis. See Figure 3-4 and Figure 3-5. 3 Slide the cover towards the front of the chassis and press down the latch. 4 Rotate the latch release lock in the clockwise direction to secure the cover. 5 Reconnect the system and peripherals to their electrical outlets, and turn on the system. Installing System Components 89
-
 1
1 -
2
-
3
-
4
-
5
-
6
-
7
-
8
-
9
-
10
-
11
-
12
-
13
-
14
-
15
-
16
-
17
-
18
-
19
-
20
-
21
-
22
-
23
-
24
-
25
-
26
-
27
-
28
-
29
-
30
-
31
-
32
-
33
-
34
-
35
-
36
-
37
-
38
-
39
-
40
-
41
-
42
-
43
-
44
-
45
-
46
-
47
-
48
-
49
-
50
-
51
-
52
-
53
-
54
-
55
-
56
-
57
-
58
-
59
-
60
-
61
-
62
-
63
-
64
-
65
-
66
-
67
-
68
-
69
-
70
-
71
-
72
-
73
-
74
-
75
-
76
-
77
-
78
-
79
-
80
-
81
-
82
-
83
-
 84
84 -
 85
85 -
 86
86 -
 87
87 -
 88
88 -
 89
89 -
 90
90 -
 91
91 -
 92
92 -
 93
93 -
 94
94 -
95
-
96
-
97
-
98
-
99
-
100
-
101
-
102
-
103
-
104
-
105
-
106
-
107
-
108
-
109
-
110
-
111
-
112
-
113
-
114
-
115
-
116
-
117
-
118
-
119
-
120
-
121
-
122
-
123
-
124
-
125
-
126
-
127
-
128
-
129
-
130
-
131
-
132
-
133
-
134
-
135
-
136
-
137
-
138
-
139
-
140
-
141
-
142
-
143
-
144
-
145
-
146
-
147
-
148
-
149
-
150
-
151
-
152
-
153
-
154
-
155
-
156
-
157
-
158
-
159
-
160
-
161
-
162
-
163
-
164
-
165
-
166
-
167
-
168
-
169
-
170
-
171
-
172
-
173
-
174
-
175
-
176
-
177
-
178
-
179
-
180
-
181
-
182
-
183
-
184
-
185
-
186
-
187
-
188
-
189
-
190
-
191
-
192
-
193
-
194
-
195
-
196
-
197
-
198
-
199
-
200
-
201
-
202
-
203
-
204
-
205
-
206
-
207
-
208
-
209
-
210
-
211
-
212
-
213
-
214
-
215
-
216
 |
 |

Installing System Components
89
Figure 3-5.
Removing and Replacing the System Cover (Twelve–Hard-Drive System)
Closing the System
1
Lift the latch on the system cover.
2
Place the cover onto the chassis and offset it slightly back so that the two
hooks on the back edge of the cover fit the corresponding tabs on the back
edge of the chassis. See Figure 3-4 and Figure 3-5.
3
Slide the cover towards the front of the chassis and press down the latch.
4
Rotate the latch release lock in the clockwise direction to secure the cover.
5
Reconnect the system and peripherals to their electrical outlets, and turn
on the system.
1
system cover latch
2
latch release lock
1
2