Epson Expression 1680 Special Edition User Manual (w/EPSON Scan software) - Page 17
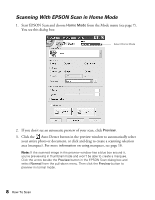
Choose the Document Source, If you're scanning from an application
 |
View all Epson Expression 1680 Special Edition manuals
Add to My Manuals
Save this manual to your list of manuals |
Page 17 highlights
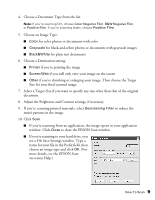
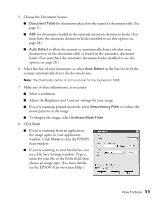
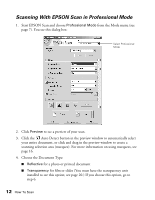
5. Choose the Document Source: ■ Document Table for documents placed on the scanner's document table (See page 5.) ■ ADF for documents loaded in the optional automatic document feeder (You must have the automatic document feeder installed to see this option; see page 28.) ■ Auto Detect to allow the scanner to automatically detect whether your document is on the document table or loaded in the automatic document feeder (You must have the automatic document feeder installed to see this option; see page 28.) 6. Select the Size of your document, or select Auto Detect in the Size list to let the scanner automatically detect the document size. Note: The Orientation option is not functional for the Expression 1680. 7. Make any of these adjustments, as necessary: ■ Select a resolution ■ Adjust the Brightness and Contrast settings for your image ■ If you're scanning printed materials, select Descreening Filter to reduce the moiré patterns in the image ■ To sharpen the image, select Unsharp Mask Filter 8. Click Scan. ■ If you're scanning from an application, the image opens in your application window. Click Close to close the EPSON Scan window. ■ If you're scanning to your hard drive, you see a File Save Settings window. Type a name for your file in the Prefix field, then choose an image type. (For more details, see the EPSON Scan on-screen Help.) How To Scan 11
-
 1
1 -
2
-
3
-
4
-
5
-
6
-
7
-
8
-
9
-
10
-
11
-
 12
12 -
 13
13 -
 14
14 -
 15
15 -
 16
16 -
 17
17 -
 18
18 -
 19
19 -
 20
20 -
 21
21 -
 22
22 -
23
-
24
-
25
-
26
-
27
-
28
-
29
-
30
-
31
-
32
-
33
-
34
-
35
-
36
-
37
-
38
-
39
-
40
-
41
-
42
-
43
-
44
-
45
-
46
-
47
-
48
-
49
-
50
-
51
-
52
-
53
-
54
-
55
-
56
-
57
-
58
-
59
-
60
-
61
-
62
-
63
-
64
-
65
-
66
-
67
-
68
-
69
-
70
-
71
-
72
 |
 |
