Epson Expression 1680 Special Edition User Manual (w/EPSON Scan software) - Page 20
option. Click, to see more options, then choose a Level
 |
View all Epson Expression 1680 Special Edition manuals
Add to My Manuals
Save this manual to your list of manuals |
Page 20 highlights
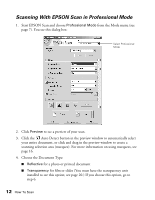
4. Use the Adjustment settings to modify your image as necessary. (You may have to use the scroll bar to see these options.) Auto Adjust - Click this button to let the software detect and analyze the image with the document settings you've specified to determine the optimum settings for your scan. Histogram Adjustment - Click this button to adjust the highlight, shadow, and gamma input levels. Tone Correction - Click this button to choose a preset tone curve for specific effects or to change the tone curve manually. Image Adjustment - Click this button to adjust the color balance, saturation, brightness, and contrast settings. For any of the setting windows above, you can click Reset to go back to the default settings for your image. See the EPSON Scan on-screen help for more information about the Adjustment options. 5. If you want to sharpen the image, select the Unsharp Mask Filter option. Click to see more options, then choose a Level to reduce or increase the effect. 6. Select the Descreening Filter option to reduce the moiré patterns in the image. To specify the source image you are scanning, click to see more options, then choose the closest option to your source document in the Screen Ruling menu. (You may have to use the scroll bar to see this menu.) 14 How To Scan
-
 1
1 -
2
-
3
-
4
-
5
-
6
-
7
-
8
-
9
-
10
-
11
-
12
-
13
-
14
-
 15
15 -
 16
16 -
 17
17 -
 18
18 -
 19
19 -
 20
20 -
 21
21 -
 22
22 -
 23
23 -
 24
24 -
 25
25 -
26
-
27
-
28
-
29
-
30
-
31
-
32
-
33
-
34
-
35
-
36
-
37
-
38
-
39
-
40
-
41
-
42
-
43
-
44
-
45
-
46
-
47
-
48
-
49
-
50
-
51
-
52
-
53
-
54
-
55
-
56
-
57
-
58
-
59
-
60
-
61
-
62
-
63
-
64
-
65
-
66
-
67
-
68
-
69
-
70
-
71
-
72
 |
 |
