Epson Expression 1680 Special Edition User Manual (w/EPSON Scan software) - Page 19
Using Professional Mode To Customize Your Scan, Choose the Auto Exposure Type
 |
View all Epson Expression 1680 Special Edition manuals
Add to My Manuals
Save this manual to your list of manuals |
Page 19 highlights
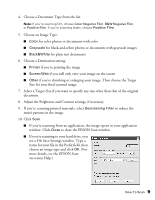
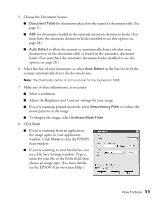
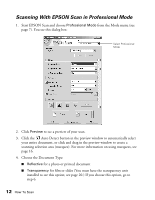
Note: The Document Type you select determines which options appear in the EPSON Scan dialog box. 5. If you chose Reflective as the Document Type, do the following: ■ Choose the Document Source: Document Table, or ADF for documents loaded in the optional automatic document feeder (see page 28). ■ Choose the Auto Exposure Type: Photo to optimize exposure for photos, or Document to optimize exposure for printed material. 6. If you chose Transparency as the Document Type, choose the Film Type: Positive Film (for slides and some film), Color Negative Film, or B&W Negative Film. 7. Either click Scan to complete your scan, or continue with the instructions in the next section to fine-tune it. Using Professional Mode To Customize Your Scan 1. Choose a color depth setting from the Image Type menu: ■ 48-bit Color ■ 24-bit Color ■ Color Smoothing ■ 16-bit Grayscale ■ 8-bit Grayscale ■ Halftone ■ Black & White Note: If you choose 48-bit Color, make sure your application supports 48-bit image files. Click to see more options, then choose Best or Draft for the Scanning Quality setting. 2. Choose a resolution setting (50 to 12800 dpi). 3. If you want to specify a Target Size for your scanned image other than the original size, select a size from the pull-down menu. You can also click to see more options, then type in the width and height, or scale the image with a percentage. If Trimming is set to On, your image is cropped to fit your specified size. If it is Off, your image is sized to fit you specified size as closely as possible. How To Scan 13
-
 1
1 -
2
-
3
-
4
-
5
-
6
-
7
-
8
-
9
-
10
-
11
-
12
-
13
-
 14
14 -
 15
15 -
 16
16 -
 17
17 -
 18
18 -
 19
19 -
 20
20 -
 21
21 -
 22
22 -
 23
23 -
 24
24 -
25
-
26
-
27
-
28
-
29
-
30
-
31
-
32
-
33
-
34
-
35
-
36
-
37
-
38
-
39
-
40
-
41
-
42
-
43
-
44
-
45
-
46
-
47
-
48
-
49
-
50
-
51
-
52
-
53
-
54
-
55
-
56
-
57
-
58
-
59
-
60
-
61
-
62
-
63
-
64
-
65
-
66
-
67
-
68
-
69
-
70
-
71
-
72
 |
 |