Epson Expression 1680 Special Edition User Manual (w/EPSON Scan software) - Page 28
See Using EPSON Scan on connector
 |
View all Epson Expression 1680 Special Edition manuals
Add to My Manuals
Save this manual to your list of manuals |
Page 28 highlights
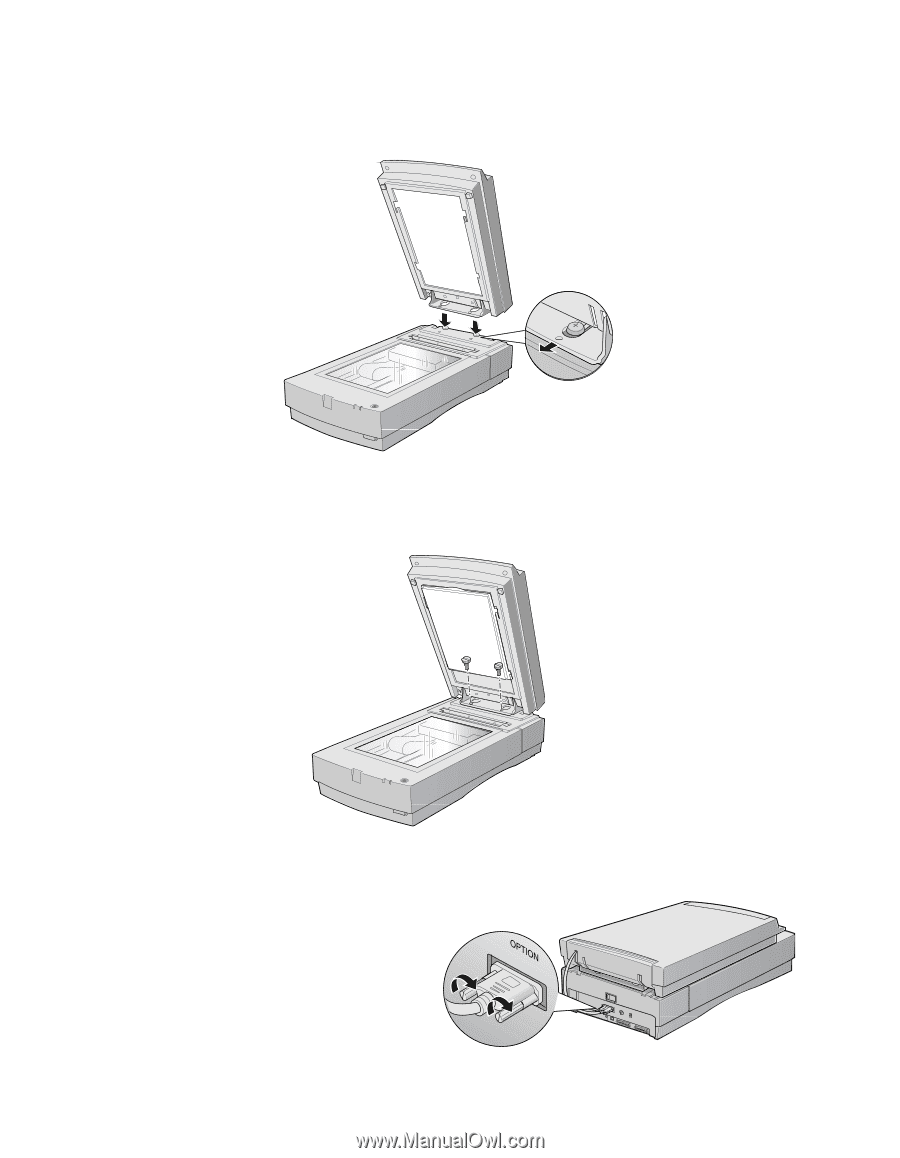
5. Slide the transparency unit forward slightly until the two holes in front of these slots are aligned with the screw holes at the back of the scanner. 6. Insert the two installation screws that came with the transparency unit into the screw holes, then tighten the screws with a coin. 7. Gently close the transparency unit. 8. Connect the transparency unit cable to the OPTION connector at the back of the scanner. Tighten the attached screws. See "Using EPSON Scan" on page 6 for scanning instructions. 22 Using Optional Equipment
-
 1
1 -
2
-
3
-
4
-
5
-
6
-
7
-
8
-
9
-
10
-
11
-
12
-
13
-
14
-
15
-
16
-
17
-
18
-
19
-
20
-
21
-
22
-
 23
23 -
 24
24 -
 25
25 -
 26
26 -
 27
27 -
 28
28 -
 29
29 -
 30
30 -
 31
31 -
 32
32 -
 33
33 -
34
-
35
-
36
-
37
-
38
-
39
-
40
-
41
-
42
-
43
-
44
-
45
-
46
-
47
-
48
-
49
-
50
-
51
-
52
-
53
-
54
-
55
-
56
-
57
-
58
-
59
-
60
-
61
-
62
-
63
-
64
-
65
-
66
-
67
-
68
-
69
-
70
-
71
-
72
 |
 |
22
Using Optional Equipment
5.
Slide the transparency unit forward slightly until the two holes in front of these
slots are aligned with the screw holes at the back of the scanner.
6.
Insert the two installation screws that came with the transparency unit into the
screw holes, then tighten the screws with a coin.
7.
Gently close the transparency unit.
8.
Connect the transparency unit
cable to the
OPTION
connector at
the back of the scanner. Tighten
the attached screws.
See “Using EPSON Scan” on page 6
for scanning instructions.