Epson Expression 1680 Special Edition User Manual (w/EPSON Scan software) - Page 22
Selecting the Scanning Area in the Preview Window, Auto Detect button.
 |
View all Epson Expression 1680 Special Edition manuals
Add to My Manuals
Save this manual to your list of manuals |
Page 22 highlights
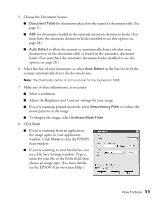
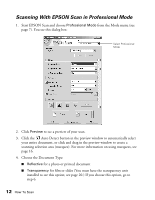
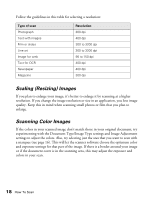
Selecting the Scanning Area in the Preview Window The preview window lets you select the area of your image that you want to scan with a marquee (a frame that you draw around the previewed image). You can create up to 50 marquees at one time. The currently selected marquee has a moving, dotted line. EPSON Scan adjusts the image quality settings to optimize each selected area. Duplicate button Delete button Auto Detect button Number of marquees Focus - click to change the scanner's focus setting Densitometer - click to view a pixel-level preview of the image Currently selected marquee ■ To automatically create a marquee around the entire image (and cut out the document table area) click the Auto Detect button. ■ To select the area to scan, click and drag in the preview window. A marquee appears around the selection. ■ To move the marquee, move the cursor to its center. When the cursor turns to a hand symbol, click and drag the marquee to a new position. ■ To resize the marquee, move the cursor to an edge or corner of the dotted line. When the cursor turns into an arrow symbol, click and drag to resize the selection area. 16 How To Scan
-
 1
1 -
2
-
3
-
4
-
5
-
6
-
7
-
8
-
9
-
10
-
11
-
12
-
13
-
14
-
15
-
16
-
 17
17 -
 18
18 -
 19
19 -
 20
20 -
 21
21 -
 22
22 -
 23
23 -
 24
24 -
 25
25 -
 26
26 -
 27
27 -
28
-
29
-
30
-
31
-
32
-
33
-
34
-
35
-
36
-
37
-
38
-
39
-
40
-
41
-
42
-
43
-
44
-
45
-
46
-
47
-
48
-
49
-
50
-
51
-
52
-
53
-
54
-
55
-
56
-
57
-
58
-
59
-
60
-
61
-
62
-
63
-
64
-
65
-
66
-
67
-
68
-
69
-
70
-
71
-
72
 |
 |
