HP 1200 Service Manual - Page 161
Troubleshooting tools, Internal reports
 |
UPC - 637836445790
View all HP 1200 manuals
Add to My Manuals
Save this manual to your list of manuals |
Page 161 highlights
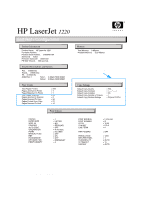
Troubleshooting tools Note Internal reports Use the control panel to print self-test pages, which show the print settings. To print a self-test page 1 When the printer is in the ready state, press the GO button. 2 A self-test page will print. Information found on the self-test page The self-test page has the following fields: Product Information, Memory, Installed Personalities and Options, Print Settings, and Page Counts (including pages jammed in printer, pages mispicked in printer, and total pages printed). If the optional copier/scanner is installed, the self-test page has a Copy Settings field, and it has additional page count information (pages jammed in scanner, pages scanned to copy, pages printed from copy, and pages scanned to host). To view a sample self-test page, see figure 80 on page 160. To print a continuous self-test page 1 Turn the printer off. 2 Press and hold the GO button. 3 Turn the printer on and continue to hold the GO button for approximately 5 seconds. Do not hold the GO button for more than 15 seconds, or you might initialize NVRAM. During this process the Attention LED will turn on. If the Ready LED also turns on before you release the GO button, you must start again with step 1. 4 Release the GO button, and the printer LEDs will begin cycling and will run until the printer is in the ready state. To stop a continuous self-test page Press the GO button. EN Troubleshooting tools 159
-
 1
1 -
2
-
3
-
4
-
5
-
6
-
7
-
8
-
9
-
10
-
11
-
12
-
13
-
14
-
15
-
16
-
17
-
18
-
19
-
20
-
21
-
22
-
23
-
24
-
25
-
26
-
27
-
28
-
29
-
30
-
31
-
32
-
33
-
34
-
35
-
36
-
37
-
38
-
39
-
40
-
41
-
42
-
43
-
44
-
45
-
46
-
47
-
48
-
49
-
50
-
51
-
52
-
53
-
54
-
55
-
56
-
57
-
58
-
59
-
60
-
61
-
62
-
63
-
64
-
65
-
66
-
67
-
68
-
69
-
70
-
71
-
72
-
73
-
74
-
75
-
76
-
77
-
78
-
79
-
80
-
81
-
82
-
83
-
84
-
85
-
86
-
87
-
88
-
89
-
90
-
91
-
92
-
93
-
94
-
95
-
96
-
97
-
98
-
99
-
100
-
101
-
102
-
103
-
104
-
105
-
106
-
107
-
108
-
109
-
110
-
111
-
112
-
113
-
114
-
115
-
116
-
117
-
118
-
119
-
120
-
121
-
122
-
123
-
124
-
125
-
126
-
127
-
128
-
129
-
130
-
131
-
132
-
133
-
134
-
135
-
136
-
137
-
138
-
139
-
140
-
141
-
142
-
143
-
144
-
145
-
146
-
147
-
148
-
149
-
150
-
151
-
152
-
153
-
154
-
155
-
 156
156 -
 157
157 -
 158
158 -
 159
159 -
 160
160 -
 161
161 -
 162
162 -
 163
163 -
 164
164 -
 165
165 -
 166
166 -
167
-
168
-
169
-
170
-
171
-
172
-
173
-
174
-
175
-
176
-
177
-
178
-
179
-
180
-
181
-
182
-
183
-
184
-
185
-
186
-
187
-
188
-
189
-
190
-
191
-
192
-
193
-
194
-
195
-
196
-
197
-
198
-
199
-
200
-
201
-
202
-
203
-
204
-
205
-
206
-
207
-
208
 |
 |
