HP 1200 Service Manual - Page 93
Toner cartridge door, of the connecting link to release it.
 |
UPC - 637836445790
View all HP 1200 manuals
Add to My Manuals
Save this manual to your list of manuals |
Page 93 highlights
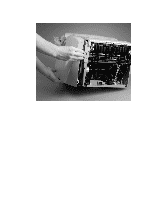
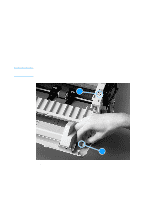
Note Toner cartridge door 1 Remove the left side, back, right side, and top covers (see pages 80 through 87). 2 Remove the control panel assembly (see page 88). 3 Remove the front cover (see page 89). 4 Open the toner cartridge door. 5 Remove one screw (callout 1) from the bracket on the right side of the printer, and remove the bracket. 6 At the right side, press the two small tabs (callout 2) on the inside of the connecting link to release it. 7 Repeat on the left side. After the toner cartridge door is removed, it is easy to remove the two connecting links. 21 2 Figure 35. Removing the toner cartridge door (1 of 2) EN Covers 91
-
 1
1 -
2
-
3
-
4
-
5
-
6
-
7
-
8
-
9
-
10
-
11
-
12
-
13
-
14
-
15
-
16
-
17
-
18
-
19
-
20
-
21
-
22
-
23
-
24
-
25
-
26
-
27
-
28
-
29
-
30
-
31
-
32
-
33
-
34
-
35
-
36
-
37
-
38
-
39
-
40
-
41
-
42
-
43
-
44
-
45
-
46
-
47
-
48
-
49
-
50
-
51
-
52
-
53
-
54
-
55
-
56
-
57
-
58
-
59
-
60
-
61
-
62
-
63
-
64
-
65
-
66
-
67
-
68
-
69
-
70
-
71
-
72
-
73
-
74
-
75
-
76
-
77
-
78
-
79
-
80
-
81
-
82
-
83
-
84
-
85
-
86
-
87
-
 88
88 -
 89
89 -
 90
90 -
 91
91 -
 92
92 -
 93
93 -
 94
94 -
 95
95 -
 96
96 -
 97
97 -
 98
98 -
99
-
100
-
101
-
102
-
103
-
104
-
105
-
106
-
107
-
108
-
109
-
110
-
111
-
112
-
113
-
114
-
115
-
116
-
117
-
118
-
119
-
120
-
121
-
122
-
123
-
124
-
125
-
126
-
127
-
128
-
129
-
130
-
131
-
132
-
133
-
134
-
135
-
136
-
137
-
138
-
139
-
140
-
141
-
142
-
143
-
144
-
145
-
146
-
147
-
148
-
149
-
150
-
151
-
152
-
153
-
154
-
155
-
156
-
157
-
158
-
159
-
160
-
161
-
162
-
163
-
164
-
165
-
166
-
167
-
168
-
169
-
170
-
171
-
172
-
173
-
174
-
175
-
176
-
177
-
178
-
179
-
180
-
181
-
182
-
183
-
184
-
185
-
186
-
187
-
188
-
189
-
190
-
191
-
192
-
193
-
194
-
195
-
196
-
197
-
198
-
199
-
200
-
201
-
202
-
203
-
204
-
205
-
206
-
207
-
208
 |
 |

EN
Covers
91
Toner cartridge door
1
Remove the left side, back, right side, and top covers (see pages
80 through 87).
2
Remove the control panel assembly (see page 88).
3
Remove the front cover (see page 89).
4
Open the toner cartridge door.
5
Remove one screw (callout 1) from the bracket on the right side
of the printer, and remove the bracket.
6
At the right side, press the two small tabs (callout 2) on the inside
of the connecting link to release it.
7
Repeat on the left side.
Note
After the toner cartridge door is removed, it is easy to remove the two
connecting links.
Figure 35.
Removing the toner cartridge door (1 of 2)
2
1
2
2