HP 1200 Service Manual - Page 98
Internal assemblies, Transfer roller
 |
UPC - 637836445790
View all HP 1200 manuals
Add to My Manuals
Save this manual to your list of manuals |
Page 98 highlights
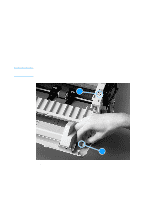
Internal assemblies Transfer roller 1 Open the toner cartridge door and remove the toner cartridge (see page 78). 2 Use needle nose pliers to gently squeeze the two small tabs on the transfer roller. 3 Lift the transfer roller up, slide it to the right, and lift it out of the printer. Figure 40. Note CAUTION Removing the transfer roller Do not misplace the small grounding spring that is underneath the right side of the transfer roller. Do not touch the black sponge portion of the transfer roller. 96 Chapter 5 - Removal and replacement EN
-
 1
1 -
2
-
3
-
4
-
5
-
6
-
7
-
8
-
9
-
10
-
11
-
12
-
13
-
14
-
15
-
16
-
17
-
18
-
19
-
20
-
21
-
22
-
23
-
24
-
25
-
26
-
27
-
28
-
29
-
30
-
31
-
32
-
33
-
34
-
35
-
36
-
37
-
38
-
39
-
40
-
41
-
42
-
43
-
44
-
45
-
46
-
47
-
48
-
49
-
50
-
51
-
52
-
53
-
54
-
55
-
56
-
57
-
58
-
59
-
60
-
61
-
62
-
63
-
64
-
65
-
66
-
67
-
68
-
69
-
70
-
71
-
72
-
73
-
74
-
75
-
76
-
77
-
78
-
79
-
80
-
81
-
82
-
83
-
84
-
85
-
86
-
87
-
88
-
89
-
90
-
91
-
92
-
 93
93 -
 94
94 -
 95
95 -
 96
96 -
 97
97 -
 98
98 -
 99
99 -
 100
100 -
 101
101 -
 102
102 -
 103
103 -
104
-
105
-
106
-
107
-
108
-
109
-
110
-
111
-
112
-
113
-
114
-
115
-
116
-
117
-
118
-
119
-
120
-
121
-
122
-
123
-
124
-
125
-
126
-
127
-
128
-
129
-
130
-
131
-
132
-
133
-
134
-
135
-
136
-
137
-
138
-
139
-
140
-
141
-
142
-
143
-
144
-
145
-
146
-
147
-
148
-
149
-
150
-
151
-
152
-
153
-
154
-
155
-
156
-
157
-
158
-
159
-
160
-
161
-
162
-
163
-
164
-
165
-
166
-
167
-
168
-
169
-
170
-
171
-
172
-
173
-
174
-
175
-
176
-
177
-
178
-
179
-
180
-
181
-
182
-
183
-
184
-
185
-
186
-
187
-
188
-
189
-
190
-
191
-
192
-
193
-
194
-
195
-
196
-
197
-
198
-
199
-
200
-
201
-
202
-
203
-
204
-
205
-
206
-
207
-
208
 |
 |

96
Chapter 5 - Removal and replacement
EN
Internal assemblies
Transfer roller
1
Open the toner cartridge door and remove the toner cartridge
(see page 78).
2
Use needle nose pliers to gently squeeze the two small tabs on
the transfer roller.
3
Lift the transfer roller up, slide it to the right, and lift it out of the
printer.
Figure 40.
Removing the transfer roller
Note
Do not misplace the small grounding spring that is underneath the right
side of the transfer roller.
CAUTION
Do not touch the black sponge portion of the transfer roller.