HP 3700 HP Color LaserJet 3550 and 3700 series - User Guide - Page 191
Registration Event log, MENUS, Con Device, PRINT QUALITY, SET REGISTRATION, Source
 |
UPC - 808736551106
View all HP 3700 manuals
Add to My Manuals
Save this manual to your list of manuals |
Page 191 highlights
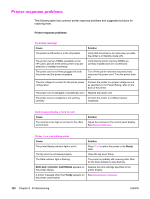
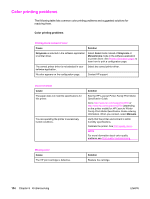
NOTE Registration page The registration page prints a horizontal arrow and a vertical arrow that show how far from center an image can be printed on the page. You can set registration values for a tray to center images on the back and front of a page. Setting the registration also allows edge-toedge printing to be set to within approximately 2 mm (0.08 inch) of all edges of the paper. Image placement varies slightly for each tray. Perform the registration procedure for each tray. 1. Press MENU to enter the MENUS. 2. Press to highlight Configure Device. 3. Press to select Configure Device. 4. Press to highlight PRINT QUALITY. 5. Press to select PRINT QUALITY. 6. Press to highlight SET REGISTRATION. 7. Press to select SET REGISTRATION. You can select a tray by specifying a Source. The default Source is Tray 2. To set the registration for Tray 2, go to step 12. Otherwise, proceed to the next step. 8. Press to highlight Source. 9. Press to select Source. 10. Press or to highlight a tray. 11. Press to select the tray. After selecting the tray, the printer control panel returns to the SET REGISTRATION menu. 12. Press to highlight PRINT TEST PAGE. 13. Press to select PRINT TEST PAGE. 14. Follow the instructions on the printed page. Event log The event log lists the printer events, including printer jams, service errors, and other printer conditions. 1. Press MENU to enter the MENUS. 2. Press to highlight DIAGNOSTICS. 3. Press to select DIAGNOSTICS. 4. Press to highlight PRINT EVENT LOG. 5. Press to select PRINT EVENT LOG. The message Printing... EVENT LOG appears on the display until the printer finishes printing the event log. The printer returns to the Ready state after printing the event log. ENWW Troubleshooting information pages 179
-
 1
1 -
2
-
3
-
4
-
5
-
6
-
7
-
8
-
9
-
10
-
11
-
12
-
13
-
14
-
15
-
16
-
17
-
18
-
19
-
20
-
21
-
22
-
23
-
24
-
25
-
26
-
27
-
28
-
29
-
30
-
31
-
32
-
33
-
34
-
35
-
36
-
37
-
38
-
39
-
40
-
41
-
42
-
43
-
44
-
45
-
46
-
47
-
48
-
49
-
50
-
51
-
52
-
53
-
54
-
55
-
56
-
57
-
58
-
59
-
60
-
61
-
62
-
63
-
64
-
65
-
66
-
67
-
68
-
69
-
70
-
71
-
72
-
73
-
74
-
75
-
76
-
77
-
78
-
79
-
80
-
81
-
82
-
83
-
84
-
85
-
86
-
87
-
88
-
89
-
90
-
91
-
92
-
93
-
94
-
95
-
96
-
97
-
98
-
99
-
100
-
101
-
102
-
103
-
104
-
105
-
106
-
107
-
108
-
109
-
110
-
111
-
112
-
113
-
114
-
115
-
116
-
117
-
118
-
119
-
120
-
121
-
122
-
123
-
124
-
125
-
126
-
127
-
128
-
129
-
130
-
131
-
132
-
133
-
134
-
135
-
136
-
137
-
138
-
139
-
140
-
141
-
142
-
143
-
144
-
145
-
146
-
147
-
148
-
149
-
150
-
151
-
152
-
153
-
154
-
155
-
156
-
157
-
158
-
159
-
160
-
161
-
162
-
163
-
164
-
165
-
166
-
167
-
168
-
169
-
170
-
171
-
172
-
173
-
174
-
175
-
176
-
177
-
178
-
179
-
180
-
181
-
182
-
183
-
184
-
185
-
 186
186 -
 187
187 -
 188
188 -
 189
189 -
 190
190 -
 191
191 -
 192
192 -
 193
193 -
 194
194 -
 195
195 -
 196
196 -
197
-
198
-
199
-
200
-
201
-
202
-
203
-
204
-
205
-
206
-
207
-
208
-
209
-
210
-
211
-
212
-
213
-
214
-
215
-
216
-
217
-
218
-
219
-
220
-
221
-
222
-
223
-
224
-
225
-
226
-
227
-
228
-
229
-
230
-
231
-
232
-
233
-
234
-
235
-
236
-
237
-
238
-
239
-
240
-
241
-
242
-
243
-
244
-
245
-
246
-
247
-
248
-
249
-
250
 |
 |