HP 3700 HP Color LaserJet 3550 and 3700 series - User Guide - Page 237
Checking DIMM installation, To enable fonts from the PCL 6 printer driver for Windows
 |
UPC - 808736551106
View all HP 3700 manuals
Add to My Manuals
Save this manual to your list of manuals |
Page 237 highlights
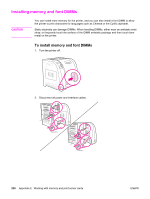
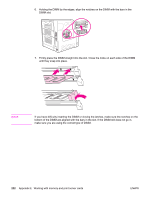
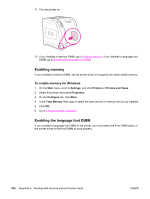
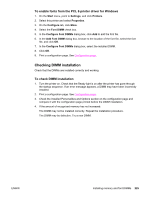
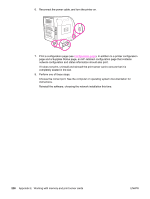
To enable fonts from the PCL 6 printer driver for Windows 1. On the Start menu, point to Settings, and click Printers. 2. Select this printer and select Properties. 3. On the Configure tab, click More. 4. Select the Font DIMM check box. 5. In the Configure Font DIMMs dialog box, click Add to add the font file. 6. In the Add Font DIMM dialog box, browse to the location of the font file, select the font file, and click OK. 7. In the Configure Font DIMMs dialog box, select the installed DIMM. 8. Click OK. 9. Print a configuration page. See Configuration page. Checking DIMM installation Check that the DIMMs are installed correctly and working. To check DIMM installation 1. Turn the printer on. Check that the Ready light is on after the printer has gone through the startup sequence. If an error message appears, a DIMM may have been incorrectly installed. 2. Print a configuration page. See Configuration page. 3. Check the Installed Personalities and Options section on the configuration page and compare it with the configuration page printed before the DIMM installation. 4. If the amount of recognized memory has not increased: The DIMM may not be installed correctly. Repeat the installation procedure. The DIMM may be defective. Try a new DIMM. ENWW Installing memory and font DIMMs 225
-
 1
1 -
2
-
3
-
4
-
5
-
6
-
7
-
8
-
9
-
10
-
11
-
12
-
13
-
14
-
15
-
16
-
17
-
18
-
19
-
20
-
21
-
22
-
23
-
24
-
25
-
26
-
27
-
28
-
29
-
30
-
31
-
32
-
33
-
34
-
35
-
36
-
37
-
38
-
39
-
40
-
41
-
42
-
43
-
44
-
45
-
46
-
47
-
48
-
49
-
50
-
51
-
52
-
53
-
54
-
55
-
56
-
57
-
58
-
59
-
60
-
61
-
62
-
63
-
64
-
65
-
66
-
67
-
68
-
69
-
70
-
71
-
72
-
73
-
74
-
75
-
76
-
77
-
78
-
79
-
80
-
81
-
82
-
83
-
84
-
85
-
86
-
87
-
88
-
89
-
90
-
91
-
92
-
93
-
94
-
95
-
96
-
97
-
98
-
99
-
100
-
101
-
102
-
103
-
104
-
105
-
106
-
107
-
108
-
109
-
110
-
111
-
112
-
113
-
114
-
115
-
116
-
117
-
118
-
119
-
120
-
121
-
122
-
123
-
124
-
125
-
126
-
127
-
128
-
129
-
130
-
131
-
132
-
133
-
134
-
135
-
136
-
137
-
138
-
139
-
140
-
141
-
142
-
143
-
144
-
145
-
146
-
147
-
148
-
149
-
150
-
151
-
152
-
153
-
154
-
155
-
156
-
157
-
158
-
159
-
160
-
161
-
162
-
163
-
164
-
165
-
166
-
167
-
168
-
169
-
170
-
171
-
172
-
173
-
174
-
175
-
176
-
177
-
178
-
179
-
180
-
181
-
182
-
183
-
184
-
185
-
186
-
187
-
188
-
189
-
190
-
191
-
192
-
193
-
194
-
195
-
196
-
197
-
198
-
199
-
200
-
201
-
202
-
203
-
204
-
205
-
206
-
207
-
208
-
209
-
210
-
211
-
212
-
213
-
214
-
215
-
216
-
217
-
218
-
219
-
220
-
221
-
222
-
223
-
224
-
225
-
226
-
227
-
228
-
229
-
230
-
231
-
 232
232 -
 233
233 -
 234
234 -
 235
235 -
 236
236 -
 237
237 -
 238
238 -
 239
239 -
 240
240 -
 241
241 -
 242
242 -
243
-
244
-
245
-
246
-
247
-
248
-
249
-
250
 |
 |