HP 3700 HP Color LaserJet 3550 and 3700 series - User Guide - Page 85
Printing envelopes, Print
 |
UPC - 808736551106
View all HP 3700 manuals
Add to My Manuals
Save this manual to your list of manuals |
Page 85 highlights
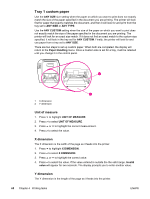
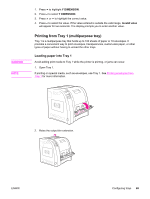
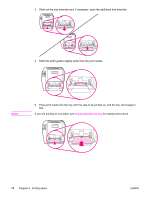
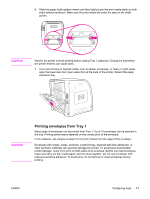
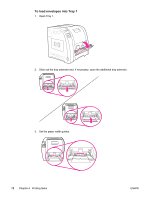
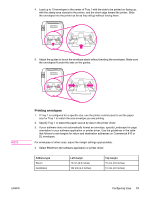
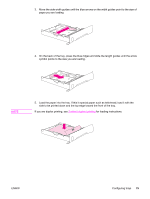
4. Load up to 10 envelopes in the center of Tray 1 with the side to be printed on facing up, with the stamp area closest to the printer, and the short edge toward the printer. Slide the envelopes into the printer as far as they will go without forcing them. ? 5. Adjust the guides to touch the envelope stack without bending the envelopes. Make sure the envelopes fit under the tabs on the guides. ? NOTE Printing envelopes 1. If Tray 1 is configured for a specific size, use the printer control panel to set the paper size for Tray 1 to match the size envelope you are printing. 2. Specify Tray 1 or select the paper source by size in the printer driver. 3. If your software does not automatically format an envelope, specify Landscape for page orientation in your software application or printer driver. Use the guidelines in the table that follows to set margins for return and destination addresses on Commercial #10 or DL envelopes. For envelopes of other sizes, adjust the margin settings appropriately. 4. Select Print from the software application or printer driver. Address type Return Destination Left margin 15 mm (0.6 inches) 102 mm (4.0 inches) Top margin 15 mm (0.6 inches) 51 mm (2.0 inches) ENWW Configuring trays 73
-
 1
1 -
2
-
3
-
4
-
5
-
6
-
7
-
8
-
9
-
10
-
11
-
12
-
13
-
14
-
15
-
16
-
17
-
18
-
19
-
20
-
21
-
22
-
23
-
24
-
25
-
26
-
27
-
28
-
29
-
30
-
31
-
32
-
33
-
34
-
35
-
36
-
37
-
38
-
39
-
40
-
41
-
42
-
43
-
44
-
45
-
46
-
47
-
48
-
49
-
50
-
51
-
52
-
53
-
54
-
55
-
56
-
57
-
58
-
59
-
60
-
61
-
62
-
63
-
64
-
65
-
66
-
67
-
68
-
69
-
70
-
71
-
72
-
73
-
74
-
75
-
76
-
77
-
78
-
79
-
 80
80 -
 81
81 -
 82
82 -
 83
83 -
 84
84 -
 85
85 -
 86
86 -
 87
87 -
 88
88 -
 89
89 -
 90
90 -
91
-
92
-
93
-
94
-
95
-
96
-
97
-
98
-
99
-
100
-
101
-
102
-
103
-
104
-
105
-
106
-
107
-
108
-
109
-
110
-
111
-
112
-
113
-
114
-
115
-
116
-
117
-
118
-
119
-
120
-
121
-
122
-
123
-
124
-
125
-
126
-
127
-
128
-
129
-
130
-
131
-
132
-
133
-
134
-
135
-
136
-
137
-
138
-
139
-
140
-
141
-
142
-
143
-
144
-
145
-
146
-
147
-
148
-
149
-
150
-
151
-
152
-
153
-
154
-
155
-
156
-
157
-
158
-
159
-
160
-
161
-
162
-
163
-
164
-
165
-
166
-
167
-
168
-
169
-
170
-
171
-
172
-
173
-
174
-
175
-
176
-
177
-
178
-
179
-
180
-
181
-
182
-
183
-
184
-
185
-
186
-
187
-
188
-
189
-
190
-
191
-
192
-
193
-
194
-
195
-
196
-
197
-
198
-
199
-
200
-
201
-
202
-
203
-
204
-
205
-
206
-
207
-
208
-
209
-
210
-
211
-
212
-
213
-
214
-
215
-
216
-
217
-
218
-
219
-
220
-
221
-
222
-
223
-
224
-
225
-
226
-
227
-
228
-
229
-
230
-
231
-
232
-
233
-
234
-
235
-
236
-
237
-
238
-
239
-
240
-
241
-
242
-
243
-
244
-
245
-
246
-
247
-
248
-
249
-
250
 |
 |
