HP 450c HP DesignJet 430, 450C, and 455CA Printer - User's Guide - Page 116
straight to step 5.
 |
View all HP 450c manuals
Add to My Manuals
Save this manual to your list of manuals |
Page 116 highlights
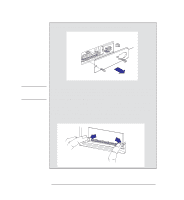
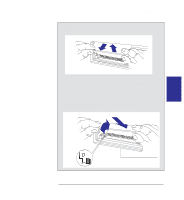
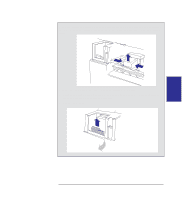
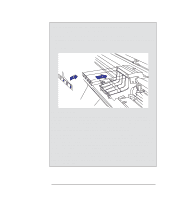
430 Reconfiguring your printer To upgrade the HP DesignJet 430 with color 2 Unscrew the cover plate at the back of the printer, and remove it. CAUTION Before handling a memory module, either put on a grounding wrist strap and attach the end to the metal chassis of the printer, or touch the outer metal surface of the printer with your hand. Otherwise, static electricity from your body could damage the memory module. 3 There are two slots for SIMMs in the printer. The SIMM containing the upgrade goes in the slot furthest from you. If both slots are free, skip this step and go straight to step 5. If the slot nearest to you already contains a SIMM (a memory module), then you must first remove it, in order to access the other slot. a Gently push aside the two clips that hold the memory module in place. 6-6
-
 1
1 -
2
-
3
-
4
-
5
-
6
-
7
-
8
-
9
-
10
-
11
-
12
-
13
-
14
-
15
-
16
-
17
-
18
-
19
-
20
-
21
-
22
-
23
-
24
-
25
-
26
-
27
-
28
-
29
-
30
-
31
-
32
-
33
-
34
-
35
-
36
-
37
-
38
-
39
-
40
-
41
-
42
-
43
-
44
-
45
-
46
-
47
-
48
-
49
-
50
-
51
-
52
-
53
-
54
-
55
-
56
-
57
-
58
-
59
-
60
-
61
-
62
-
63
-
64
-
65
-
66
-
67
-
68
-
69
-
70
-
71
-
72
-
73
-
74
-
75
-
76
-
77
-
78
-
79
-
80
-
81
-
82
-
83
-
84
-
85
-
86
-
87
-
88
-
89
-
90
-
91
-
92
-
93
-
94
-
95
-
96
-
97
-
98
-
99
-
100
-
101
-
102
-
103
-
104
-
105
-
106
-
107
-
108
-
109
-
110
-
 111
111 -
 112
112 -
 113
113 -
 114
114 -
 115
115 -
 116
116 -
 117
117 -
 118
118 -
 119
119 -
 120
120 -
 121
121 -
122
-
123
-
124
-
125
-
126
-
127
-
128
-
129
-
130
-
131
-
132
-
133
-
134
-
135
-
136
-
137
-
138
-
139
-
140
-
141
-
142
-
143
-
144
-
145
-
146
-
147
-
148
-
149
-
150
-
151
-
152
-
153
-
154
-
155
-
156
-
157
-
158
-
159
-
160
-
161
-
162
-
163
-
164
-
165
-
166
-
167
-
168
-
169
-
170
-
171
-
172
-
173
-
174
-
175
-
176
-
177
-
178
-
179
-
180
-
181
-
182
-
183
-
184
-
185
-
186
-
187
-
188
-
189
-
190
-
191
-
192
-
193
-
194
-
195
-
196
 |
 |
