HP 450c HP DesignJet 430, 450C, and 455CA Printer - User's Guide - Page 82
Settings, Use settings from tables below, Width, Color/Grayscale, Available options, Grayscale, Use - designjet windows 7 driver
 |
View all HP 450c manuals
Add to My Manuals
Save this manual to your list of manuals |
Page 82 highlights
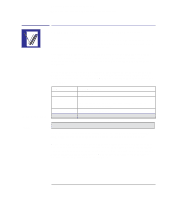
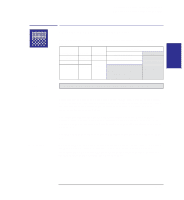
Controlling your print's appearance Changing the printer's logical pen characteristics Changing the printer's logical pen characteristics The characteristics of the printer's logical pens, referenced by your software, can be set either by software or by the settings for pens 1 through 8 in the Setup Sheet. The default is to use settings from the software. Sometimes you may, for example, want to produce a set of drawings all with the same pen settings, but without having to change the software settings for the individual drawings. In this case you can choose to provide the pen settings from the printer. If you want to provide your own settings in the printer and use those, use the Pen Settings section in the Setup Sheet and select Use settings from tables below. Using this option, you can specify the Width and Color/Grayscale of logical pens 1 through 8. Item Pens Width (mm) Grayscale (%) 450C/455CA Color Available options 1 through 8. 0.13, 0.18, 0.25, 0.35, 0.50, 0.70, 1.00 Note that 0.13 mm is a one-pixel line width and renders some colors as a dot pattern. 100, 80, 60, 40, 20, 10, 5 Black, Red, Green, Yellow, Blue, Magenta, Cyan 430 For the HP DesignJet 430, only pen Width and Grayscale are available. Once you have chosen your pen settings, you can change back to Use settings from software and your settings will be saved for future use if you require. Note. If you want to produce black and white drawings instead of grayscale, then, unless your driver has an option for this, choose Use settings from tables below and set all 8 pens to Black/100% Grayscale. If you are using one of the Windows drivers supplied with the printer, you must set this in the driver since the driver overrides the Pen Settings in the Setup Sheet. 3-12
-
 1
1 -
2
-
3
-
4
-
5
-
6
-
7
-
8
-
9
-
10
-
11
-
12
-
13
-
14
-
15
-
16
-
17
-
18
-
19
-
20
-
21
-
22
-
23
-
24
-
25
-
26
-
27
-
28
-
29
-
30
-
31
-
32
-
33
-
34
-
35
-
36
-
37
-
38
-
39
-
40
-
41
-
42
-
43
-
44
-
45
-
46
-
47
-
48
-
49
-
50
-
51
-
52
-
53
-
54
-
55
-
56
-
57
-
58
-
59
-
60
-
61
-
62
-
63
-
64
-
65
-
66
-
67
-
68
-
69
-
70
-
71
-
72
-
73
-
74
-
75
-
76
-
 77
77 -
 78
78 -
 79
79 -
 80
80 -
 81
81 -
 82
82 -
 83
83 -
 84
84 -
 85
85 -
 86
86 -
 87
87 -
88
-
89
-
90
-
91
-
92
-
93
-
94
-
95
-
96
-
97
-
98
-
99
-
100
-
101
-
102
-
103
-
104
-
105
-
106
-
107
-
108
-
109
-
110
-
111
-
112
-
113
-
114
-
115
-
116
-
117
-
118
-
119
-
120
-
121
-
122
-
123
-
124
-
125
-
126
-
127
-
128
-
129
-
130
-
131
-
132
-
133
-
134
-
135
-
136
-
137
-
138
-
139
-
140
-
141
-
142
-
143
-
144
-
145
-
146
-
147
-
148
-
149
-
150
-
151
-
152
-
153
-
154
-
155
-
156
-
157
-
158
-
159
-
160
-
161
-
162
-
163
-
164
-
165
-
166
-
167
-
168
-
169
-
170
-
171
-
172
-
173
-
174
-
175
-
176
-
177
-
178
-
179
-
180
-
181
-
182
-
183
-
184
-
185
-
186
-
187
-
188
-
189
-
190
-
191
-
192
-
193
-
194
-
195
-
196
 |
 |