HP A4500A Hardware Manual - rp24xx, Customer Viewable - Page 75
Step 1., Callout, Metal brackets
 |
View all HP A4500A manuals
Add to My Manuals
Save this manual to your list of manuals |
Page 75 highlights
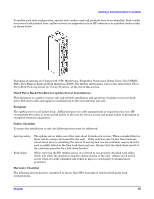
Installing a Stand-alone Server in a Cabinet Callout # 2 Metal brackets 3 Plastic end caps Item Once the rail kit has been installed and the server is positioned in the cabinet, follow the procedure listed below to attach the brackets and end caps: Step 1. Extend the server between four and six inches out of the cabinet to allow room to work. Step 2. Attach the metal brackets to each end of the bezel with two plastic retainers, as shown in the following graphic. Chapter 83
-
 1
1 -
2
-
3
-
4
-
5
-
6
-
7
-
8
-
9
-
10
-
11
-
12
-
13
-
14
-
15
-
16
-
17
-
18
-
19
-
20
-
21
-
22
-
23
-
24
-
25
-
26
-
27
-
28
-
29
-
30
-
31
-
32
-
33
-
34
-
35
-
36
-
37
-
38
-
39
-
40
-
41
-
42
-
43
-
44
-
45
-
46
-
47
-
48
-
49
-
50
-
51
-
52
-
53
-
54
-
55
-
56
-
57
-
58
-
59
-
60
-
61
-
62
-
63
-
64
-
65
-
66
-
67
-
68
-
69
-
 70
70 -
 71
71 -
 72
72 -
 73
73 -
 74
74 -
 75
75 -
 76
76 -
 77
77 -
 78
78 -
 79
79 -
 80
80 -
81
-
82
-
83
-
84
-
85
-
86
-
87
-
88
-
89
-
90
-
91
-
92
-
93
-
94
-
95
-
96
-
97
-
98
-
99
-
100
-
101
-
102
-
103
-
104
-
105
-
106
-
107
-
108
-
109
-
110
-
111
-
112
-
113
-
114
-
115
-
116
-
117
-
118
-
119
-
120
-
121
-
122
-
123
-
124
-
125
-
126
-
127
-
128
-
129
-
130
-
131
-
132
-
133
-
134
-
135
-
136
-
137
-
138
-
139
-
140
-
141
-
142
-
143
-
144
-
145
-
146
-
147
-
148
-
149
-
150
-
151
-
152
-
153
-
154
-
155
-
156
-
157
-
158
-
159
-
160
-
161
-
162
-
163
-
164
-
165
-
166
-
167
-
168
-
169
-
170
-
171
-
172
-
173
-
174
-
175
-
176
-
177
-
178
-
179
-
180
-
181
-
182
-
183
-
184
-
185
-
186
-
187
-
188
-
189
-
190
-
191
-
192
-
193
-
194
-
195
-
196
-
197
-
198
-
199
-
200
-
201
-
202
 |
 |

Chapter
Installing a Stand-alone Server in a Cabinet
83
Once the rail kit has been installed and the server is positioned in the cabinet, follow the procedure listed
below to attach the brackets and end caps:
Step 1.
Extend the server between four and six inches out of the cabinet to allow room to work.
Step 2.
Attach the metal brackets to each end of the bezel with two plastic retainers, as shown in the
following graphic.
2
Metal brackets
3
Plastic end caps
Callout #
Item