HP A4500A Hardware Manual - rp24xx, Customer Viewable - Page 86
It will only support the weight of the server chassis in an emergency.
 |
View all HP A4500A manuals
Add to My Manuals
Save this manual to your list of manuals |
Page 86 highlights
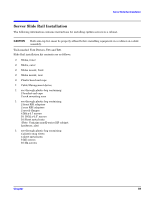
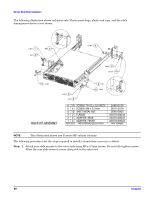
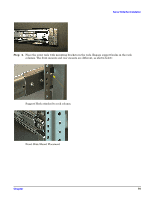
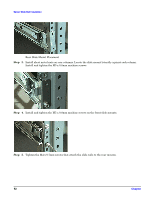
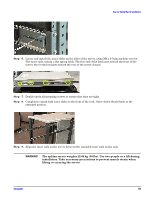
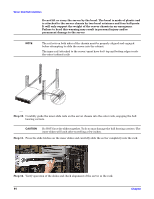
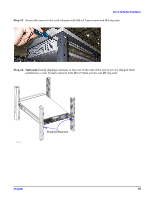
Server Slide Rail Installation Do not lift or carry the server by the bezel. The bezel is made of plastic and is attached to the server chassis by two bezel retainers and four ball-posts. It will only support the weight of the server chassis in an emergency. Failure to heed this warning may result in personal injury and/or permanent damage to the server NOTE The rail sets on both sides of the chassis must be properly aligned and engaged before attempting to slide the server into the cabinet. The inner rail (attached to the server) must have both top and bottom edges inside the outer (cabinet) rails ccrr014 Step 10. Carefully guide the inner slide rails on the server chassis into the outer rails, engaging the ball bearing carriers. CAUTION Do NOT force the slides together. To do so may damage the ball bearing carriers. The inner slides will latch after travelling a few inches. Step 11. Press the slide latches on the inner slides and carefully slide the server completely into the rack. Step 12. Verify operation of the slides and check alignment of the server in the rack. 94 Chapter
-
 1
1 -
2
-
3
-
4
-
5
-
6
-
7
-
8
-
9
-
10
-
11
-
12
-
13
-
14
-
15
-
16
-
17
-
18
-
19
-
20
-
21
-
22
-
23
-
24
-
25
-
26
-
27
-
28
-
29
-
30
-
31
-
32
-
33
-
34
-
35
-
36
-
37
-
38
-
39
-
40
-
41
-
42
-
43
-
44
-
45
-
46
-
47
-
48
-
49
-
50
-
51
-
52
-
53
-
54
-
55
-
56
-
57
-
58
-
59
-
60
-
61
-
62
-
63
-
64
-
65
-
66
-
67
-
68
-
69
-
70
-
71
-
72
-
73
-
74
-
75
-
76
-
77
-
78
-
79
-
80
-
 81
81 -
 82
82 -
 83
83 -
 84
84 -
 85
85 -
 86
86 -
 87
87 -
 88
88 -
 89
89 -
 90
90 -
 91
91 -
92
-
93
-
94
-
95
-
96
-
97
-
98
-
99
-
100
-
101
-
102
-
103
-
104
-
105
-
106
-
107
-
108
-
109
-
110
-
111
-
112
-
113
-
114
-
115
-
116
-
117
-
118
-
119
-
120
-
121
-
122
-
123
-
124
-
125
-
126
-
127
-
128
-
129
-
130
-
131
-
132
-
133
-
134
-
135
-
136
-
137
-
138
-
139
-
140
-
141
-
142
-
143
-
144
-
145
-
146
-
147
-
148
-
149
-
150
-
151
-
152
-
153
-
154
-
155
-
156
-
157
-
158
-
159
-
160
-
161
-
162
-
163
-
164
-
165
-
166
-
167
-
168
-
169
-
170
-
171
-
172
-
173
-
174
-
175
-
176
-
177
-
178
-
179
-
180
-
181
-
182
-
183
-
184
-
185
-
186
-
187
-
188
-
189
-
190
-
191
-
192
-
193
-
194
-
195
-
196
-
197
-
198
-
199
-
200
-
201
-
202
 |
 |
