HP A4500A Hardware Manual - rp24xx, Customer Viewable - Page 76
Installation In Third-Party Racks, Step 3., Overview
 |
View all HP A4500A manuals
Add to My Manuals
Save this manual to your list of manuals |
Page 76 highlights
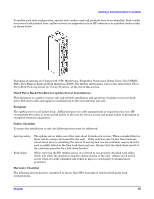
Installing a Stand-alone Server in a Cabinet Step 3. Fit the plastic end caps over the metal brackets as shown below. Step 4. Push the server back into the cabinet until it is flush against the vertical columns. Replace the screws that fasten the server to the rack. Step 5. Attach the bezel to the front of the server. The cabinet-mounted server will now look like the picture shown below. Installation In Third-Party Racks Overview HP has qualified the rack systems of several vendors as suitable for rp24xx server installation. 84 Chapter
-
 1
1 -
2
-
3
-
4
-
5
-
6
-
7
-
8
-
9
-
10
-
11
-
12
-
13
-
14
-
15
-
16
-
17
-
18
-
19
-
20
-
21
-
22
-
23
-
24
-
25
-
26
-
27
-
28
-
29
-
30
-
31
-
32
-
33
-
34
-
35
-
36
-
37
-
38
-
39
-
40
-
41
-
42
-
43
-
44
-
45
-
46
-
47
-
48
-
49
-
50
-
51
-
52
-
53
-
54
-
55
-
56
-
57
-
58
-
59
-
60
-
61
-
62
-
63
-
64
-
65
-
66
-
67
-
68
-
69
-
70
-
 71
71 -
 72
72 -
 73
73 -
 74
74 -
 75
75 -
 76
76 -
 77
77 -
 78
78 -
 79
79 -
 80
80 -
 81
81 -
82
-
83
-
84
-
85
-
86
-
87
-
88
-
89
-
90
-
91
-
92
-
93
-
94
-
95
-
96
-
97
-
98
-
99
-
100
-
101
-
102
-
103
-
104
-
105
-
106
-
107
-
108
-
109
-
110
-
111
-
112
-
113
-
114
-
115
-
116
-
117
-
118
-
119
-
120
-
121
-
122
-
123
-
124
-
125
-
126
-
127
-
128
-
129
-
130
-
131
-
132
-
133
-
134
-
135
-
136
-
137
-
138
-
139
-
140
-
141
-
142
-
143
-
144
-
145
-
146
-
147
-
148
-
149
-
150
-
151
-
152
-
153
-
154
-
155
-
156
-
157
-
158
-
159
-
160
-
161
-
162
-
163
-
164
-
165
-
166
-
167
-
168
-
169
-
170
-
171
-
172
-
173
-
174
-
175
-
176
-
177
-
178
-
179
-
180
-
181
-
182
-
183
-
184
-
185
-
186
-
187
-
188
-
189
-
190
-
191
-
192
-
193
-
194
-
195
-
196
-
197
-
198
-
199
-
200
-
201
-
202
 |
 |

Chapter
Installing a Stand-alone Server in a Cabinet
84
Step 3.
Fit the plastic end caps over the metal brackets as shown below.
Step 4.
Push the server back into the cabinet until it is flush against the vertical columns. Replace the
screws that fasten the server to the rack.
Step 5.
Attach the bezel to the front of the server. The cabinet-mounted server will now look like the
picture shown below.
Installation In Third-Party Racks
Overview
HP has qualified the rack systems of several vendors as suitable for rp24xx server installation.