HP A4500A Hardware Manual - rp24xx, Customer Viewable - Page 89
Cabinet Installation, forward during installation.
 |
View all HP A4500A manuals
Add to My Manuals
Save this manual to your list of manuals |
Page 89 highlights
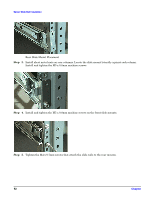
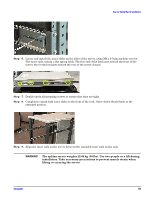
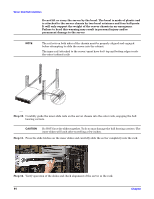
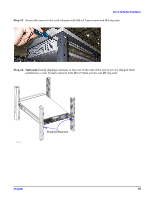
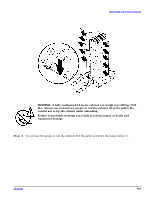
Cabinet Installation Cabinet Installation Installation of a factory-loaded cabinet consists of the following steps: Step 1. Move the cabinet to the installation site. Step 2. Lower the leveling feet. (This will prevent excessive wear on the casters, level the cabinet, and provide stability.) WARNING Extend or install the cabinet stabilizers, located at the bottom of the front of the cabinet, as an additional safeguard against the cabinet toppling forward during installation. Failure to observe this precaution could result in personal injury or death and equipment damage. Step 3. Connect the console and system peripherals to the server(s). NOTE Attaching cables while the rails are extended fully forward will ensure that sufficient slack is available for later maintenance. Step 4. Connect the cabinet power cord to the appropriate wall outlet. Step 5. Be sure all peripherals outside the cabinet are connected to wall outlets. The cabinet/server system assembly is now ready for the power up process. Chapter 97
-
 1
1 -
2
-
3
-
4
-
5
-
6
-
7
-
8
-
9
-
10
-
11
-
12
-
13
-
14
-
15
-
16
-
17
-
18
-
19
-
20
-
21
-
22
-
23
-
24
-
25
-
26
-
27
-
28
-
29
-
30
-
31
-
32
-
33
-
34
-
35
-
36
-
37
-
38
-
39
-
40
-
41
-
42
-
43
-
44
-
45
-
46
-
47
-
48
-
49
-
50
-
51
-
52
-
53
-
54
-
55
-
56
-
57
-
58
-
59
-
60
-
61
-
62
-
63
-
64
-
65
-
66
-
67
-
68
-
69
-
70
-
71
-
72
-
73
-
74
-
75
-
76
-
77
-
78
-
79
-
80
-
81
-
82
-
83
-
 84
84 -
 85
85 -
 86
86 -
 87
87 -
 88
88 -
 89
89 -
 90
90 -
 91
91 -
 92
92 -
 93
93 -
 94
94 -
95
-
96
-
97
-
98
-
99
-
100
-
101
-
102
-
103
-
104
-
105
-
106
-
107
-
108
-
109
-
110
-
111
-
112
-
113
-
114
-
115
-
116
-
117
-
118
-
119
-
120
-
121
-
122
-
123
-
124
-
125
-
126
-
127
-
128
-
129
-
130
-
131
-
132
-
133
-
134
-
135
-
136
-
137
-
138
-
139
-
140
-
141
-
142
-
143
-
144
-
145
-
146
-
147
-
148
-
149
-
150
-
151
-
152
-
153
-
154
-
155
-
156
-
157
-
158
-
159
-
160
-
161
-
162
-
163
-
164
-
165
-
166
-
167
-
168
-
169
-
170
-
171
-
172
-
173
-
174
-
175
-
176
-
177
-
178
-
179
-
180
-
181
-
182
-
183
-
184
-
185
-
186
-
187
-
188
-
189
-
190
-
191
-
192
-
193
-
194
-
195
-
196
-
197
-
198
-
199
-
200
-
201
-
202
 |
 |
