HP Color LaserJet Enterprise CP4525 HP Color LaserJet Enterprise CP4020/CP4520 - Page 184
Remove the new DIMM from the antistatic package. Locate the alignment notch on the bottom, slot
 |
View all HP Color LaserJet Enterprise CP4525 manuals
Add to My Manuals
Save this manual to your list of manuals |
Page 184 highlights
4. Unscrew the thumb screws and then pull the formatter board from the product. Place the formatter board on a clean, flat, grounded surface. 5. To replace a DIMM that is currently installed, spread the latches apart on each side of the DIMM slot, lift the DIMM up at an angle, and pull it out. XOXOXOXOXO XOXOXOXOXO XOXOXOXOXO XOXOXOXOXO XOXXOOXXOOXO XOXOXXOOXOXO XOXOXO XOXOXO XOXOXO XOXOXO XOXOXO XOXOXO XOXOXO XOXOXOXO XOXOXO XOXOXO XOXOXO XOXOXO XOXOXO XOXOXOXOXOXO XOXOXOXOXOXO XOXO XOXOXO 6. Remove the new DIMM from the antistatic package. Locate the alignment notch on the bottom edge of the DIMM. 170 Chapter 9 Manage and maintain ENWW
-
 1
1 -
2
-
3
-
4
-
5
-
6
-
7
-
8
-
9
-
10
-
11
-
12
-
13
-
14
-
15
-
16
-
17
-
18
-
19
-
20
-
21
-
22
-
23
-
24
-
25
-
26
-
27
-
28
-
29
-
30
-
31
-
32
-
33
-
34
-
35
-
36
-
37
-
38
-
39
-
40
-
41
-
42
-
43
-
44
-
45
-
46
-
47
-
48
-
49
-
50
-
51
-
52
-
53
-
54
-
55
-
56
-
57
-
58
-
59
-
60
-
61
-
62
-
63
-
64
-
65
-
66
-
67
-
68
-
69
-
70
-
71
-
72
-
73
-
74
-
75
-
76
-
77
-
78
-
79
-
80
-
81
-
82
-
83
-
84
-
85
-
86
-
87
-
88
-
89
-
90
-
91
-
92
-
93
-
94
-
95
-
96
-
97
-
98
-
99
-
100
-
101
-
102
-
103
-
104
-
105
-
106
-
107
-
108
-
109
-
110
-
111
-
112
-
113
-
114
-
115
-
116
-
117
-
118
-
119
-
120
-
121
-
122
-
123
-
124
-
125
-
126
-
127
-
128
-
129
-
130
-
131
-
132
-
133
-
134
-
135
-
136
-
137
-
138
-
139
-
140
-
141
-
142
-
143
-
144
-
145
-
146
-
147
-
148
-
149
-
150
-
151
-
152
-
153
-
154
-
155
-
156
-
157
-
158
-
159
-
160
-
161
-
162
-
163
-
164
-
165
-
166
-
167
-
168
-
169
-
170
-
171
-
172
-
173
-
174
-
175
-
176
-
177
-
178
-
 179
179 -
 180
180 -
 181
181 -
 182
182 -
 183
183 -
 184
184 -
 185
185 -
 186
186 -
 187
187 -
 188
188 -
 189
189 -
190
-
191
-
192
-
193
-
194
-
195
-
196
-
197
-
198
-
199
-
200
-
201
-
202
-
203
-
204
-
205
-
206
-
207
-
208
-
209
-
210
-
211
-
212
-
213
-
214
-
215
-
216
-
217
-
218
-
219
-
220
-
221
-
222
-
223
-
224
-
225
-
226
-
227
-
228
-
229
-
230
-
231
-
232
-
233
-
234
-
235
-
236
-
237
-
238
-
239
-
240
-
241
-
242
-
243
-
244
-
245
-
246
-
247
-
248
-
249
-
250
-
251
-
252
-
253
-
254
-
255
-
256
-
257
-
258
-
259
-
260
-
261
-
262
-
263
-
264
-
265
-
266
-
267
-
268
-
269
-
270
-
271
-
272
-
273
-
274
-
275
-
276
-
277
-
278
-
279
-
280
-
281
-
282
 |
 |

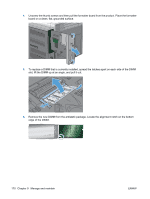
4.
Unscrew the thumb screws and then pull the formatter board from the product. Place the formatter
board on a clean, flat, grounded surface.
5.
To replace a DIMM that is currently installed, spread the latches apart on each side of the DIMM
slot, lift the DIMM up at an angle, and pull it out.
XOXOXO
XOXOXO
XOXOXOXOXOXO
XOXOXOXOXO
XOXOXOXOXO
XOXOXOXOXO
XOXOXOXOXO
XOXOXOXOXOXO
XOXO
XOXOXO
XOXOXO
XOXOXO
XOXOXO
XOXOXO
XOXOXO
XOXOXO
XOXOXO
XOXOXO
XOXOXO
XOXOXO
XO
X
OXO
XOXOXOXO
XOXOXO
XOXOXO
XOXOXO
6.
Remove the new DIMM from the antistatic package. Locate the alignment notch on the bottom
edge of the DIMM.
170
Chapter 9
Manage and maintain
ENWW