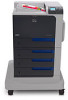
HP Color LaserJet Enterprise CP4525 HP Color LaserJet Enterprise CP4020/CP4520 - Page 82
Connect to a network, Supported network protocols
 |
View all HP Color LaserJet Enterprise CP4525 manuals
Add to My Manuals
Save this manual to your list of manuals |
Page 82 highlights
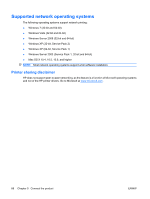
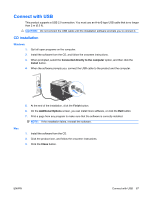
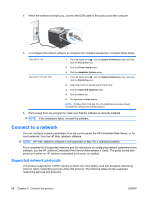
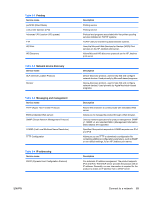
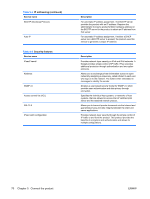
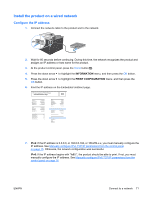
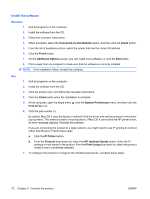
4. When the software prompts you, connect the USB cable to the product and the computer. 5. To configure the product software to recognize the installed accessories, complete these steps: Mac OS X 10.4 Mac OS X 10.5 and 10.6 1. From the Apple menu , click the System Preferences menu and then click the Print & Fax icon. 2. Click the Printer Setup button. 3. Click the Installable Options menu. 1. From the Apple menu , click the System Preferences menu and then click the Print & Fax icon. 2. Select the product in the left side of the window. 3. Click the Options & Supplies button. 4. Click the Driver tab. 5. Configure the installed options. NOTE: For Mac OS X 10.5 and 10.6, the installation procedure should automatically configure the installed options. 6. Print a page from any program to make sure that the software is correctly installed. NOTE: If the installation failed, reinstall the software. Connect to a network You can configure network parameters from the control panel, the HP Embedded Web Server, or for most networks, from the HP Web Jetadmin software. NOTE: HP Web Jetadmin software is not supported on Mac OS X operating systems. For a complete list of supported networks and for instructions on configuring network parameters from software, see the HP Jetdirect Embedded Print Server Administrator's Guide. The guide comes with products in which an HP Jetdirect embedded print server is installed. Supported network protocols The product supports the TCP/IP network protocol, the most widely used and accepted networking protocol. Many networking services utilize this protocol. The following tables list the supported networking services and protocols. 68 Chapter 5 Connect the product ENWW
-
 1
1 -
2
-
3
-
4
-
5
-
6
-
7
-
8
-
9
-
10
-
11
-
12
-
13
-
14
-
15
-
16
-
17
-
18
-
19
-
20
-
21
-
22
-
23
-
24
-
25
-
26
-
27
-
28
-
29
-
30
-
31
-
32
-
33
-
34
-
35
-
36
-
37
-
38
-
39
-
40
-
41
-
42
-
43
-
44
-
45
-
46
-
47
-
48
-
49
-
50
-
51
-
52
-
53
-
54
-
55
-
56
-
57
-
58
-
59
-
60
-
61
-
62
-
63
-
64
-
65
-
66
-
67
-
68
-
69
-
70
-
71
-
72
-
73
-
74
-
75
-
76
-
 77
77 -
 78
78 -
 79
79 -
 80
80 -
 81
81 -
 82
82 -
 83
83 -
 84
84 -
 85
85 -
 86
86 -
 87
87 -
88
-
89
-
90
-
91
-
92
-
93
-
94
-
95
-
96
-
97
-
98
-
99
-
100
-
101
-
102
-
103
-
104
-
105
-
106
-
107
-
108
-
109
-
110
-
111
-
112
-
113
-
114
-
115
-
116
-
117
-
118
-
119
-
120
-
121
-
122
-
123
-
124
-
125
-
126
-
127
-
128
-
129
-
130
-
131
-
132
-
133
-
134
-
135
-
136
-
137
-
138
-
139
-
140
-
141
-
142
-
143
-
144
-
145
-
146
-
147
-
148
-
149
-
150
-
151
-
152
-
153
-
154
-
155
-
156
-
157
-
158
-
159
-
160
-
161
-
162
-
163
-
164
-
165
-
166
-
167
-
168
-
169
-
170
-
171
-
172
-
173
-
174
-
175
-
176
-
177
-
178
-
179
-
180
-
181
-
182
-
183
-
184
-
185
-
186
-
187
-
188
-
189
-
190
-
191
-
192
-
193
-
194
-
195
-
196
-
197
-
198
-
199
-
200
-
201
-
202
-
203
-
204
-
205
-
206
-
207
-
208
-
209
-
210
-
211
-
212
-
213
-
214
-
215
-
216
-
217
-
218
-
219
-
220
-
221
-
222
-
223
-
224
-
225
-
226
-
227
-
228
-
229
-
230
-
231
-
232
-
233
-
234
-
235
-
236
-
237
-
238
-
239
-
240
-
241
-
242
-
243
-
244
-
245
-
246
-
247
-
248
-
249
-
250
-
251
-
252
-
253
-
254
-
255
-
256
-
257
-
258
-
259
-
260
-
261
-
262
-
263
-
264
-
265
-
266
-
267
-
268
-
269
-
270
-
271
-
272
-
273
-
274
-
275
-
276
-
277
-
278
-
279
-
280
-
281
-
282
 |
 |
