HP J6480 User Guide - Page 103
Case I: Shared voice/fax line with answering machine
 |
UPC - 883585506811
View all HP J6480 manuals
Add to My Manuals
Save this manual to your list of manuals |
Page 103 highlights
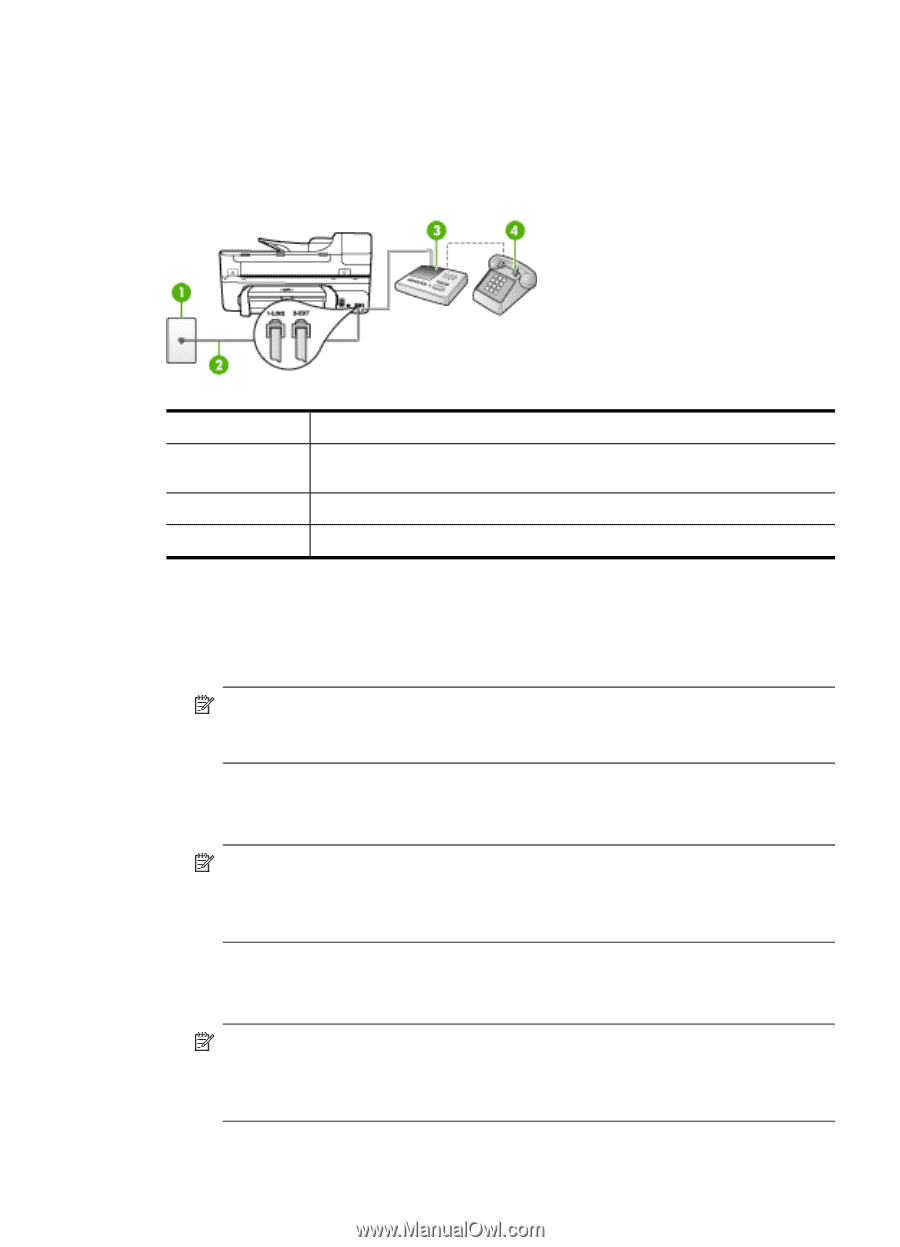
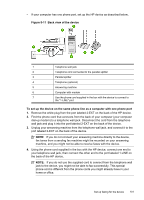
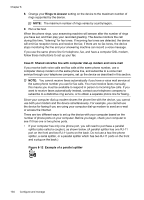
Case I: Shared voice/fax line with answering machine If you receive both voice calls and fax calls at the same phone number, and you also have an answering machine that answers voice calls at this phone number, set up the device as described in this section. Figure 8-9 Back view of the device 1 Telephone wall jack 2 Use the phone cord provided to connect to the 1-LINE port on the back of the device 3 Answering machine 4 Telephone (optional) To set up the device with a shared voice/fax line with answering machine 1. Remove the white plug from the port labeled 2-EXT on the back of the device. 2. Unplug your answering machine from the telephone wall jack, and connect it to the port labeled 2-EXT on the back of the device. NOTE: If you do not connect your answering machine directly to the device, fax tones from a sending fax machine might be recorded on your answering machine, and you probably will not be able to receive faxes with the device. 3. Using the phone cord supplied in the box with the device, connect one end to your telephone wall jack, then connect the other end to the port labeled 1-LINE on the back of the device. NOTE: If you do not use the supplied cord to connect from the telephone wall jack to the device, you might not be able to fax successfully. This special phone cord is different from the phone cords you might already have in your home or office. 4. (Optional) If your answering machine does not have a built-in phone, for convenience you might want to connect a phone to the back of your answering machine at the "OUT" port. NOTE: If your answering machine does not let you connect an external phone, you can purchase and use a parallel splitter (also known as a coupler) to connect both the answering machine and telephone to the device. You can use standard phone cords for these connections. 5. Turn on the Auto Answer setting. Set up faxing for the device 99
-
 1
1 -
2
-
3
-
4
-
5
-
6
-
7
-
8
-
9
-
10
-
11
-
12
-
13
-
14
-
15
-
16
-
17
-
18
-
19
-
20
-
21
-
22
-
23
-
24
-
25
-
26
-
27
-
28
-
29
-
30
-
31
-
32
-
33
-
34
-
35
-
36
-
37
-
38
-
39
-
40
-
41
-
42
-
43
-
44
-
45
-
46
-
47
-
48
-
49
-
50
-
51
-
52
-
53
-
54
-
55
-
56
-
57
-
58
-
59
-
60
-
61
-
62
-
63
-
64
-
65
-
66
-
67
-
68
-
69
-
70
-
71
-
72
-
73
-
74
-
75
-
76
-
77
-
78
-
79
-
80
-
81
-
82
-
83
-
84
-
85
-
86
-
87
-
88
-
89
-
90
-
91
-
92
-
93
-
94
-
95
-
96
-
97
-
 98
98 -
 99
99 -
 100
100 -
 101
101 -
 102
102 -
 103
103 -
 104
104 -
 105
105 -
 106
106 -
 107
107 -
 108
108 -
109
-
110
-
111
-
112
-
113
-
114
-
115
-
116
-
117
-
118
-
119
-
120
-
121
-
122
-
123
-
124
-
125
-
126
-
127
-
128
-
129
-
130
-
131
-
132
-
133
-
134
-
135
-
136
-
137
-
138
-
139
-
140
-
141
-
142
-
143
-
144
-
145
-
146
-
147
-
148
-
149
-
150
-
151
-
152
-
153
-
154
-
155
-
156
-
157
-
158
-
159
-
160
-
161
-
162
-
163
-
164
-
165
-
166
-
167
-
168
-
169
-
170
-
171
-
172
-
173
-
174
-
175
-
176
-
177
-
178
-
179
-
180
-
181
-
182
-
183
-
184
-
185
-
186
-
187
-
188
-
189
-
190
-
191
-
192
-
193
-
194
-
195
-
196
-
197
-
198
-
199
-
200
-
201
-
202
-
203
-
204
-
205
-
206
-
207
-
208
-
209
-
210
-
211
-
212
-
213
-
214
-
215
-
216
-
217
-
218
 |
 |