HP J6480 User Guide - Page 80
Embedded Web server s, HP Printer Utility (Mac OS), Web browser, Printer Settings, Additional - printer ink
 |
UPC - 883585506811
View all HP J6480 manuals
Add to My Manuals
Save this manual to your list of manuals |
Page 80 highlights
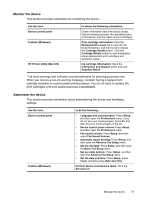
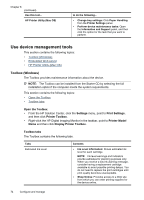
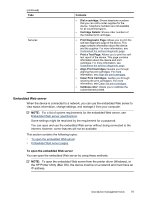
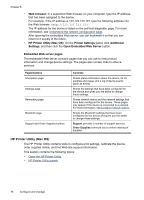
Chapter 8 • Web browser: In a supported Web browser on your computer, type the IP address that has been assigned to the device. For example, if the IP address is 123.123.123.123, type the following address into the Web browser: http://123.123.123.123 The IP address for the device is listed on the self-test diagnostic page. For more information, see Understand the network configuration page. After opening the embedded Web server, you can bookmark it so that you can return to it quickly in the future. • HP Printer Utility (Mac OS): On the Printer Settings panel, click Additional Settings, and then click the Open Embedded Web Server button. Embedded Web server pages The embedded Web server contains pages that you can use to view product information and change device settings. The pages also contain links to other eservices. Pages/buttons Information page Settings page Networking page Bluetooth page Support and Order Supplies buttons Contents Shows status information about the device, its ink supplies and usage, and a log of device events (such as errors). Shows the settings that have been configured for the device and gives you the ability to change these settings. Shows network status and the network settings that have been configured for the device. These pages only appear if the device is connected to a network. For more information, see Configure network options. Shows the Bluetooth settings that have been configured for the device and gives you the ability to change these settings. Support provides a number of support services. Order Supplies connects you to online ordering of supplies. HP Printer Utility (Mac OS) The HP Printer Utility contains tools to configure print settings, calibrate the device, order supplies online, and find Web site support information. This section contains the following topics: • Open the HP Printer Utility • HP Printer Utility panels 76 Configure and manage
-
 1
1 -
2
-
3
-
4
-
5
-
6
-
7
-
8
-
9
-
10
-
11
-
12
-
13
-
14
-
15
-
16
-
17
-
18
-
19
-
20
-
21
-
22
-
23
-
24
-
25
-
26
-
27
-
28
-
29
-
30
-
31
-
32
-
33
-
34
-
35
-
36
-
37
-
38
-
39
-
40
-
41
-
42
-
43
-
44
-
45
-
46
-
47
-
48
-
49
-
50
-
51
-
52
-
53
-
54
-
55
-
56
-
57
-
58
-
59
-
60
-
61
-
62
-
63
-
64
-
65
-
66
-
67
-
68
-
69
-
70
-
71
-
72
-
73
-
74
-
 75
75 -
 76
76 -
 77
77 -
 78
78 -
 79
79 -
 80
80 -
 81
81 -
 82
82 -
 83
83 -
 84
84 -
 85
85 -
86
-
87
-
88
-
89
-
90
-
91
-
92
-
93
-
94
-
95
-
96
-
97
-
98
-
99
-
100
-
101
-
102
-
103
-
104
-
105
-
106
-
107
-
108
-
109
-
110
-
111
-
112
-
113
-
114
-
115
-
116
-
117
-
118
-
119
-
120
-
121
-
122
-
123
-
124
-
125
-
126
-
127
-
128
-
129
-
130
-
131
-
132
-
133
-
134
-
135
-
136
-
137
-
138
-
139
-
140
-
141
-
142
-
143
-
144
-
145
-
146
-
147
-
148
-
149
-
150
-
151
-
152
-
153
-
154
-
155
-
156
-
157
-
158
-
159
-
160
-
161
-
162
-
163
-
164
-
165
-
166
-
167
-
168
-
169
-
170
-
171
-
172
-
173
-
174
-
175
-
176
-
177
-
178
-
179
-
180
-
181
-
182
-
183
-
184
-
185
-
186
-
187
-
188
-
189
-
190
-
191
-
192
-
193
-
194
-
195
-
196
-
197
-
198
-
199
-
200
-
201
-
202
-
203
-
204
-
205
-
206
-
207
-
208
-
209
-
210
-
211
-
212
-
213
-
214
-
215
-
216
-
217
-
218
 |
 |