HP LaserJet M9040/M9050 HP LaserJet M9040/M9050 MFP - Software Technical Refer - Page 189
PS Emulation driver Device Settings, Available PostScript Memory
 |
View all HP LaserJet M9040/M9050 manuals
Add to My Manuals
Save this manual to your list of manuals |
Page 189 highlights
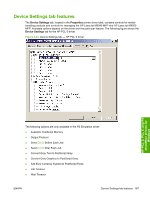
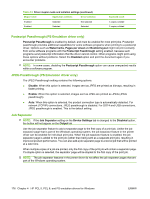
6. Click the Properties button. The HP Font Installer dialog box appears, and the external fonts that are installed appear in the Installed Fonts window. 7. If you are installing fonts, type the name and path of the font metric file in the Printer Font File Location text box, or click the Browse button to locate the file on the computer. The font file names appear in the Font(s) to be Added window. 8. Select the fonts to add or remove, and then click either the Add or the Remove button. If you are installing fonts, the fonts are installed and the file names appear in the Installed Font(s) window. If you are removing fonts, the fonts are removed from the Installed Font(s) window. 9. Click the OK button to close the HP Font Installer dialog box. PS Emulation driver Device Settings The following controls are available and appear only in the PS Emulation driver Device Settings tab: ● Available PostScript Memory ● Output Protocol ● Send Ctrl-D Before Each Job ● Send Ctrl-D After Each Job ● Convert Gray Text to PostScript Gray ● Convert Gray Graphics to PostScript Gray ● Add Euro Currency Symbol to PostScript Fonts ● Job Timeout ● Wait Timeout ● Minimum Font Size to Download as Outline ● Maximum Font Size to Download as Outline ● Postscript Passthrough ● JPEG Passthrough Available PostScript Memory This control specifies the amount of available postscript memory and provides a spin box for changing this value. The available postscript memory is a subset of the device total physical memory. It is usually best to set the postscript memory to match the total RAM that appears on the configuration page. To print a configuration page from the product control panel, perform the following: 1. Touch Administration. 2. Touch Information. 3. Touch Configuration/Status Pages. 4. Touch Configuration Page. 5. Touch Print. HP PCL 5, PCL 6, and PS emulation drivers for Windows ENWW Device Settings tab features 171
-
 1
1 -
2
-
3
-
4
-
5
-
6
-
7
-
8
-
9
-
10
-
11
-
12
-
13
-
14
-
15
-
16
-
17
-
18
-
19
-
20
-
21
-
22
-
23
-
24
-
25
-
26
-
27
-
28
-
29
-
30
-
31
-
32
-
33
-
34
-
35
-
36
-
37
-
38
-
39
-
40
-
41
-
42
-
43
-
44
-
45
-
46
-
47
-
48
-
49
-
50
-
51
-
52
-
53
-
54
-
55
-
56
-
57
-
58
-
59
-
60
-
61
-
62
-
63
-
64
-
65
-
66
-
67
-
68
-
69
-
70
-
71
-
72
-
73
-
74
-
75
-
76
-
77
-
78
-
79
-
80
-
81
-
82
-
83
-
84
-
85
-
86
-
87
-
88
-
89
-
90
-
91
-
92
-
93
-
94
-
95
-
96
-
97
-
98
-
99
-
100
-
101
-
102
-
103
-
104
-
105
-
106
-
107
-
108
-
109
-
110
-
111
-
112
-
113
-
114
-
115
-
116
-
117
-
118
-
119
-
120
-
121
-
122
-
123
-
124
-
125
-
126
-
127
-
128
-
129
-
130
-
131
-
132
-
133
-
134
-
135
-
136
-
137
-
138
-
139
-
140
-
141
-
142
-
143
-
144
-
145
-
146
-
147
-
148
-
149
-
150
-
151
-
152
-
153
-
154
-
155
-
156
-
157
-
158
-
159
-
160
-
161
-
162
-
163
-
164
-
165
-
166
-
167
-
168
-
169
-
170
-
171
-
172
-
173
-
174
-
175
-
176
-
177
-
178
-
179
-
180
-
181
-
182
-
183
-
 184
184 -
 185
185 -
 186
186 -
 187
187 -
 188
188 -
 189
189 -
 190
190 -
 191
191 -
 192
192 -
 193
193 -
 194
194 -
195
-
196
-
197
-
198
-
199
-
200
-
201
-
202
-
203
-
204
-
205
-
206
-
207
-
208
-
209
-
210
-
211
-
212
-
213
-
214
-
215
-
216
-
217
-
218
-
219
-
220
-
221
-
222
-
223
-
224
-
225
-
226
-
227
-
228
-
229
-
230
-
231
-
232
-
233
-
234
-
235
-
236
-
237
-
238
-
239
-
240
-
241
-
242
-
243
-
244
-
245
-
246
-
247
-
248
-
249
-
250
-
251
-
252
-
253
-
254
-
255
-
256
-
257
-
258
-
259
-
260
-
261
-
262
-
263
-
264
-
265
-
266
-
267
-
268
-
269
-
270
-
271
-
272
-
273
-
274
-
275
-
276
-
277
-
278
-
279
-
280
-
281
-
282
-
283
-
284
-
285
-
286
-
287
-
288
-
289
-
290
-
291
-
292
-
293
-
294
-
295
-
296
-
297
-
298
-
299
-
300
-
301
-
302
-
303
-
304
-
305
-
306
-
307
-
308
-
309
-
310
-
311
-
312
-
313
-
314
-
315
-
316
-
317
-
318
-
319
-
320
-
321
-
322
-
323
-
324
-
325
-
326
 |
 |
