HP LaserJet M9040/M9050 HP LaserJet M9040/M9050 MFP - Software Technical Refer - Page 278
Windows Server 2003 and Windows XP Professional
 |
View all HP LaserJet M9040/M9050 manuals
Add to My Manuals
Save this manual to your list of manuals |
Page 278 highlights
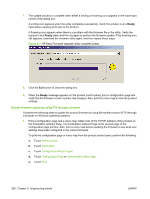
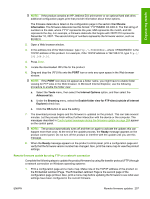
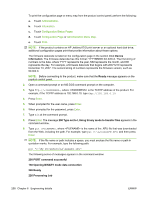
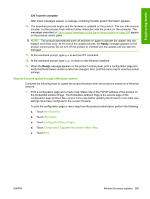
NOTE: If the product contains an HP Jetdirect EIO print server or an optional hard disk drive, additional configuration pages print that provide information about those options. The firmware datecode is listed on the configuration page in the section titled Device Information. The firmware datecode has this format: YYYYMMDD XX.XXX.X. The first string of numbers is the date, where YYYY represents the year, MM represents the month, and DD represents the day. For example, a firmware datecode that begins with 20071210 represents December 10, 2007. The second string of numbers represents the firmware version, such as 50.002.0. 2. From a command prompt or in an MS-DOS command window, type copy /b \ \\, where is the name of the .RFU file, including the path, is the name of the computer, connected to the product by a USB cable from which the product is being shared, and is the product share name. For example, type the following: C:\>copy /b c:\xxxxfw.rfu \\COMPUTERNAME\SHARENAME NOTE: If the file name or path includes a space, you must enclose the file name or path in quotation marks. For example, type C:\>copy /b "c:\My Documents\xxxxfw.rfu" \ \COMPUTERNAME\SHARENAME 3. Press Enter. The message 1 file(s) copied appears on the computer screen. The download process begins and the firmware is updated on the product. This can take several minutes. Let the process finish without further interaction with the product or the computer. The messages described in Control panel messages during the firmware update on page 264 appear on the product control panel. NOTE: The product automatically turns off and then on again to activate the update; this can happen more than once. At the end of the update process, the Ready message appears on the product control panel. Do not turn off the device or interfere with the update until you see this message. 4. When the Ready message appears on the product control panel, print a configuration page and verify that the firmware version number has changed. Also, print the menu map to view the product settings. To share the device, do the following: 1. On the Start menu, click the Settings option, and then Windows 2000: Click the Printers option. -or- Windows Server 2003 and Windows XP Professional: Click the Printers and Faxes option. -or- Windows XP Home: Click the Printers and Other Hardware Devices option. -or- Windows Vista: Under the Hardware and Sound category, click the Printer option. 2. Right-click the device name. 3. Click the Properties option. 260 Chapter 6 Engineering details ENWW
-
 1
1 -
2
-
3
-
4
-
5
-
6
-
7
-
8
-
9
-
10
-
11
-
12
-
13
-
14
-
15
-
16
-
17
-
18
-
19
-
20
-
21
-
22
-
23
-
24
-
25
-
26
-
27
-
28
-
29
-
30
-
31
-
32
-
33
-
34
-
35
-
36
-
37
-
38
-
39
-
40
-
41
-
42
-
43
-
44
-
45
-
46
-
47
-
48
-
49
-
50
-
51
-
52
-
53
-
54
-
55
-
56
-
57
-
58
-
59
-
60
-
61
-
62
-
63
-
64
-
65
-
66
-
67
-
68
-
69
-
70
-
71
-
72
-
73
-
74
-
75
-
76
-
77
-
78
-
79
-
80
-
81
-
82
-
83
-
84
-
85
-
86
-
87
-
88
-
89
-
90
-
91
-
92
-
93
-
94
-
95
-
96
-
97
-
98
-
99
-
100
-
101
-
102
-
103
-
104
-
105
-
106
-
107
-
108
-
109
-
110
-
111
-
112
-
113
-
114
-
115
-
116
-
117
-
118
-
119
-
120
-
121
-
122
-
123
-
124
-
125
-
126
-
127
-
128
-
129
-
130
-
131
-
132
-
133
-
134
-
135
-
136
-
137
-
138
-
139
-
140
-
141
-
142
-
143
-
144
-
145
-
146
-
147
-
148
-
149
-
150
-
151
-
152
-
153
-
154
-
155
-
156
-
157
-
158
-
159
-
160
-
161
-
162
-
163
-
164
-
165
-
166
-
167
-
168
-
169
-
170
-
171
-
172
-
173
-
174
-
175
-
176
-
177
-
178
-
179
-
180
-
181
-
182
-
183
-
184
-
185
-
186
-
187
-
188
-
189
-
190
-
191
-
192
-
193
-
194
-
195
-
196
-
197
-
198
-
199
-
200
-
201
-
202
-
203
-
204
-
205
-
206
-
207
-
208
-
209
-
210
-
211
-
212
-
213
-
214
-
215
-
216
-
217
-
218
-
219
-
220
-
221
-
222
-
223
-
224
-
225
-
226
-
227
-
228
-
229
-
230
-
231
-
232
-
233
-
234
-
235
-
236
-
237
-
238
-
239
-
240
-
241
-
242
-
243
-
244
-
245
-
246
-
247
-
248
-
249
-
250
-
251
-
252
-
253
-
254
-
255
-
256
-
257
-
258
-
259
-
260
-
261
-
262
-
263
-
264
-
265
-
266
-
267
-
268
-
269
-
270
-
271
-
272
-
 273
273 -
 274
274 -
 275
275 -
 276
276 -
 277
277 -
 278
278 -
 279
279 -
 280
280 -
 281
281 -
 282
282 -
 283
283 -
284
-
285
-
286
-
287
-
288
-
289
-
290
-
291
-
292
-
293
-
294
-
295
-
296
-
297
-
298
-
299
-
300
-
301
-
302
-
303
-
304
-
305
-
306
-
307
-
308
-
309
-
310
-
311
-
312
-
313
-
314
-
315
-
316
-
317
-
318
-
319
-
320
-
321
-
322
-
323
-
324
-
325
-
326
 |
 |
