HP LaserJet M9040/M9050 HP LaserJet M9040/M9050 MFP - Software Technical Refer - Page 290
Print-ready file printing in UNIX systems, Print-ready file printing by using the LPR command
 |
View all HP LaserJet M9040/M9050 manuals
Add to My Manuals
Save this manual to your list of manuals |
Page 290 highlights
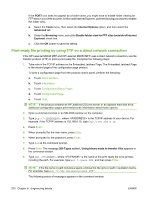
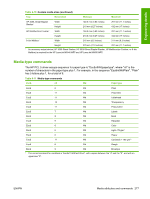
8. Enter a share name. 9. Click the Apply button. Then, click the OK button to close. Print-ready file printing in UNIX systems For UNIX systems, any command method that delivers the print-ready file to the product is acceptable, including the following: At the command prompt, type cp , where is the location of the print-ready file. Print-ready file printing by using the LPR command Complete the following steps to print a print-ready file by using the LPR command. 1. Make note of the TCP/IP address on the Embedded Jetdirect Page. The Embedded Jetdirect Page is the second page of the configuration page printout. To print a configuration page from the product control panel, perform the following: a. Touch Administration. b. Touch Information. c. Touch Configuration/Status Pages. d. Touch Configuration Page. e. Touch Print. NOTE: If the product contains an HP Jetdirect EIO print server or an optional hard disk drive, additional configuration pages print that provide information about those options. 2. From a command prompt or in an MS-DOS window, type the following: lpr -P IPADDRESS -S IPADDRESS -o l FILENAME lpr -S -Pbinps where IPADDRESS can be either the TCP/IP address or the host name of the product, and where FILENAME is the file name of the print-ready file. The parameter (-o l) consists of a lowercase "O", not a zero, and a lowercase "L", not the numeral 1. This parameter sets the transport protocol to binary mode. 3. The file prints, but no messages appear in the command prompt window. 4. Type exit at the command prompt to close the command window. Print-ready file printing through the HP Embedded Web Server 1. Open the HP Embedded Web Server (HP EWS). 2. In the Information tab, click the Print button. 3. Click the Browse button and navigate to the file that you want to print. 4. Click the Apply button. 272 Chapter 6 Engineering details ENWW
-
 1
1 -
2
-
3
-
4
-
5
-
6
-
7
-
8
-
9
-
10
-
11
-
12
-
13
-
14
-
15
-
16
-
17
-
18
-
19
-
20
-
21
-
22
-
23
-
24
-
25
-
26
-
27
-
28
-
29
-
30
-
31
-
32
-
33
-
34
-
35
-
36
-
37
-
38
-
39
-
40
-
41
-
42
-
43
-
44
-
45
-
46
-
47
-
48
-
49
-
50
-
51
-
52
-
53
-
54
-
55
-
56
-
57
-
58
-
59
-
60
-
61
-
62
-
63
-
64
-
65
-
66
-
67
-
68
-
69
-
70
-
71
-
72
-
73
-
74
-
75
-
76
-
77
-
78
-
79
-
80
-
81
-
82
-
83
-
84
-
85
-
86
-
87
-
88
-
89
-
90
-
91
-
92
-
93
-
94
-
95
-
96
-
97
-
98
-
99
-
100
-
101
-
102
-
103
-
104
-
105
-
106
-
107
-
108
-
109
-
110
-
111
-
112
-
113
-
114
-
115
-
116
-
117
-
118
-
119
-
120
-
121
-
122
-
123
-
124
-
125
-
126
-
127
-
128
-
129
-
130
-
131
-
132
-
133
-
134
-
135
-
136
-
137
-
138
-
139
-
140
-
141
-
142
-
143
-
144
-
145
-
146
-
147
-
148
-
149
-
150
-
151
-
152
-
153
-
154
-
155
-
156
-
157
-
158
-
159
-
160
-
161
-
162
-
163
-
164
-
165
-
166
-
167
-
168
-
169
-
170
-
171
-
172
-
173
-
174
-
175
-
176
-
177
-
178
-
179
-
180
-
181
-
182
-
183
-
184
-
185
-
186
-
187
-
188
-
189
-
190
-
191
-
192
-
193
-
194
-
195
-
196
-
197
-
198
-
199
-
200
-
201
-
202
-
203
-
204
-
205
-
206
-
207
-
208
-
209
-
210
-
211
-
212
-
213
-
214
-
215
-
216
-
217
-
218
-
219
-
220
-
221
-
222
-
223
-
224
-
225
-
226
-
227
-
228
-
229
-
230
-
231
-
232
-
233
-
234
-
235
-
236
-
237
-
238
-
239
-
240
-
241
-
242
-
243
-
244
-
245
-
246
-
247
-
248
-
249
-
250
-
251
-
252
-
253
-
254
-
255
-
256
-
257
-
258
-
259
-
260
-
261
-
262
-
263
-
264
-
265
-
266
-
267
-
268
-
269
-
270
-
271
-
272
-
273
-
274
-
275
-
276
-
277
-
278
-
279
-
280
-
281
-
282
-
283
-
284
-
 285
285 -
 286
286 -
 287
287 -
 288
288 -
 289
289 -
 290
290 -
 291
291 -
 292
292 -
 293
293 -
 294
294 -
 295
295 -
296
-
297
-
298
-
299
-
300
-
301
-
302
-
303
-
304
-
305
-
306
-
307
-
308
-
309
-
310
-
311
-
312
-
313
-
314
-
315
-
316
-
317
-
318
-
319
-
320
-
321
-
322
-
323
-
324
-
325
-
326
 |
 |