HP StorageWorks 16-EL SAN Switch 2/16 version 3.1.x - Installation Guide - Page 35
For Front Rack Access, Attaching the Outer Slide Rails
 |
View all HP StorageWorks 16-EL manuals
Add to My Manuals
Save this manual to your list of manuals |
Page 35 highlights
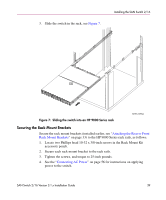
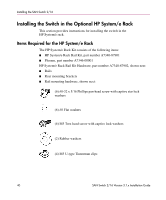
Installing the SAN Switch 2/16 For Front Rack Access Use these steps to attach the front rack mount brackets to the switch. The front rack mount brackets act as stops to prevent the switch from sliding out the front of the rack. Use these steps if you installed the inner slide rails to the switch using the procedure outlined in "Attaching the Inner Slide Rails to the Switch," step 1b on page 32. 1. Align the right rack mount bracket with the two screw holes at the end of the inner rails on the right, power supply end of the switch. 2. Locate two slotted-head Phillips head 8-32 x 3/8-inch screws and two lock nuts contained in the Rack Mount Kit accessory pouch. 3. Secure the right mount bracket to the end of the inner slide rail using the screws and lock nuts. 4. Tighten the screws and torque to 15-inch pounds. 5. Repeat steps 1 through 4 to install the left mount bracket onto the second inner slide rail. Attaching the Outer Slide Rails Use the following steps to install the outer slide rails in the HP 9000 Series Rack. Note: This procedure requires two technicians to properly align the outer slide rails in the HP 9000 Series Rack. Obtain the following items, located in the Rack Mount Kit: ■ Four 3-hole bar nuts ■ Eight Phillips head 8-32 x 3/8-inch screws ■ Eight square alignment washers ■ # 2 Phillips screwdriver with torque capability SAN Switch 2/16 Version 3.1.x Installation Guide 35
-
 1
1 -
2
-
3
-
4
-
5
-
6
-
7
-
8
-
9
-
10
-
11
-
12
-
13
-
14
-
15
-
16
-
17
-
18
-
19
-
20
-
21
-
22
-
23
-
24
-
25
-
26
-
27
-
28
-
29
-
 30
30 -
 31
31 -
 32
32 -
 33
33 -
 34
34 -
 35
35 -
 36
36 -
 37
37 -
 38
38 -
 39
39 -
 40
40 -
41
-
42
-
43
-
44
-
45
-
46
-
47
-
48
-
49
-
50
-
51
-
52
-
53
-
54
-
55
-
56
-
57
-
58
-
59
-
60
-
61
-
62
-
63
-
64
-
65
-
66
-
67
-
68
-
69
-
70
-
71
-
72
-
73
-
74
-
75
-
76
-
77
-
78
-
79
-
80
-
81
-
82
-
83
-
84
-
85
-
86
-
87
-
88
-
89
-
90
-
91
-
92
-
93
-
94
-
95
-
96
-
97
-
98
-
99
-
100
-
101
-
102
-
103
-
104
-
105
-
106
-
107
-
108
-
109
-
110
-
111
-
112
-
113
-
114
-
115
-
116
-
117
-
118
-
119
-
120
 |
 |